Your Ultimate HVAC Install Checklist: 7 Steps for 2025
- Jul 16, 2025
- 14 min read
Installing a new HVAC system is one of the most significant investments you'll make in your property's comfort and value. While choosing the right unit is crucial, the quality of the installation is what truly determines its efficiency, reliability, and lifespan. A rushed or incomplete job can lead to years of high energy bills, frequent breakdowns, and poor indoor air quality, a particular concern for residents in areas like Tucson.
That's why having a comprehensive hvac install checklist is not just helpful-it's essential for homeowners and property managers who want to protect their investment. This detailed guide goes beyond the basics, breaking down the seven critical stages of a professional installation, from initial load calculations to final system commissioning.
We'll explore the technical details that separate a standard setup from a high-performance system, giving you the knowledge to oversee your project with confidence. Whether you're a seasonal resident preparing your Arizona home, a facility manager overseeing a commercial property, or simply a homeowner wanting the job done right, this checklist will serve as your roadmap. It ensures you can verify every crucial step, from proper ductwork design to advanced indoor air quality enhancements, securing optimal comfort and long-term peace of mind.
1. Load Calculation and Equipment Sizing
The absolute cornerstone of any successful HVAC installation is a meticulous load calculation, a process that determines the precise heating and cooling needs of your property. This isn't a simple guess based on square footage; it's a scientific analysis that prevents the common pitfalls of installing oversized or undersized equipment. An oversized unit will cycle on and off too frequently, failing to dehumidify the air properly and causing unnecessary wear. An undersized unit will run constantly without ever reaching the desired temperature, leading to high energy bills and a shortened lifespan.
This calculation is the first and most critical step on your hvac install checklist because it directly impacts comfort, efficiency, and long-term costs. Without it, every subsequent step is based on flawed assumptions.
The Science Behind Sizing
A professional load calculation, often referred to as a Manual J calculation by organizations like the Air Conditioning Contractors of America (ACCA), evaluates numerous factors:
Heat Gain: How much heat enters your home through windows (solar gain), walls, the roof, and air leaks (infiltration).
Heat Loss: How much heat escapes during colder months through the same building envelope components.
Internal Loads: Heat generated by occupants, lighting, and appliances like computers and ovens.
Building specifics: Factors like insulation levels (R-value), window type and efficiency, ceiling height, and local climate data for Tucson are all crucial inputs.
The Load Calculation Workflow
The following infographic illustrates the fundamental workflow a contractor uses to determine the right equipment size.
This systematic process ensures that the final equipment selection is based on specific data from your property, not a generic rule of thumb. For a deeper dive into this vital step, you can learn more about calculating HVAC size for your home. By precisely matching the equipment to the calculated load, your new system will operate at peak efficiency, providing optimal comfort for years to come.
2. Electrical Requirements and Power Supply
Following a proper load calculation, the next critical item on your hvac install checklist is ensuring the electrical infrastructure can safely and reliably power the new system. HVAC units are high-demand appliances that require specific voltage, amperage, and dedicated circuits. Overlooking this step can lead to tripped breakers, damaged equipment, electrical hazards, and a failed final inspection, bringing your entire project to a halt.
Addressing electrical requirements is not a suggestion; it's a mandatory safety and operational standard. A new central air conditioner cannot simply be plugged into an existing outlet. The electrical supply must be planned and executed with the same precision as the equipment sizing to ensure longevity and safe operation.
The Code Behind the Current
All electrical work for an HVAC installation must adhere to strict codes, primarily the National Electrical Code (NEC) and local municipal regulations. These codes dictate the necessary components to guarantee a safe installation:
Dedicated Circuits: Modern HVAC systems require their own dedicated circuit to prevent overloading your home’s electrical system. For example, a standard residential central air conditioner typically needs a 240-volt, 30-amp circuit.
Disconnect Switches: A disconnect switch must be installed within sight of the outdoor unit. This allows technicians to safely shut off power directly at the unit for maintenance and repairs, a crucial safety feature.
Proper Grounding: Grounding is essential to protect the unit, your home, and anyone servicing the equipment from electrical faults and power surges.
Conductor Sizing: The gauge of the copper wiring must be appropriately sized for the circuit's amperage and the distance from the electrical panel to the unit, preventing overheating and voltage drop.
The Electrical Installation Workflow
A qualified electrician or a certified HVAC technician with electrical expertise will assess your current panel's capacity to handle the new load. If your existing panel is insufficient, an upgrade may be necessary. They will then install the new circuit, including the breaker, wiring, and the exterior disconnect. This work often requires a separate electrical permit and a final inspection to verify compliance with all applicable codes, ensuring your new system is not only efficient but fundamentally safe.
3. Ductwork Design and Installation
If the HVAC unit is the heart of the system, the ductwork is the circulatory system responsible for delivering conditioned air. Proper ductwork design and installation are critical for ensuring efficient and even air distribution. Poorly designed or installed ducts can lead to significant energy loss, sometimes as much as 20-40%, resulting in comfort imbalances, poor air quality, and high utility bills.
This step is a non-negotiable part of a comprehensive hvac install checklist because even the most efficient HVAC unit cannot overcome the problems created by leaky, undersized, or poorly routed ductwork. It's the difference between a system that performs optimally and one that constantly struggles.
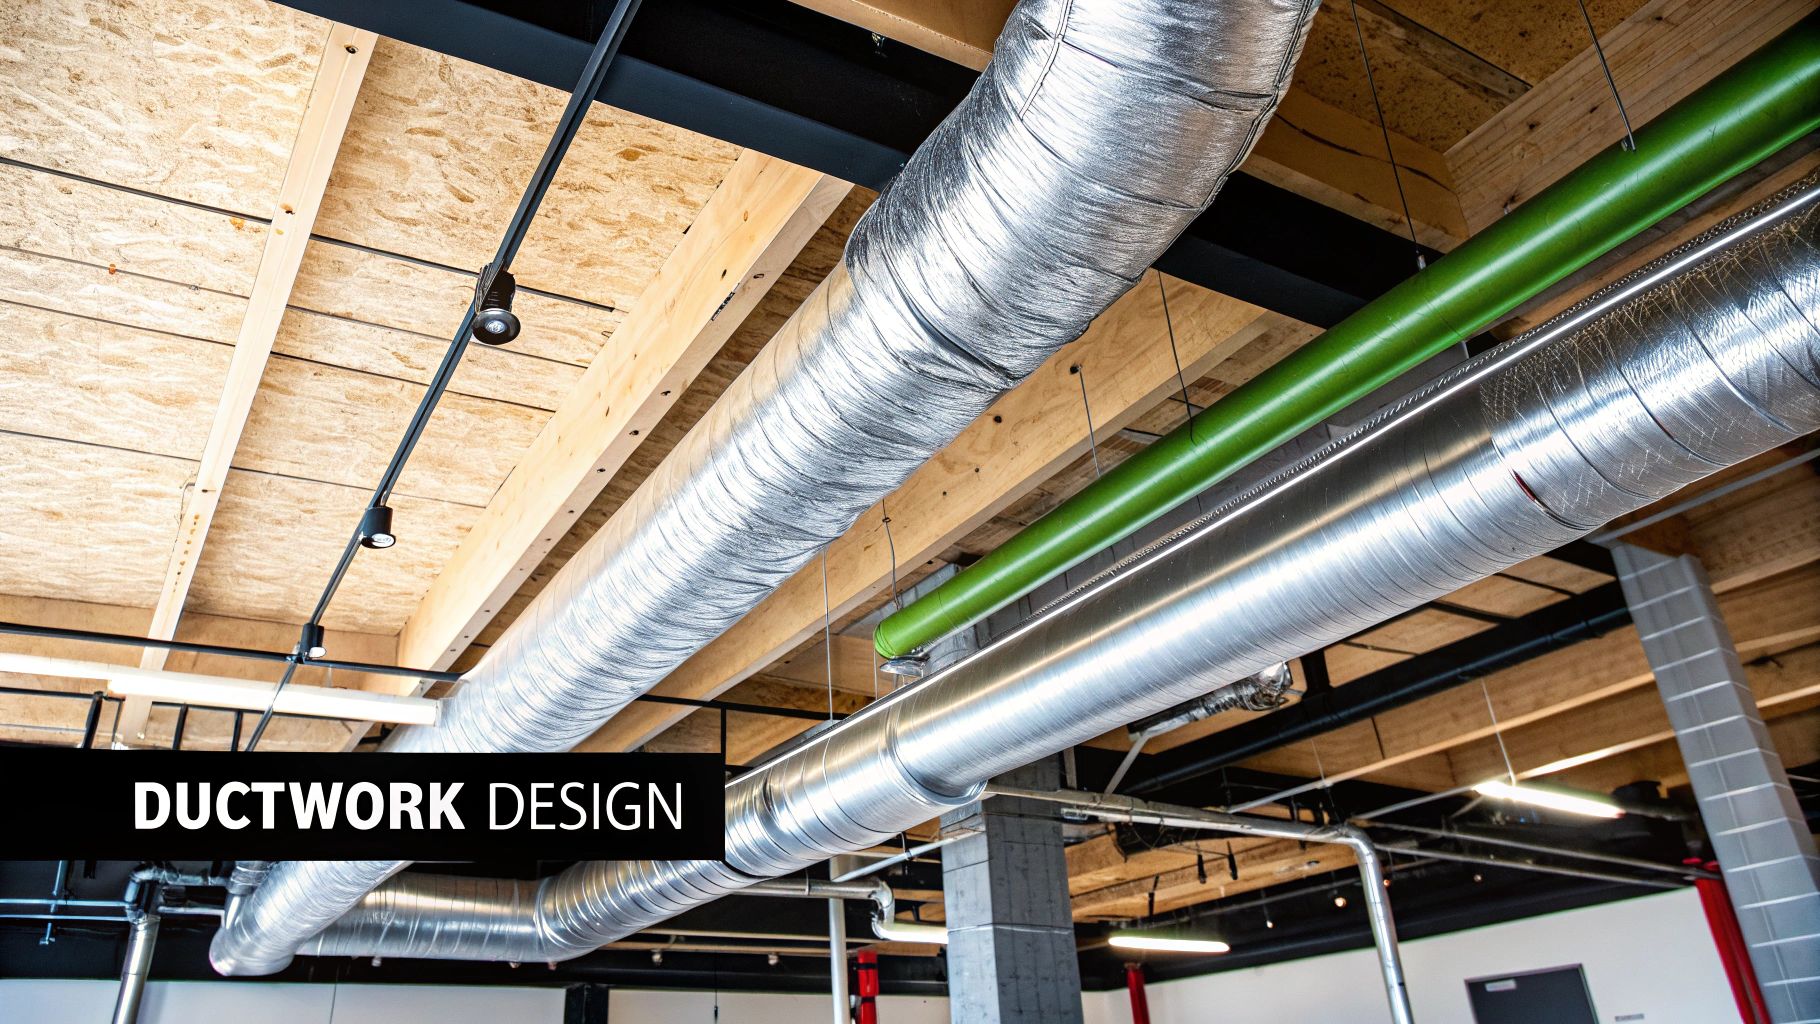
The Blueprint for Airflow
Organizations like the Air Conditioning Contractors of America (ACCA) and the Sheet Metal and Air Conditioning Contractors' National Association (SMACNA) provide detailed guidelines for duct design (known as Manual D). A professional design considers airflow velocity, friction loss, and the specific needs of each room to create a balanced system.
Sizing and Layout: Ducts must be sized correctly to deliver the required cubic feet per minute (CFM) of air to each space. The layout, whether a trunk-and-branch or radial system, is planned to minimize length and sharp turns.
Material Selection: The choice between sheet metal, flexible ducts, or duct board depends on the application, budget, and space constraints, each with its own installation requirements.
Sealing and Insulation: All joints, seams, and connections must be sealed with mastic or approved tape to prevent air leakage. Ducts running through unconditioned spaces like attics or crawlspaces must be thoroughly insulated to prevent thermal loss.
Ductwork Best Practices
Executing a proper duct installation involves meticulous attention to detail. Ignoring these small steps can lead to major performance issues down the road.
Seal every joint with mastic: Unlike duct tape, which deteriorates over time, mastic sealant creates a permanent, airtight bond.
Provide adequate support: Ducts must be properly supported to prevent sagging, which can create kinks and restrict airflow.
Install balancing dampers: These allow for fine-tuning airflow to individual rooms, ensuring balanced comfort throughout the property.
Use turning vanes: In sharp, rectangular duct elbows, turning vanes help guide the air smoothly, reducing pressure drops and noise.
By focusing on a high-quality duct system, you ensure that the conditioned air your unit produces is delivered exactly where it's needed, maximizing both comfort and efficiency. A clean and well-maintained duct system is also vital for indoor air quality. For more information, you can learn more about professional air duct cleaning services.
4. Refrigerant Lines and Connections
The refrigerant lines are the circulatory system of your air conditioner or heat pump, transporting refrigerant between the indoor and outdoor units to move heat. The integrity of these lines and their connections is absolutely vital for the system to function efficiently, reliably, and safely. Improper handling can lead to refrigerant leaks, which are harmful to the environment and can cause catastrophic equipment failure.
This step is a non-negotiable part of any professional hvac install checklist because it directly governs system performance and longevity. Flawed refrigerant line work guarantees poor cooling, high energy bills, and expensive future repairs, making meticulous attention to detail here essential.
The Science Behind Refrigerant Flow
Proper installation of refrigerant lines, often called a "line set," ensures the refrigerant can change state from liquid to gas and back again without impediment. This process is what allows heat to be absorbed from inside your home and released outside. Key factors include:
Correct Sizing: The diameter of the copper tubing must match the manufacturer's specifications for the specific model and the length of the line run. Incorrect sizing can lead to poor oil return to the compressor, causing it to fail.
Leak-Free Connections: All connection points, whether brazed (welded) or flared (mechanically sealed), must be perfectly sealed. Even a minuscule leak can drain the system of its refrigerant over time.
Proper Insulation: The larger of the two refrigerant lines (the suction line) must be fully insulated to prevent it from sweating and to maintain thermal efficiency.
Regulatory Compliance: Technicians must be EPA Section 608 certified to handle refrigerants, following strict protocols for recovery, charging, and leak detection to protect the ozone layer.
The Refrigerant Line Installation Workflow
A qualified technician follows a precise workflow to ensure the refrigerant circuit is clean, dry, and leak-free. This includes using a nitrogen purge while brazing to prevent oxidation inside the pipes, which can contaminate the system. After connecting the lines, a deep vacuum is pulled using a micron gauge to remove all air and moisture before the system's refrigerant is released or charged. This critical dehydration step prevents the formation of corrosive acids within the system.
Executing this process correctly prevents the most common post-installation problems. By ensuring every connection is torqued to specification and the entire circuit is pristine before charging, the system is set up for a long, efficient service life, providing you with consistent comfort.
5. Drainage and Condensate Management
A critical, yet often overlooked, component of a new HVAC system is its ability to manage condensate. As your air conditioner or high-efficiency furnace operates, it removes moisture from the air, producing a significant amount of water. Proper drainage is essential to prevent this water from causing catastrophic damage to your property, including rotted wood, damaged ceilings, and the growth of harmful mold and mildew.
This step is a non-negotiable part of any professional hvac install checklist. It safeguards your home's structural integrity and protects your indoor air quality. A poorly designed or installed drainage system can turn your new high-efficiency unit into a major liability.
The Science Behind Condensate Removal
Effective condensate management relies on gravity and proper engineering principles, as outlined by standards like the International Plumbing Code (IPC). The system must be designed to channel water away from the unit and your home safely and reliably. This involves more than just connecting a pipe; it requires careful planning for slope, flow, and backup protection.
A complete condensate system addresses several key areas:
Primary Drain Line: The main path for water to exit the unit. It must have a continuous downward slope (typically 1/4 inch per foot) to prevent standing water.
Condensate Pump: Used when a gravity drain isn't feasible, such as with a basement furnace. The pump actively pushes water up and out to a proper disposal location.
Overflow Protection: A secondary drain pan and/or an overflow safety switch are crucial. These devices shut off the HVAC unit if the primary drain clogs, preventing a damaging water spill.
Proper Termination: The drain line must terminate in an approved location where it won't cause erosion or create a slip hazard.
Condensate Management in Practice
Implementing a robust drainage system involves specific components and best practices. For instance, an air handler in an attic will typically have a primary, gravity-fed drain line leading to the exterior, along with a secondary drain pan underneath the unit that has its own separate drain line. A basement furnace might have its drain line routed to a condensate pump, which then expels the water to a nearby floor drain or utility sink.
Ensuring these systems are properly installed and maintained is key to managing indoor humidity levels and preventing moisture-related problems. You can learn more about how to control humidity in your house with expert tips. By demanding a well-designed drainage system, you ensure your new HVAC investment is protected from the damaging effects of its own byproducts.
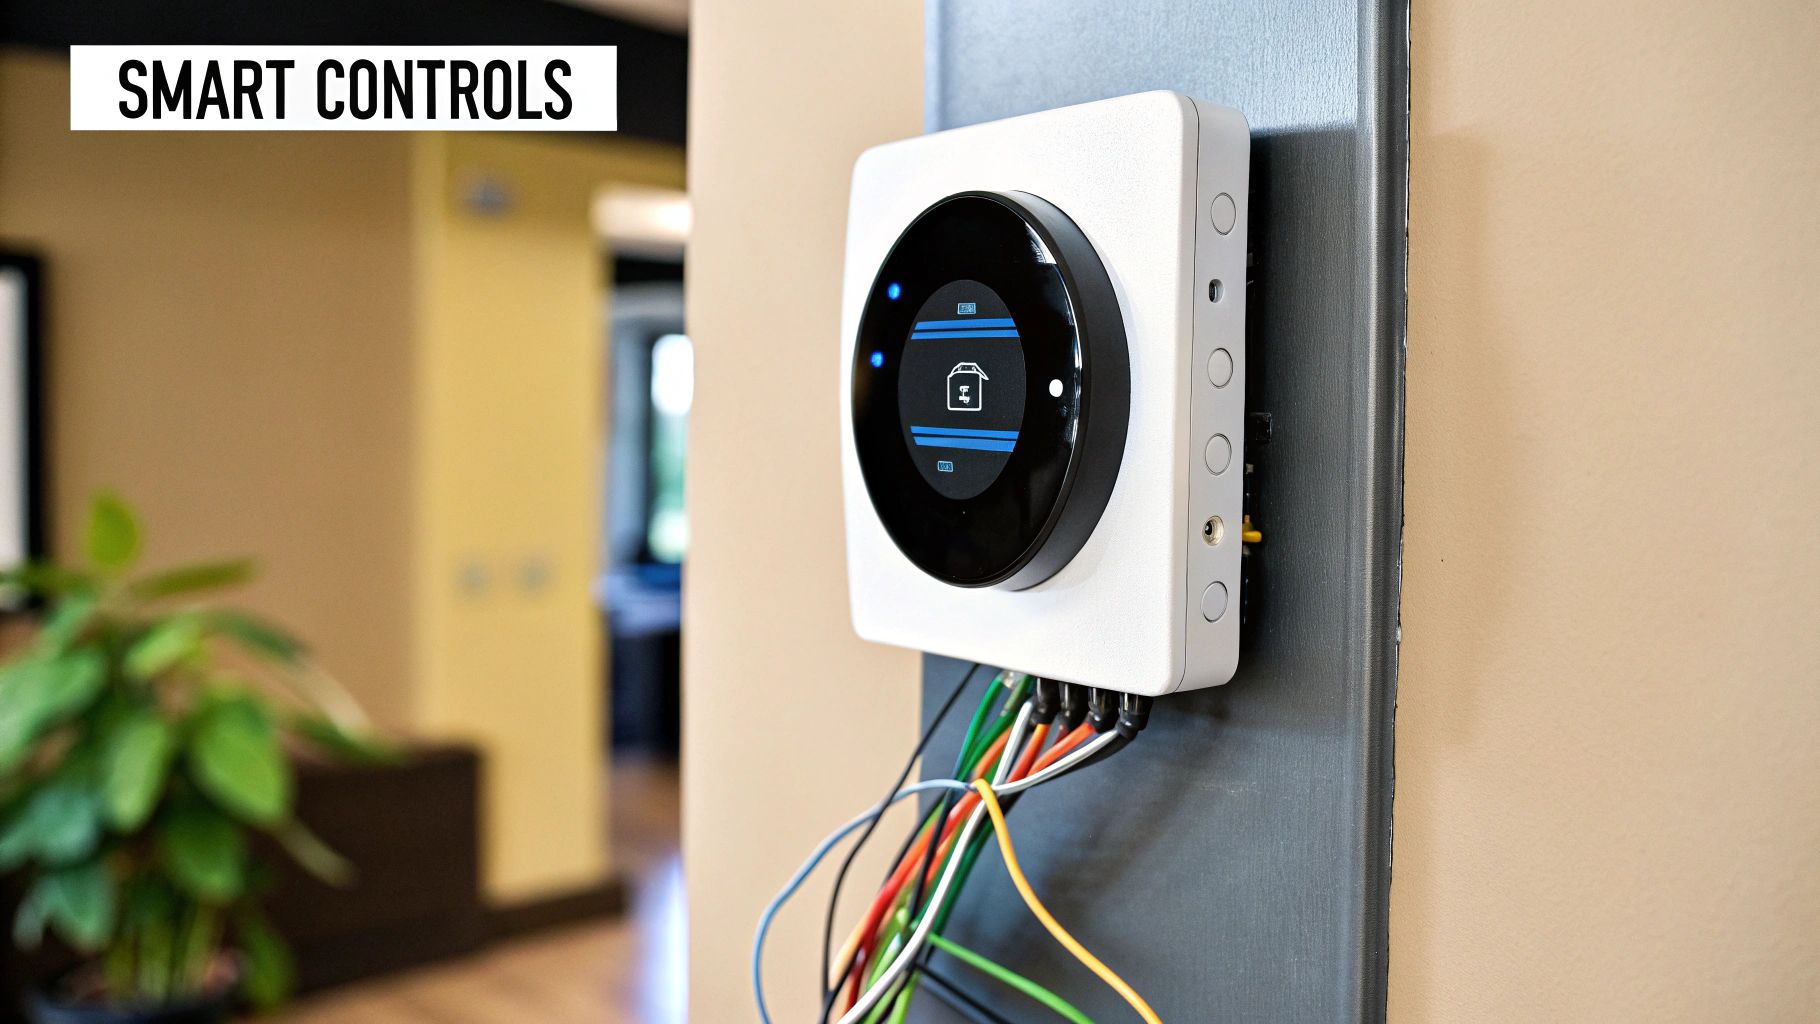
6. Control Systems and Thermostats
The most powerful HVAC equipment is ineffective without a precise and intelligent control system. The thermostat acts as the brain of your climate control, translating your comfort preferences into operational commands for the heating and cooling units. Choosing and correctly installing the right control system is a pivotal step that unlocks the full potential for efficiency, comfort, and energy savings from your new equipment.
This step is a crucial part of any comprehensive hvac install checklist because it directly influences your daily interaction with the system and its overall energy consumption. A modern thermostat does far more than just turn the system on and off; it optimizes performance based on your lifestyle and habits.
The Science Behind Control
Modern control systems, especially smart thermostats like those from Nest and Ecobee, use sophisticated algorithms to manage your home's climate. They go beyond simple temperature settings by learning your schedule, sensing occupancy, and even using local weather forecasts to pre-heat or pre-cool your home efficiently. This intelligent management prevents energy waste and ensures your space is comfortable exactly when you need it to be.
Compatibility Check: A technician must verify that the chosen thermostat is fully compatible with the specific make and model of your HVAC equipment, including any multi-stage or variable-speed features.
Strategic Placement: The thermostat's location is critical. It must be installed on an interior wall, away from direct sunlight, drafts from windows or doors, and heat sources like lamps or kitchen appliances to ensure accurate temperature readings.
Proper Wiring: Using the correct gauge wire and ensuring all connections are secure is fundamental for reliable communication between the thermostat and the HVAC unit.
The Control System Workflow
The process involves more than just mounting a device on the wall. For example, a zoned system installation would involve multiple thermostats controlling electronic dampers within the ductwork, allowing for different temperature settings in different areas of the property. This tailored approach is especially effective in larger homes with varied occupancy patterns. Properly programming setback schedules, where the temperature is adjusted automatically when you're away or asleep, is a simple yet powerful way to maximize energy savings.
By integrating the right controls, you transform a standard HVAC unit into a responsive and efficient system. To understand how these controls pair with different equipment, you can explore this guide to residential HVAC system types. Selecting the correct thermostat ensures your investment delivers not just climate control, but smart, automated comfort.
7. Ventilation and Indoor Air Quality
A modern HVAC system does more than just heat and cool; it's central to maintaining a healthy indoor environment. Proper ventilation is a critical component that ensures stale, pollutant-filled indoor air is replaced with fresh, clean outdoor air. This process is essential for removing allergens, airborne contaminants, and excess moisture, directly impacting the health and comfort of occupants. In today's tightly sealed, energy-efficient homes, this mechanical ventilation is not just a luxury but a necessity to prevent poor air quality.
This step is a vital part of the hvac install checklist because it addresses the "V" in HVAC: ventilation. A system installed without adequate ventilation can lead to issues like high humidity, lingering odors, and the buildup of volatile organic compounds (VOCs), all of which can compromise occupant well-being and the structural integrity of the home.
The Science Behind Fresh Air Exchange
Professional ventilation strategies are guided by standards like ASHRAE 62.2 for residential buildings. The goal is to create a balanced exchange of air without sacrificing the energy efficiency gained from a well-sealed building envelope. Modern solutions like Energy Recovery Ventilators (ERVs) and Heat Recovery Ventilators (HRVs) are designed to precondition incoming fresh air using the temperature of the outgoing stale air, minimizing energy loss.
Fresh Air Intake: A dedicated intake brings controlled amounts of fresh outdoor air into the system for circulation.
Exhaust Systems: Bathroom and kitchen fans remove moisture and pollutants at their source.
Filtration: High-efficiency MERV-rated filters capture dust, pollen, and other particulates from both recirculated and incoming air.
Air Purification: Advanced options like UV-C germicidal lights can be installed within the ductwork to neutralize biological contaminants like mold spores and bacteria.
The Ventilation Workflow
A qualified technician ensures that your new system meets or exceeds local building codes and ventilation standards. This involves strategically placing intakes and exhausts, correctly sizing any supplemental equipment like an ERV, and ensuring the entire system works cohesively. For example, a powerful kitchen exhaust hood may require a dedicated makeup air unit to prevent the house from becoming depressurized. By focusing on a holistic approach, your HVAC system becomes a powerful tool for health. For a closer look at these solutions, you can explore the different options for improving indoor air quality.
7-Point HVAC Install Checklist Comparison
Item | Implementation Complexity 🔄 | Resource Requirements ⚡ | Expected Outcomes 📊 | Ideal Use Cases 💡 | Key Advantages ⭐ |
|---|---|---|---|---|---|
Load Calculation and Equipment Sizing | Medium-High: requires expertise/software | Specialized software, skilled personnel | Accurate equipment sizing, energy efficiency, comfort | New HVAC installations, upgrades | Prevents oversizing, improves comfort, extends equipment life |
Electrical Requirements and Power Supply | Medium: requires licensed electrician | Electrical hardware, permits, inspections | Safe operation, code compliance, reliable power supply | All HVAC systems | Ensures safety, prevents voltage issues, meets code |
Ductwork Design and Installation | Medium-High: space & structural considerations | Materials (ducts, sealants), installation labor | Efficient airflow, energy savings, noise reduction | Buildings needing air distribution | Maximizes efficiency, even airflow, reduces noise |
Refrigerant Lines and Connections | High: specialized certification and tools | Certified technicians, refrigerants, testing tools | Leak-free system, maintains warranty, environmental compliance | Refrigerant-based systems | Ensures performance, prevents leaks, complies with EPA |
Drainage and Condensate Management | Low-Medium: piping and pump setup | Drain pans, pumps, plumbing connections | Prevents water damage, controls humidity | All HVAC systems producing condensate | Protects building, maintains air quality, code compliant |
Control Systems and Thermostats | Medium-High: wiring, programming, integration | Smart thermostats, control wiring, network setup | Energy optimization, remote control, comfort | Smart homes, commercial buildings | Enhances efficiency, comfort, remote access |
Ventilation and Indoor Air Quality | Medium: added components and maintenance | Ventilation equipment, filters, ERV/HRV systems | Improved air quality, code compliance, energy recovery | New constructions, remodeled ventilation systems | Maintains healthy air, reduces pollutants, energy saving |
From Checklist to Comfort: Partnering for a Perfect Installation
Navigating the complexities of a new HVAC installation can feel overwhelming, but this detailed HVAC install checklist demystifies the process, transforming it from a source of stress into a structured path toward lasting comfort. We have journeyed through the most critical stages, from the foundational importance of a precise load calculation to the final, nuanced details of indoor air quality and smart thermostat integration. Each point on this checklist represents a non-negotiable step toward ensuring your system’s efficiency, longevity, and reliability.
Understanding these elements empowers you, the homeowner or property manager, to ask the right questions and hold your installation team to the highest standards. It’s the difference between a system that merely functions and one that performs optimally, saving you money on utility bills and providing consistent comfort for years to come. For residents in Tucson and across Arizona, where the climate demands peak performance, a meticulous installation is not a luxury; it is an absolute necessity.
Key Takeaways for a Flawless Installation
Recapping our journey, remember these core principles:
Precision is Paramount: The initial load calculation (Manual J) and proper equipment sizing are the bedrock of an efficient system. An improperly sized unit will lead to short cycling, increased wear and tear, and higher energy costs.
The System is Holistic: Your HVAC unit is part of a larger ecosystem. The integrity of your ductwork, the safety of your electrical connections, and the effectiveness of your condensate drainage are just as crucial as the air conditioner or furnace itself.
Modern Comfort is Smart Comfort: Don’t overlook the final touches. A properly configured smart thermostat can optimize energy usage based on your lifestyle, while advanced IAQ solutions like UV purifiers and high-MERV filters protect your family’s health.
Mastering this HVAC install checklist is about more than just ticking boxes. It is about investing wisely in one of your property’s most significant assets. A well-executed installation directly translates into tangible benefits: lower energy consumption, fewer repair calls, enhanced indoor air quality, and the peace of mind that comes from a dependable system. By partnering with a contractor who respects and rigorously follows these steps, you are not just buying a piece of equipment; you are securing a comfortable, healthy, and efficient living environment for the future.
Ensure your investment is protected by partnering with professionals who treat this checklist as their minimum standard. The certified technicians at Covenant Aire Solutions bring unparalleled expertise and integrity to every project in the Tucson area, guaranteeing your installation is done right the first time. Contact Covenant Aire Solutions today to schedule a consultation and experience the difference that a commitment to excellence makes.