Air Conditioner Heat Not Working? Quick Fix Tips
- Oct 18, 2025
- 14 min read
Updated: Oct 20, 2025
It's one of those frustrating moments every homeowner dreads: you flip your system over to "heat" for the first time all season, and all you get is a blast of chilly air. What gives?

Often, the problem is simpler than you think. More often than not, the culprit is something basic like a dirty air filter, the wrong setting on your thermostat, or maybe even low refrigerant. These are the usual suspects we see time and time again.
Common Reasons Your AC Heat Is Not Working
When your heat pump decides to blow cold air instead of warm, you’ve got a common and annoying problem on your hands. This isn't just a minor inconvenience; it's becoming a major issue as more of us rely on these all-in-one systems for year-round comfort.
In fact, within the U.S. HVAC industry, a surprising 30% of service calls are specifically for heating issues in heat pump systems. It's a widespread headache, and you can find more data on this trend over at news.climate.columbia.edu.
Besides leaving you in the cold, these failures are a huge energy drain. Your system is pulling electricity and running up your utility bill without actually doing the one thing you need it to do: heat your home.
The Most Frequent Culprits
Several components can go wrong and knock out your system's heating function. Let's walk through the most likely offenders, starting with the easiest to check.
Incorrect Thermostat Settings: You'd be surprised how often this is the problem. Someone might have left the thermostat set to "cool," or the fan is switched to "on" instead of "auto." When the fan is "on," it runs continuously, blowing air whether it's been heated or not.
Dirty or Clogged Air Filter: This is, without a doubt, a top offender. A filter choked with dust and debris suffocates your system, restricting airflow over the heat exchanger or coils. The system simply can't warm the air effectively. In really bad cases, this can cause the unit to overheat and shut itself down for safety.
Low Refrigerant Levels: A heat pump works by using refrigerant to pull heat from the outside air and move it inside. If there’s a leak, the refrigerant level drops, and the system loses its ability to transfer heat. It just can't generate warmth without enough "juice."
Malfunctioning Reversing Valve: This little part is the traffic cop of your system, telling it whether to be in cooling or heating mode. If it gets stuck in the "cool" position, that's all you're going to get: cold air. If you're curious about the mechanics, you can get a deeper understanding by reading our guide on what a heat pump is.
This infographic gives you a quick visual guide for the first few steps you should take when your heat setting is blowing cold.
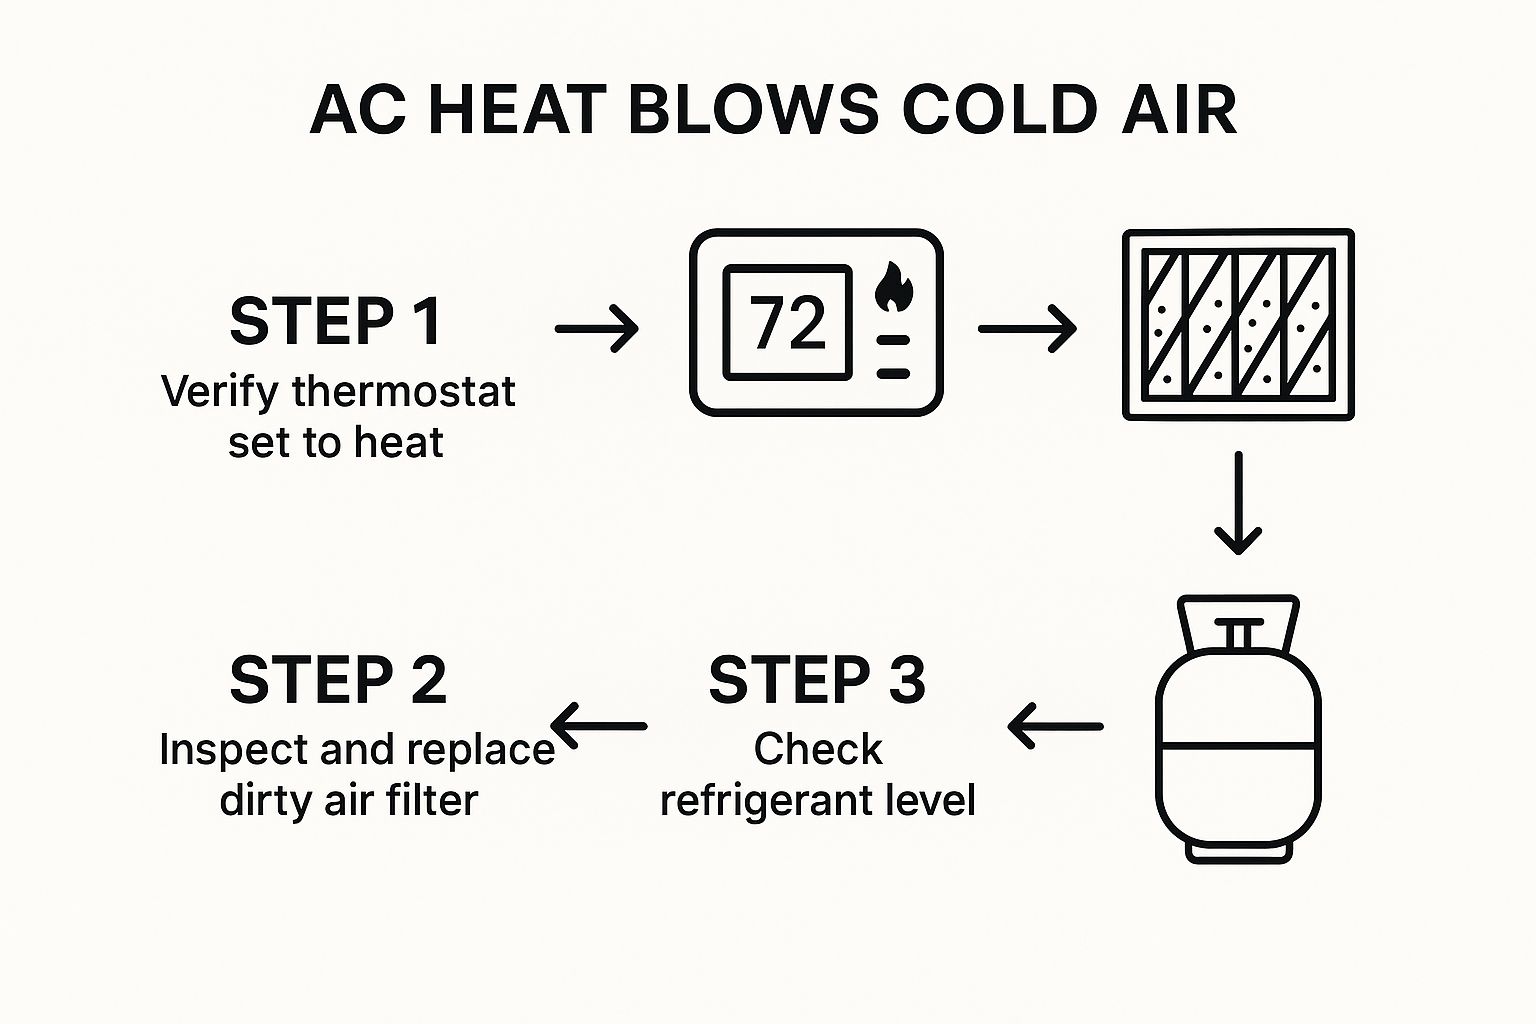
As you can see, the smart approach is always to start with the simple stuff. Check your thermostat and filter first before you start worrying about more complex (and expensive) problems like refrigerant leaks.
To help you narrow things down, I've put together a quick checklist. Use it to match your system's behavior to the likely cause and figure out if it's something you can tackle yourself or if it's time to call in a pro.
Quick Diagnostic Checklist for AC Heat Issues
Symptom | Potential Cause | DIY Fix or Professional Help? |
|---|---|---|
System blows cold air, but fan runs constantly. | Thermostat fan setting is on "On" instead of "Auto." | DIY: Check and adjust thermostat settings. |
Airflow from vents is weak and not very warm. | Dirty/clogged air filter. | DIY: Inspect and replace the air filter. |
System runs, but air is only slightly cool; ice may be visible on the outdoor unit. | Low refrigerant due to a leak. | Professional Help: This requires a licensed technician to find and repair the leak and recharge the system. |
System is stuck blowing cold air, no matter the setting. | Malfunctioning reversing valve. | Professional Help: The reversing valve is a complex component that needs an expert to diagnose and replace. |
The outdoor unit isn't running at all. | Tripped circuit breaker or electrical issue. | DIY: Check your breaker box. If it continues to trip, call a professional. |
Remember, while some of these issues are easy fixes, others involving refrigerant or electrical components are best left to a qualified technician. Safety first
When your heat decides to quit on a cold day, the immediate thought is often a costly repair call. But before you reach for the phone, hold on. Many times, the fix is something surprisingly simple that you can handle in a few minutes, no tools or technical skills needed.
Let's walk through the most common culprits that even the pros check first.
Your thermostat is the brain of your entire HVAC system, so it's the most logical place to start your detective work. It’s incredibly easy for settings to get bumped or changed, especially after months of running the AC.
Confirm Your Thermostat Settings
First thing's first: make sure the thermostat is actually switched to “Heat” mode. It sounds almost too obvious, but you’d be surprised how often this is the issue. If it’s still on "Cool" or "Off," you're never going to get that warmth you're after.
Next, glance at the temperature setting. For the heat to kick on, the set temperature needs to be higher than the current temperature in the room. If you have it set to 68°F but the room is already a comfortable 70°F, your system is doing exactly what it's told: staying off.
Finally, check that fan setting. For effective heating, your fan should almost always be on “Auto.” If it’s switched to “On,” the fan will blow constantly, even when the furnace isn’t generating heat. This is why you might feel cool or room-temperature air coming from your vents.
Pro Tip: A simple settings tweak on the thermostat resolves an estimated 15-20% of our "no heat" service calls. Always check these three things: Mode, Temperature, and Fan, before you move on to anything else.
Inspect the Air Filter
Once you’ve confirmed the thermostat settings are correct, your next stop should be the air filter. A dirty, clogged filter is hands-down one of the most common reasons for HVAC issues, whether it's poor cooling or a heater that won't fire up.
Think of it this way: a clogged filter is essentially suffocating your system. Air can't move freely across the heat exchanger, so your furnace can't transfer heat into your home. This strain forces the system to work way harder than it should, often causing it to overheat and shut down automatically as a safety precaution.
You should be giving your filter a visual check about once a month.
Hold it up to a light. Can't see the light through it? It's definitely time for a new one.
Look for any thick, visible layers of dust, pet hair, or grime.
Plan on replacing disposable filters every 30-90 days, though this can vary based on your home's air quality and the filter manufacturer's advice.
Simply cleaning or replacing the filter to restore proper airflow is often the magic bullet that gets your heat running again. For more easy troubleshooting advice, check out our guide on quick fixes for a non-working air conditioner.
How to Inspect Your System for Deeper Issues
Alright, if the easy fixes didn’t do the trick, it’s time to roll up our sleeves and look a little deeper. Your HVAC system often gives you clues that something’s wrong; you just have to know what to look and listen for. Think of yourself as a detective; a few careful observations can often lead you straight to the problem before you even have to pick up the phone.
Don't worry, I’m not asking you to take anything apart. This is all about observation. Knowing what you’re looking at can give you a huge head start on figuring out what’s wrong.
Listen for the Reversing Valve
In any heat pump, there's a critical part called the reversing valve. This is essentially the traffic cop of your system. It directs the flow of refrigerant, telling it whether to cool your home or heat it. When you switch your thermostat to "heat," you should hear a specific sound coming from the outdoor unit.
What are you listening for? It's often a distinct "whoosh" or a solid "click" as the valve shifts into position. That sound is a good sign; it means the system got the message to start making heat and is trying to do its job.
But if all you hear is the familiar hum of the fan motor, that could be your problem right there. The valve might be stuck, which is a classic reason the heat won't work. Your system is effectively trapped in cooling mode.
Look for Signs of a Refrigerant Leak
Refrigerant is the lifeblood of your heating and cooling system. If the level is low, it simply can't move heat from outside into your home. A refrigerant leak is one of the most common culprits behind poor performance, and it usually leaves behind some tell-tale evidence. To get a more structured approach, you can always follow a comprehensive HVAC maintenance checklist to guide your inspection.
Take a close look at the copper lines and coils on both the indoor and outdoor units. Here's what to keep an eye out for:
Oily Residue: The refrigerant is mixed with a special oil to keep the compressor lubricated. If you spot greasy or oily gunk on the coils or where the lines connect, that’s a dead giveaway for a leak.
Hissing Sounds: Get close to the unit (safely, of course) and listen. A faint hissing or bubbling sound could be the sound of refrigerant gas escaping the lines.
Ice Buildup: This one seems counterintuitive, but low refrigerant can actually cause the coils on your outdoor unit to freeze over, even on a cool but not freezing day. That ice acts like an insulator and stops the unit from absorbing any heat from the outside air.
Important Takeaway: Refrigerant is a controlled chemical and can only be handled by a licensed professional. If you think you have a leak, the next call you make should be to a qualified HVAC technician.
Check for a Stuck Defrost Cycle
When it's cold and damp outside, it's perfectly normal for a thin layer of frost to build up on your outdoor unit. Your heat pump knows this and has a built-in defrost cycle to deal with it. It temporarily reverses the system to send warm refrigerant through the outdoor coils and melt away the ice. You might even see a puff of steam coming from the unit, which is totally normal.
The problem is, sometimes the system gets stuck in this cycle. This is usually due to a bad sensor or a faulty control board. If your outdoor unit looks like a block of ice and you’re getting no heat inside, it's very likely stuck in defrost mode. You can learn more about the components that make this heat transfer possible in our guide to your air conditioner heat exchanger.
Checking for Thermostat and Electrical Problems
Sometimes, when your air conditioner's heat decides to take a vacation, the problem isn't with the main unit at all. The real culprit can be hiding in the electrical system or the thermostat, the brains of the whole operation. Let's start with the simple stuff before assuming the worst.
Often, the fix is as easy as dealing with a tripped circuit breaker. Your HVAC system usually has two dedicated breakers in your home's main electrical panel: one for the indoor unit and another for the outdoor one. All it takes is a minor power surge to trip one of them, cutting the power and stopping the heat cold.
Find and Reset Your Circuit Breakers
First things first, you need to locate your breaker panel. You'll typically find it tucked away in a garage, basement, or utility closet. Once you've found it, scan the labels for anything marked "HVAC," "Furnace," or "Air Cond."
Look to see if either breaker is stuck in the middle or flipped to the "off" position.
If you find one that's tripped, you have to push it firmly all the way to "off" first. This is a crucial step.
Then, just flip it back to the "on" position to get the power flowing again.
This simple reset can solve the problem in seconds. However, if the breaker trips again immediately, that’s a red flag. It points to a more serious electrical issue that needs a professional's touch.
Troubleshooting Your Thermostat
If the breakers look good, your thermostat is the next logical suspect. It's not always about dead batteries, either. A thermostat can cause heating failures in a few different ways. A common scenario I see in the field is an improperly calibrated sensor. It basically tricks the system into thinking the room is already warm enough, so it never sends the "call for heat" signal.
Thermostat malfunctions are a surprisingly common reason your air conditioner heat is not working. An estimated 10% of service calls for no heat are resolved by addressing simple thermostat issues, from incorrect wiring to faulty sensors.
Improper wiring is another classic culprit. If wires are loose or connected to the wrong terminals, the communication between your thermostat and the heat pump simply breaks down. Having a basic understanding of the standard wiring can help you spot any obvious problems. If you're feeling handy, you can check out this complete guide to thermostat wiring color codes to see if something looks out of place.
When dealing with newer systems, it helps to be familiar with professional-grade smart home devices, including thermostats, as these can sometimes require very specific configurations to function correctly.
It's also worth remembering that the energy wasted from these little malfunctions adds up fast. Air conditioners already account for a staggering 10% of global electricity consumption for heating and cooling. When the heating function fails, it often forces people to rely on less efficient space heaters, driving up energy use and costs even further.
Knowing When to Call an HVAC Professional
There’s a real sense of accomplishment that comes with fixing something yourself. But when it comes to HVAC systems, there’s a fine line between a smart DIY fix and a costly mistake. Sometimes, the best move you can make is to put down the tools and call a certified technician, especially when your air conditioner heat is not working because of a tricky internal problem.
Knowing when you're in over your head can save you from big headaches, expensive damage, or serious safety hazards.
Take a suspected refrigerant leak, for example. If you think you have one, that’s your cue to stop everything. Handling refrigerant isn't a DIY-friendly task; it requires a special EPA license and very specific equipment to manage it safely and legally. Trying to top it off or patch a line yourself is not only dangerous but also against the law.
Clear Signs You Need an Expert
Some problems scream "call a professional," and you should definitely listen. These aren't minor hiccups; they're symptoms of bigger issues that can snowball fast if you ignore them. These situations demand the kind of diagnostic tools and experience only a trained technician brings to the table.
Here are the definite "call a pro" situations:
Loud, Unusual Noises: That grinding, squealing, or intense buzzing isn't just annoying. It’s your system telling you a major component, like the compressor or a fan motor, is on its last legs.
Persistent Electrical Issues: You reset a tripped breaker, and it immediately pops again. Don't just keep flipping it. This points to an underlying electrical fault that’s a genuine fire hazard and needs a pro to diagnose safely.
You Suspect a Bad Reversing Valve: If you switch your system to heat and never hear that distinct "whoosh" or "click," the reversing valve might be stuck or broken. This is a complex repair that's well beyond a typical DIY job.
A common mistake we see is homeowners trying to "limp along" a failing system. This often turns a moderate repair into a full system replacement. If you’re unsure, it’s always better to get a professional opinion.
DIY vs Professional HVAC Repair Cost Scenarios
Knowing the potential costs can help you decide when to tackle a job and when to call in the cavalry. A simple part swap might be a cheap DIY fix, but a complex repair can quickly become more expensive if you make a mistake.
Repair Task | Typical DIY Cost | Estimated Professional Cost |
|---|---|---|
Replacing a Thermostat | $25 - $200 | $150 - $450 |
Cleaning Dirty Coils | $15 - $30 (for cleaner) | $100 - $400 |
Replacing a Capacitor | $15 - $50 | $125 - $350 |
Recharging Refrigerant (Leak Fix) | Not a DIY job | $300 - $1,500+ |
Replacing a Blower Motor | $150 - $400 (for part) | $450 - $1,200 |
This table shows that while some tasks are affordable DIY projects, others carry a much higher professional cost for a reason: they require specialized knowledge, tools, and carry significant risk if done improperly.
Choosing a Reputable HVAC Company
When you do need to make that call, you want to feel confident you're hiring the right people. Start by asking any potential company if they are licensed, bonded, and insured in your state. This protects you and ensures they meet professional standards.
A reputable company will also provide transparent, upfront pricing, so you aren't hit with surprises on the final bill. Getting your heat back on shouldn't feel like a gamble. When facing a critical failure, our **emergency air conditioning repair guide** can walk you through what to expect during a service call. Being prepared helps you stay in control of the situation.
Got Questions About Your AC Heat? Let's Clear Things Up.
Even after trying a few fixes, it’s totally normal to have some lingering questions when your air conditioner’s heat decides to take a vacation. I hear these all the time from homeowners, so let’s run through some quick answers to get you pointed in the right direction.
"Why in the World Is My AC Blowing Cold Air When I Turned on the Heat?"
This is, without a doubt, the number one call we get. When this happens, it usually boils down to one of three culprits.
First, go check your air filter. I know, it sounds too simple, but a filter that’s completely choked with dust can restrict airflow so badly that the system’s coils get icy cold, preventing any real heat from ever reaching your vents.
Second, your system might be running low on refrigerant. Think of refrigerant as the lifeblood of your heat pump; it’s what actually grabs heat from the chilly outside air and carries it into your home. If the levels are low, there’s just not enough "stuff" to move the heat.
The third possibility is a stuck reversing valve. This is the mechanical switch that tells your unit, "Okay, stop cooling and start heating." If that valve gets stuck in the AC position, it doesn't matter what your thermostat says, you’re getting cold air.
It surprises a lot of people, but a dirty air filter is the reason behind as many as 40% of our "no heat" calls. Just staying on top of that one simple task can save you a headache and a service call.
How Often Should My Heat Pump Get a Professional Tune-Up?
To keep your system running reliably and avoid that dreaded middle-of-the-night failure, you really want to have a pro look at it once a year. The sweet spot for this is in the fall, right before the temperatures drop and you start to depend on it every day.
A professional tune-up is more than just a quick look-see. A good technician will:
Clean key components: They’ll get into the guts of the system and clean things like the coils and fan blades, which immediately boosts efficiency.
Verify refrigerant levels: They'll check the refrigerant charge to make sure it’s at the perfect level for solid heating performance.
Test all the electricals: They’ll inspect and test all the electrical connections and parts to catch a small, fraying wire before it becomes a major system failure.
This kind of preventative care is hands-down the best way to avoid being left in the cold.
Can a Bad Thermostat Really Stop the Heat from Working?
Absolutely. Your thermostat is the brain of the entire operation. If it's not giving the right commands, nothing else is going to work properly. Sometimes the fix is as simple as dead batteries, which is always the first thing you should check.
Other thermostat issues can be a little sneakier. A faulty sensor might be telling the system your room is already warm, so it never kicks on. In other cases, there could be a wiring problem preventing the "call for heat" signal from ever reaching the outdoor unit. It’s always smart to rule out the thermostat before you start worrying about a big mechanical problem.
I See Some Ice on My Outdoor Unit. Is That Normal in the Winter?
Seeing a thin, even layer of frost on the coils of your outdoor unit is perfectly normal, especially when it’s cold and damp outside. Your heat pump is designed with a built-in defrost cycle to handle this. Every so often, it will briefly switch modes to melt that frost away. You might even see a puff of what looks like steam; that’s just the system doing its job.
What’s not normal is when the entire unit looks like it's been encased in a thick block of ice. This is a big red flag that the defrost cycle isn't working. The problem could be a bad defrost control board, a faulty sensor, or just severely blocked airflow. When you see this kind of heavy ice buildup, it's time to call a professional before it causes serious damage.
If you've gone through these checks and your heat is still on the fritz, it's time to bring in the experts. For reliable, honest, and prompt service in Tucson and the surrounding areas, trust the certified technicians at Covenant Aire Solutions. We offer 24/7 emergency service to make sure your home stays comfortable all year long. Visit us at covenantairesolutions.com to schedule your appointment today.