Central Air Conditioning Leaking Water Solved
- Sep 11, 2025
- 13 min read
Finding a puddle of water around your indoor AC unit is never a welcome sight. It’s one of those things that can make your stomach drop. But before you panic, know that it's usually not a sign of total system failure. Most of the time, the culprit is something pretty simple.
Your air conditioner does more than just cool your home; a huge part of its job is pulling humidity out of the air. That moisture, called condensate, beads up on the chilly evaporator coils, drips into a drain pan, and then flows harmlessly outside through a PVC pipe known as the condensate drain line.
When everything is working as it should, you'll never even notice this process. A water leak means something has gone wrong and that little stream of water is being diverted.
Why Is My AC Leaking Water Inside?
To help you get a quick handle on what might be going on, here's a rundown of the most common causes I see in the field.
Quick Guide to Common AC Leak Causes
Potential Cause | Common Signs | What to Do First |
|---|---|---|
Clogged Drain Line | Water pooling around the indoor unit, musty smells, slow dripping from the ceiling. | Turn off the AC. Try to locate the drain line outside and see if it's blocked. |
Frozen Evaporator Coils | Noticeable ice on the coils, weak airflow from vents, AC running constantly but not cooling. | Turn off the cooling and run the fan to melt the ice. Change your air filter. |
Cracked Drain Pan | Water dripping directly from the bottom of the indoor unit, even if the drain line is clear. | Inspect the pan for visible cracks or rust, especially if your unit is 10+ years old. |
Faulty Condensate Pump | Water overflowing from the pump's reservoir, pump not making its usual humming sound. | Check if the pump is plugged in and if the float switch is stuck. |
This table covers the big ones, but let's dive a little deeper into what's actually happening with your system.
The Most Common Culprits Explained
By far, the number one reason for an AC leak is a clogged condensate drain line. I can't tell you how many service calls come down to this one simple problem. Over time, that drain pipe becomes a breeding ground for algae, mold, and sludge, which eventually forms a blockage.
Once that pipe is clogged, the water has nowhere to go. It backs up into the drain pan and spills over, right onto your floor or, worse, through your ceiling. In fact, industry data shows that nearly 30-50% of service calls for water leaks are traced back to this exact issue.
Of course, a clog isn't the only thing that can go wrong. Other potential causes include:
A Cracked Drain Pan: The pan that catches the water can get brittle and crack over time, especially in older units. Rust is another big enemy here.
Frozen Evaporator Coils: If airflow is blocked, usually by a dirty air filter, the coils can get too cold and freeze over. When that ice eventually melts, it can create a gush of water that overwhelms the drain pan.
A Malfunctioning Condensate Pump: For systems installed in basements or attics, a small pump is often used to push the condensate outside. If that pump fails, the reservoir will overflow.
A proactive approach is always best. A small, unchecked leak can quickly lead to significant water damage, mold growth, and costly home repairs. Addressing the source promptly saves you money and stress.
Figuring out the specific cause is the key to getting it fixed right. For more general troubleshooting, you can explore common water line leak repair techniques to understand how professionals find hidden leaks.
And if you're pretty sure you're dealing with a blockage, our guide on how to clean an AC condensate drain line like a pro gives you the exact steps to clear it yourself: https://www.covenantairesolutions.com/post/how-to-clean-ac-condensate-drain-line-like-a-pro
Your Diagnostic Guide to a Leaking AC
Alright, so you’ve discovered a puddle of water around your indoor AC unit. Before you grab a wrench, let’s do a little detective work first. A methodical inspection is the best way to figure out what’s going on, and it all starts with safety.
First thing’s first: head to your circuit breaker and shut off all power to your HVAC system. This is a non-negotiable step. It completely removes the risk of electrical shock while you’re poking around the unit. Once you're certain the power is off, you can start your investigation.
Locating the Indoor Air Handler
Your diagnostic journey begins at the indoor air handler. This is the metal cabinet that’s usually tucked away in a closet, the attic, or down in the basement. It’s the heart of the indoor part of your system and where the evaporator coil lives.
Once you’ve found it, you’ll want to zero in on the condensate collection and drainage system. This is made up of the drain pan, the drain line, and in some cases, a small condensate pump.
Inspecting the Condensate System
Now it's time to look for clues. The condition of the condensate drain pan can tell you almost everything you need to know about the leak. You'll find this pan sitting right underneath the evaporator coils.
Take a close look and see what you find:
Is the drain pan overflowing? This is the most common culprit. An overflowing pan is a dead giveaway that you have a clogged condensate drain line. The water has backed up because it simply has nowhere else to go.
Is the pan cracked or rusted through? Over time, these pans can fail, especially on units older than 10 years. If you spot water dripping from underneath the air handler but the pan itself isn't full, a crack or rust hole is the likely cause.
Is the pan bone dry while water is pooling somewhere else? This one’s a little trickier. A dry pan could mean that condensation is actually freezing on the coils, then melting and dripping down the sides, missing the pan entirely.
The location and condition of the water are your most reliable clues. An overflowing pan almost always points to a blockage. Water showing up far away from the pan, on the other hand, suggests a more complex issue like a frozen coil.
A frozen evaporator coil is a very common reason for a central AC to leak water. However, it's usually a symptom of another problem, like restricted airflow from a dirty filter. If you want to dive deeper into why this happens, you can learn more about why an AC unit freezes up in our detailed guide.
Checking Key Components for Clues
Your inspection shouldn't stop at the pan. The components connected to it can offer even more signs to help you pinpoint the leak's origin.
Examine the Condensate Drain Line: This is the PVC pipe (usually white) that runs out of the drain pan. Look for any visible signs of a blockage right at the connection point. You might see a buildup of algae, slime, or other gunk where the pipe meets the pan.
Check the Condensate Pump (If You Have One): If your air handler is in the basement or sits below the level of the outside drain, you'll have a small box with tubes attached. This is a condensate pump, and its job is to lift water up and out. If its reservoir is full and overflowing, the pump has probably failed, or its float switch is stuck.
By taking a few minutes to carefully observe these areas, you can move from just knowing you have a leak to understanding exactly where it's coming from. That knowledge will give you the confidence to decide if this is a simple fix you can handle yourself or if it’s time to call in a professional.
Practical DIY Fixes You Can Actually Do
Once you've figured out what's likely causing your central air conditioner to leak, it's time to roll up your sleeves. A lot of common AC issues are surprisingly straightforward. With a few basic tools and a little confidence, you can often tackle them yourself and save a hefty service fee.
The golden rule here is safety first. Always, and I mean always, start by shutting off the power to your HVAC system at the circuit breaker. This simple step is non-negotiable and prevents any electrical hazards before you touch anything.
Clearing a Clogged Condensate Drain Line
A blockage in the condensate drain is the #1 reason for an AC leaking water indoors. The good news? It's often an easy fix if you have a wet/dry shop vac. Your goal is to use the vacuum's suction to pull the clog right out of the outdoor drain pipe.
Here’s what you’ll need to get it done:
A wet/dry shop vacuum
Duct tape
A funnel
One cup of distilled white vinegar
First, find the PVC drain line outside your house and attach the vacuum hose to the end. You'll want to use duct tape to create a really snug, airtight seal around the connection. Let the vacuum run for a minute or two; that's usually all it takes to dislodge and suck out whatever gunk has built up in there.
After you've cleared the line, head back inside to the air handler. Look for the access tee on the drain line, pop the cap off, and use a funnel to slowly pour in the cup of vinegar. This will help kill off any lingering mold or algae. For a more detailed walkthrough, check out our guide on https://www.covenantairesolutions.com/post/how-to-clean-condensed-drain-line-like-a-pro.
Replacing a Dirty Air Filter
A filthy air filter is another huge culprit behind a frozen evaporator coil, which, you guessed it, leaks water everywhere when it thaws. Swapping out your filter is probably the easiest and most important piece of maintenance you can do. It takes less than five minutes.
Just find the filter slot on your indoor air handler, slide out the old one, and make a note of the size printed on its cardboard frame. Pop the new one in, making sure the airflow arrows point toward the air handler itself. A clean filter keeps air moving properly, which stops the coils from getting too cold and turning into a block of ice.
Pro Tip: Set a recurring reminder on your phone to check your air filter every 30 days. Some filters claim they can last up to 90 days, but a monthly check helps you spot problems early, especially during peak summer heat or if you have pets.
This simple habit can head off so many common AC headaches. The infographic below breaks down the key steps to keeping your system leak-free and running smoothly.
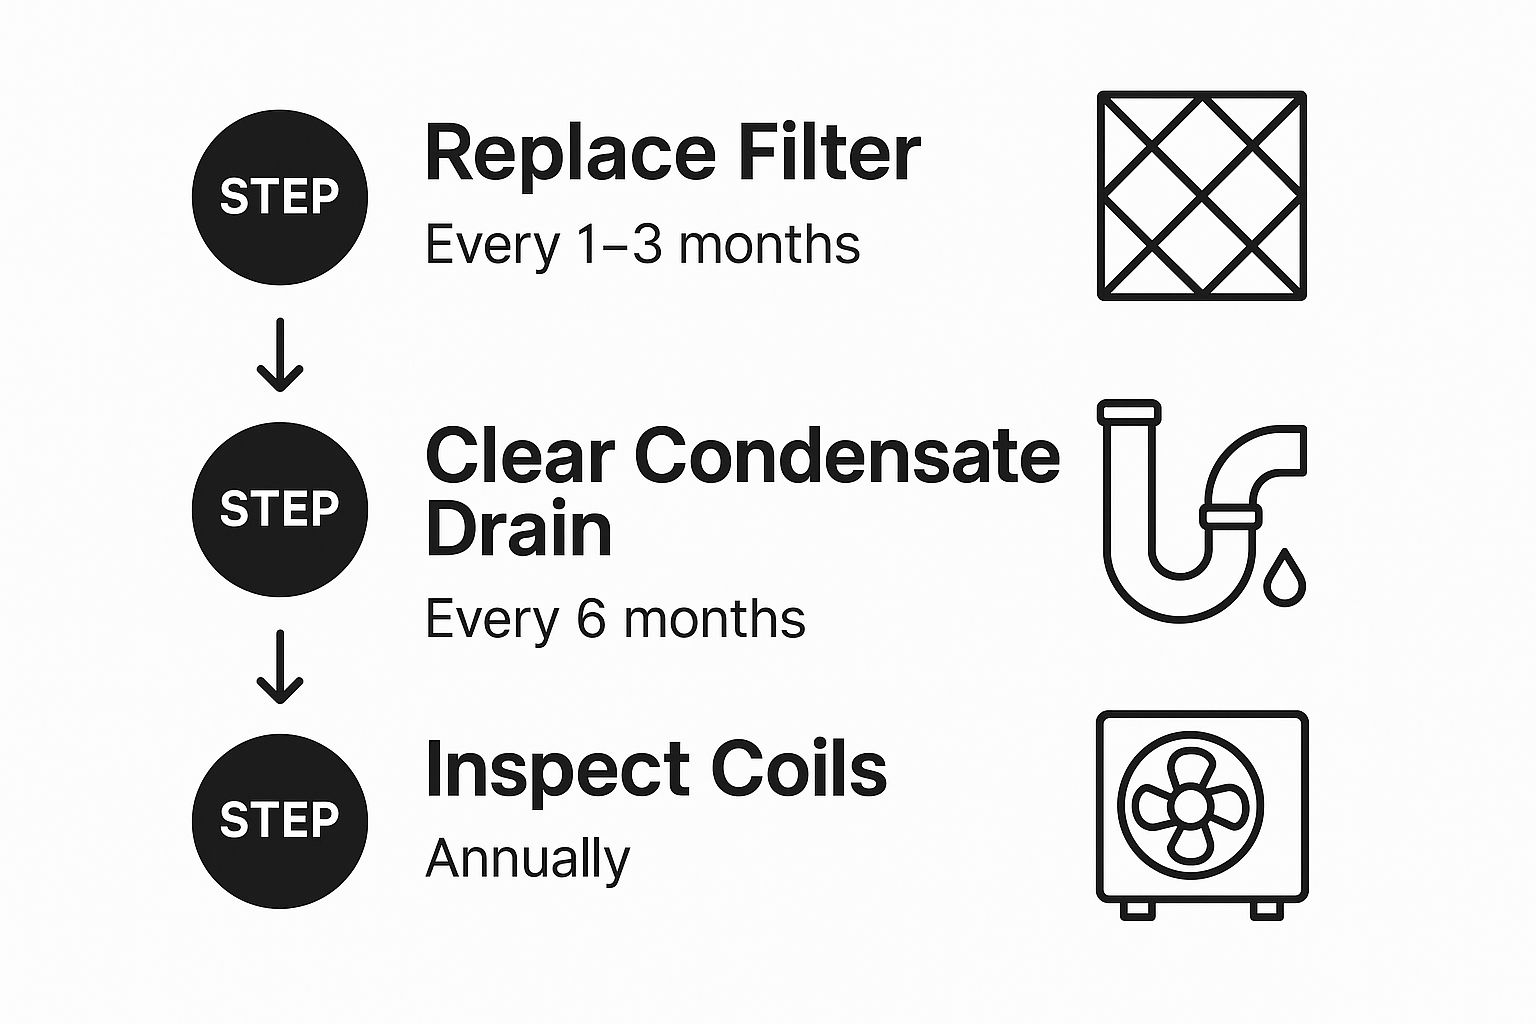
As you can see, a few consistent, simple actions are your best defense against surprise breakdowns and water damage.
Addressing a Cracked Drain Pan
What if you inspected the drain pan and found a crack? Whether it’s plastic or metal, you can often patch minor cracks as a temporary fix to hold you over until a professional can replace it. This is not a permanent solution, but it can prevent immediate water damage.
To get a temporary seal, you absolutely have to get the area around the crack completely dry. When dealing with small leaks, having the right various sealants designed for either plastic or metal is key.
Apply the sealant evenly over the crack to create a solid waterproof barrier. Let it cure completely based on the manufacturer's instructions before you even think about turning the AC back on. Again, this is just a stop-gap measure to buy you some time.
When Ice on Your Coils Is the Real Problem
If you pop open your indoor air handler and see a block of ice hugging the evaporator coil, you’ve just found the real culprit behind your water leak. A central air conditioner leaking water is often just a symptom of this much bigger issue: a frozen coil. As that ice inevitably melts, it unleashes way more water than your drain pan was ever built to handle, and an overflow is pretty much guaranteed.
Seeing ice points to one of two main problems. The first, and by far the most common, is restricted airflow. Your AC system is designed to have a constant, steady stream of warm indoor air flowing over those evaporator coils. When something chokes off that airflow, usually a dirty, clogged air filter, the coils get way too cold and freeze solid.

Why Airflow Is So Critical
Think of it this way: the warm air moving over the coils is what keeps the super-chilled refrigerant inside from dropping below freezing. Take that warm air away, and the coils quickly turn into an ice block. It’s a simple cause-and-effect relationship that catches a lot of homeowners by surprise.
While a dirty filter is the number one offender, other blockages can trip up your system, too:
Blocked Vents: Is a piece of furniture, a rug, or even a curtain covering up your supply or return vents? This is a classic mistake that can seriously disrupt your system’s air circulation.
Dirty Coils: Sometimes the coils themselves are the problem. A thick blanket of dust and grime acts like an insulator, preventing the heat exchange needed to keep things from freezing up.
The More Serious Issue: Low Refrigerant
The second major cause of a frozen coil is low refrigerant. This one is a much bigger deal because your AC’s refrigerant runs in a closed-loop system. If it’s low, that means you have a leak somewhere. A drop in refrigerant creates a drop in pressure, which makes the evaporator coil intensely cold, cold enough to freeze over.
Refrigerant leaks are a global concern. Even well-maintained systems might lose 2-5% of their charge annually, but a poorly installed unit can leak at a much faster rate. These leaks don't just kill your cooling efficiency; they're a frequent cause of frozen coils and the water damage that follows. For a deeper dive, you can check out the IPCC's findings on refrigerant and condensate management.
A frozen coil is your AC's way of screaming for help. Whether it's a simple airflow problem or a more complex refrigerant leak, ignoring it will only lead to bigger, more expensive headaches down the road, like a fried compressor.
You can't handle refrigerant issues yourself; it requires certified pros with specialized tools. If you’ve already changed your filter and double-checked that all your vents are clear but the coils still keep freezing, it’s time to hang up your DIY hat. This is a clear signal to call an HVAC technician to diagnose and fix the real problem safely.
Knowing When to Call an HVAC Professional
Look, I'm all for the DIY spirit. Tackling a home repair project can be incredibly satisfying. But when it comes to your HVAC system, knowing your limits is probably the most important skill you can have. Some jobs are straightforward, but attempting a complex repair without the right training or tools can turn a small leak into a system-wide disaster.
Your safety, and the health of your expensive HVAC system, should always come first. Certain red flags are your cue to put the tools down, step away, and call in a certified pro. These aren't suggestions; they're non-negotiables for avoiding dangerous situations.
Clear Signs It’s Time for a Pro
If you run into any of these scenarios, it's time to get an expert on the phone. Don't second-guess it.
You Suspect a Refrigerant Leak: If your coils are icing over again and again, even after you’ve diligently cleaned the filter and checked for airflow blockages, a refrigerant leak is the likely culprit. Handling refrigerant is not a DIY job: it requires an EPA certification and specialized recovery equipment.
Electrical Components are Involved: See water near any wiring or a malfunctioning condensate pump? Stop immediately. Water and electricity are a lethal mix, and any repair involving them must be handled by a trained technician who knows exactly how to work safely.
You See Significant Physical Damage: We're talking about major rust eating away at the coils, a drain pan that's severely cracked, or other obvious damage to core components. A simple patch isn't going to cut it here. These problems need a professional assessment to determine if a replacement part is needed.
The Leak Won't Quit After Your Fixes: You’ve done everything right; you cleared the drain line, you swapped out the filter, but that stubborn puddle keeps coming back. This is a classic sign that the problem runs deeper than a simple clog, and a pro has the diagnostic tools to find the real source.
Understanding when a problem is out of your league is crucial. When your best DIY efforts don't solve the leak, it's time to contact professional heating and air conditioning services to get the job done correctly and safely.
Preparing for the Service Call
Once you've made the call, you can help make the technician's visit faster and more effective by being prepared. The more information you can give them upfront, the quicker they can get to the root of the problem.
Try to have these details ready before they arrive:
The make and model of your AC unit. You can usually find this on a sticker or plate on the side of the indoor air handler or the outdoor condenser.
A clear description of what's happening. Make a note of where you see the water, how much there is, and any other odd things you've noticed, like strange sounds or weaker airflow than normal.
A history of what you've already tried. Let the tech know that you've already cleaned the drain line or changed the filter. This saves them time and helps them narrow down the possibilities.
Giving the technician this head start helps them show up with a better game plan and potentially the right parts on hand.
For more expert tips on dealing with a central air conditioning leaking water emergency, be sure to check out our complete guide for more solutions: https://www.covenantairesolutions.com/post/central-ac-is-leaking-water-expert-tips-solutions
Still Have Questions About Leaking AC Units?
Let's tackle some of the most common questions homeowners ask when they find their central air conditioning leaking water. Getting straight, simple answers can give you the confidence to manage your system and prevent a small issue from snowballing.
Even a tiny drip might seem like no big deal at first, but it's always your AC's way of telling you something needs a closer look.
How Often Should I Clean My AC Drain Line?
As a good rule of thumb, plan on cleaning the condensate drain line once or twice a year. Doing it in the spring before the heavy cooling season kicks in is perfect timing.
However, if you're in a particularly humid climate or have pets that shed a lot, bumping that up to every three months is a smart move.
A quick flush with some distilled vinegar is usually all it takes to knock out the algae and sludge that cause most clogs. Honestly, this one proactive step is the single best way to stop a leak before it ever gets the chance to start.
Can a Leaking AC Cause Serious Water Damage?
Yes, absolutely. What starts as a small puddle can quickly escalate. I've seen it saturate drywall, warp expensive hardwood floors, and encourage mold to grow unseen behind walls.
When a drain line gets completely blocked, it can dump gallons of water in a surprisingly short amount of time. The resulting damage can be significant and costly to repair.
It's critical to address any indoor water leak immediately, no matter how small it seems. The longer water sits, the higher the risk of structural damage and health hazards from mold.
Ignoring the problem only gives it time to get worse. Acting fast not only saves your home but also helps you get a handle on your system’s overall health. Speaking of system health, you can also learn more about how to reduce air conditioning costs by keeping your unit running as efficiently as possible.
Is a Little Water Leak Normal?
No, it is never normal for your central AC to leak water inside your house. The entire system is specifically designed to collect every drop of condensation and safely drain it outside.
If you see any water pooling around your indoor unit, that's a clear signal that something in that process has failed. It might be a simple clog, but it could also point to a more serious issue. Either way, it always requires investigation.
Think of it this way: an indoor leak is your AC’s cry for help.
If you’ve diagnosed your central air conditioning leaking water and feel the problem is beyond a DIY fix, don’t hesitate to call in the experts. Covenant Aire Solutions is here 24/7 to provide fast, reliable repairs that protect your home and restore your comfort. Contact us today at https://www.covenantairesolutions.com.