
Heat Pump Board Replacement: A Complete DIY Guide
At 5 a.m., a Tucson homeowner wakes to a cold house, checks the thermostat, and sees it calling for heat. The indoor blower may run, but the outdoor heat pump is silent. A control board becomes the obvious suspect, yet replacing it immediately can turn a correct diagnosis into an expensive mistake.
Heat pump board replacement is a decision problem before it's a parts swap. The board may have failed, but a thermostat signal, fuse, transformer, sensor, defrost control, wiring fault, capacitor, or voltage event can create nearly identical symptoms. The practical sequence is simple: confirm the failure, match the exact replacement, install it safely, and test the system under real operating conditions.
When the Control Board Is the Real Problem
A technician arriving at that Tucson home shouldn't start by ordering a board. The first checks are basic because basic faults are common: thermostat mode and setpoint, breaker position, air filter condition, disconnect status, and voltage at the equipment. A diagnostic visit that skips those checks is incomplete. Covenant Aire Solutions' HVAC system diagnostics resource reflects the same principle: identify the fault path before recommending a component.
The board is the command center for the air handler or outdoor unit. It receives thermostat calls, monitors safety switches and sensors, controls relays, manages defrost logic, and coordinates equipment operation. When it fails, the system may stay completely inactive, or it may operate erratically, shut down during a cycle, run a fan without heating or cooling, or display diagnostic lights that don't match the homeowner's expectations.
That doesn't make the board the automatic answer. A technician should verify transformer output, fuses, incoming power, thermostat signals, and external fault conditions before condemning it. The published review of heat-pump failures found 13,993 recorded faults from 2001 to 2011, with 8,659 retained after cleanup, and control or electronics repeatedly appeared among the leading fault categories across several heat-pump types (published heat-pump failure review). In some categories, control and electronics represented roughly 23% to 32% of common faults, so board-related service is a recurring field problem, not an unusual repair.
What can damage a board
A monsoon-related voltage surge can damage electronic controls, but the board may fail later rather than immediately. A failed capacitor can stress associated controls, thermal cycling can produce cracked solder joints, and rodents can chew low-voltage wiring that makes a healthy board appear dead. Burn marks, corroded terminals, bulging capacitors, and loose connectors are useful clues, but they still don't prove the board is the root cause.
Practical rule: Don't buy a board until the technician has explained what test confirmed the board failure and what caused the original fault.
Misdiagnosis wastes the part cost, labor, and time without fixing the system. Worse, installing a new board while a shorted wire, failing sensor, bad capacitor, or unstable power supply remains can damage the replacement board as well. A heat-pump technician needs a working understanding of controls, refrigeration, electrical safety, and manufacturer logic, which is why this overview of why HVAC technicians must master heat-pump technology is useful background for homeowners comparing service providers.
Symptoms That Point to Board Failure
A failed board usually presents as loss of control, not just a total electrical blackout. Reported signs include a unit that won't turn on, intermittent operation, a blower running without heating or cooling, no thermostat response, short cycling, and a burning smell or scorch marks on the board (heat-pump control-board symptoms).
Start with the symptom, then test the control path that could produce it:
Outdoor unit stays silent: Confirm the thermostat is sending a heat call, then check whether the air handler produces the expected 24-volt signal to the outdoor controls. If the signal is absent, investigate the thermostat circuit or indoor board before blaming the outdoor board.
Random shutdowns: Look for loose terminals, safety-switch interruptions, voltage problems, and diagnostic codes that appear immediately before the shutdown. A board may be losing control, but an external safety fault can be forcing it to stop.
Blower runs without heating or cooling: Verify the indoor fan command, outdoor contactor operation, and compressor call. A relay that never closes can implicate the board, while correct relay action with no compressor operation points elsewhere.
Error codes return after reset: Record the code before cycling power. Persistent codes matter more than a one-time display, but the manufacturer's service information must define what that code means.
Defrost behaves incorrectly: Check the defrost sensor or thermistor and its resistance against the equipment specification. A forced test defrost that works normally can point toward the sensor rather than the board, an important distinction highlighted by current defrost-control parts guidance (defrost-control selection and troubleshooting).
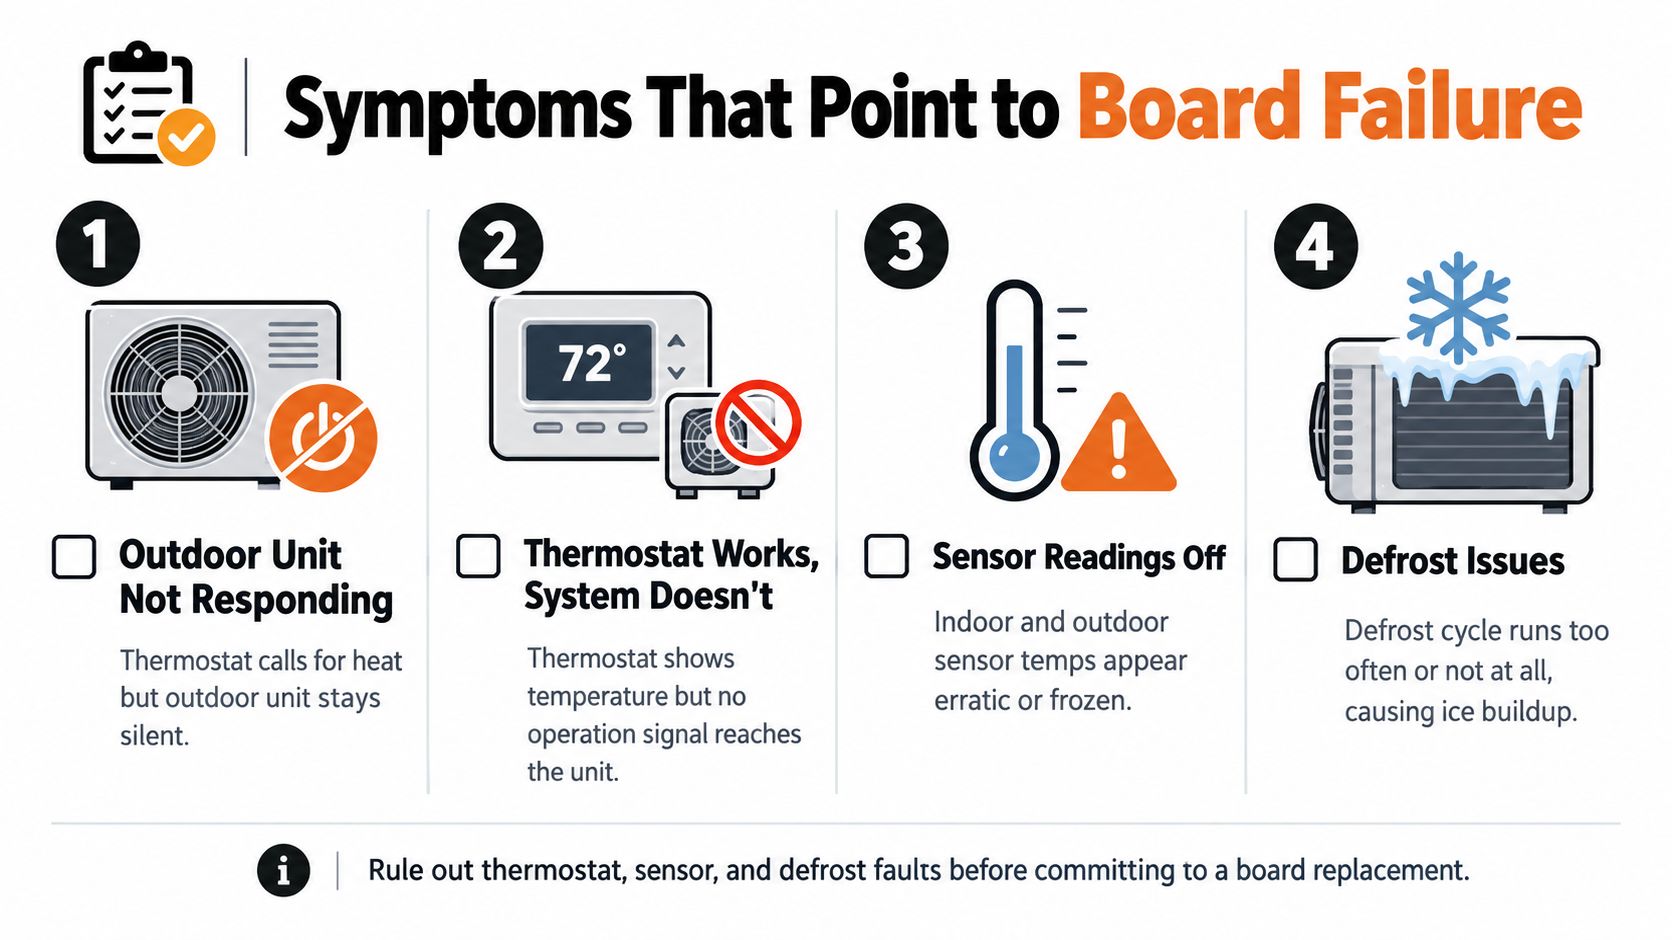
How to separate board faults from lookalikes
A thermostat can display the correct room temperature while failing to deliver a reliable operation signal. A technician can temporarily test the control circuit, including a controlled R-to-Y call where appropriate, and observe whether the board responds with the expected relay click and equipment sequence. This testing should be performed only by someone who understands the unit's wiring and safety controls. Homeowners should use this thermostat troubleshooting guide to understand the possible fault paths, not as permission to bridge unknown terminals.
The reversing valve, defrost board, thermistor, transformer, and fuses deserve attention before replacement. These components can mimic a failed main board, and some are less costly to repair. A board becomes the stronger diagnosis when power and control inputs are correct, the board fails to produce the required outputs, visible damage supports the finding, or the manufacturer's test procedure identifies an internal control failure.
Choosing the Right Replacement Board
Once testing confirms the board is the failed component, choose a replacement by exact compatibility, not appearance. A near-match isn't good enough, particularly on inverter-driven or communicating heat pumps. Check the equipment model number, serial range, board part number, connector layout, fuse rating, jumper settings, and any firmware or configuration requirements.
OEM boards usually come from the manufacturer or an authorized distributor. HVAC supply houses may stock universal aftermarket boards, while salvage channels may offer used or refurbished parts. Each route trades purchase cost against fit, documentation, warranty, and uncertainty.
Factor | OEM Board | Universal Aftermarket Board |
|---|---|---|
Compatibility | Designed for the specified equipment family and connector layout | May fit multiple systems, but requires careful configuration |
Controls | Usually preserves proprietary communication and diagnostic functions | May offer broader fitment but limited manufacturer-specific behavior |
Configuration | Manufacturer settings and documentation generally apply | DIP-switch or jumper setup may be required |
Warranty | Coverage follows the manufacturer or distributor's terms | Coverage varies by seller and product |
Best fit | Inverter-driven, communicating, or warranty-covered equipment | Conventional systems with confirmed compatibility and available documentation |
Public parts listings show boards and replacement kits from roughly $39 to over $279, depending on brand and application (public control-board parts listing). That range is not a quote for your repair. It shows why the exact part number matters more than a generic search for “heat pump control board.”
A universal board can suit a conventional system when the manufacturer's wiring and configuration requirements are clear. On a complex system, a lower purchase price can create a poor trade-off if the substitute lacks proprietary diagnostic codes, communicating controls, or the intended operating sequence. Used boards may cost less, but their age and failure history are often unknown.
Before checkout, cross-reference the part number in the manufacturer's database, confirm the serial range, compare connector positions, and read the return policy. A listing that says “compatible” without identifying your precise model is not enough. Reviewing how to read HVAC wiring diagrams helps you compare the replacement with the unit's wiring diagram instead of trusting a product photograph alone.
Replacing the Board Step by Step
A replacement board is not automatically the answer because a fuse is open or the heat pump will not start. Confirm the failure first, then decide whether the repair belongs in a homeowner inspection or a licensed service call. Board work combines low-voltage controls, line voltage, and capacitors that can retain energy after shutdown.
Inverter equipment requires extra caution. Bosch IDS2.0 safety documentation warns that components may retain 380 V DC and instructs technicians to wait at least 3 minutes before touching the outdoor board (Bosch IDS2.0 safety documentation). If you cannot verify zero voltage with the correct meter and know how to test safely, stop before opening the cabinet.
Use this field sequence:
Isolate every power source. Turn off the breaker and outdoor disconnect. The thermostat being off does not make the equipment safe. Verify zero voltage before touching terminals.
Document the original setup. Photograph the board from several angles. Label each wire and harness by terminal, not just color. Record jumper and DIP-switch positions.
Find the failure cause. Check for burned terminals, damaged insulation, corrosion, loose grounds, rodent damage, blown fuses, and evidence of capacitor or voltage problems. A new board can fail again if the underlying fault remains.
Remove the old board carefully. Release connectors without pulling ribbon cables. Remove the mounting screws or clips, commonly 2 to 4 according to field replacement guidance (control-panel replacement workflow). Keep screw types organized.
Compare both boards. Confirm the model, terminal labels, fuse ratings, connector arrangement, mounting points, jumpers, and DIP switches. Similar dimensions do not prove electrical compatibility.
Mount and reconnect. Install the replacement in the original position. Reconnect one harness at a time using your photographs and the wiring diagram. Check for pinched wires and secure every ground strap.
Restore power and test. Replace all panels before restoring power. Run a complete thermostat call and check heating, cooling, defrost operation, diagnostic LEDs, abnormal sounds, and reversing-valve response.
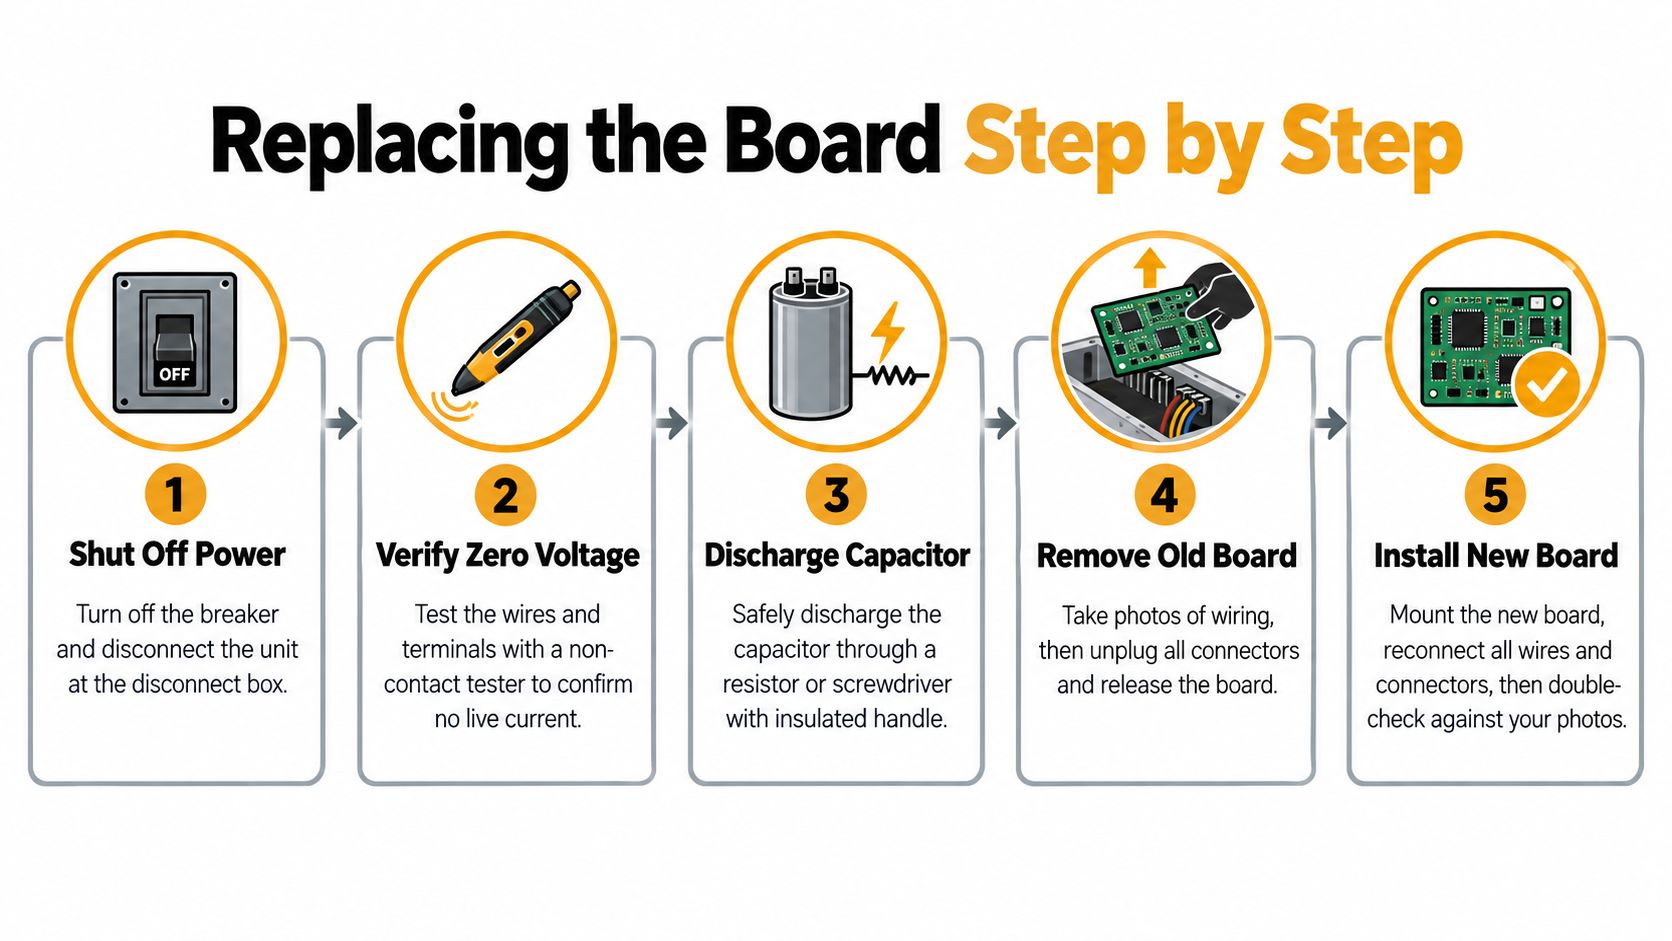
Details that separate a repair from a callback
A reversed thermostat lead can create confusing operating modes. A missing ground strap can cause unreliable behavior. A blower-door safety switch may prevent startup after reassembly, while skipped DIP-switch settings or software resets can leave a communicating system incorrectly configured.
Watch the full operating sequence, not only the first few minutes. Confirm that the thermostat call reaches the equipment, indoor and outdoor sections communicate, the compressor runs normally, the reversing valve shifts when commanded, and diagnostic codes stay clear. A guide by Steel City IT on logic faults provides general context for tracing electronic problems, but the unit's own service information and electrical safety procedures control the repair.
What Heat Pump Board Replacement Actually Costs
A board replacement quote should separate the part, diagnosis, labor, and any trip or emergency fee. Independent HVAC repair pricing puts heat-pump defrost control-board replacement at roughly $120 to $450 total, with many jobs near $200 to $325. Parts are often estimated at $50 to $200, labor at $70 to $250, and diagnosis plus replacement at approximately 0.5 to 3 hours (heat-pump defrost-board pricing guide).
The same pricing reference places universal aftermarket boards around $50 to $100. OEM or proprietary boards for older or high-efficiency equipment can reach $150 to $400. Parts listings also show a much broader market range, from roughly $39 to over $279, because the brand, application, and required features determine which board fits.
Cost Component | Standard Split System | Inverter/Communicating System |
|---|---|---|
Parts | Cost depends on whether an OEM, universal, or refurbished board fits | Exact model, communication features, and configuration can make the board more specialized |
Diagnosis | Usually checks power, controls, sensors, and relay outputs | May require communication and inverter fault analysis |
Labor | A documented, accessible board can be a relatively direct service | Programming, registration, or proprietary diagnostics may add complexity |
Trip or emergency charges | Some companies add a service or after-hours fee | The same type of charge may apply, with troubleshooting often more involved |
Main cost risk | Paying for a board that was not the failed component | Installing a physically compatible part that cannot communicate correctly |
Colder-region emergency calls can add $50 to $150 in labor or trip fees, according to the pricing reference above. Ask whether the diagnostic fee is credited toward the repair. Access, equipment design, testing time, and local pricing can change the final quote.
The lowest part price may produce the most expensive repair if the original cause remains. A surge, shorted compressor, failed capacitor, damaged sensor, or wiring fault can damage a replacement board as well. Before approving the work, ask the technician to identify both the failed component and the condition that may have caused it.
A sound estimate explains what testing confirmed, which board is specified for the equipment, and whether programming or configuration is included. For more context on separating diagnostic work from repair charges, see this guide to decoding heat-pump repair costs.
When to Call a Licensed HVAC Technician
A homeowner can handle only a narrow part of heat pump board replacement. Model-number checks, photos of wiring, filter inspection, and a basic breaker check are reasonable starting points. Confirming a failed board requires electrical testing inside the equipment, and that is a different risk level from replacing a thermostat cover. Local rules may also limit who can perform the work.
Call a licensed technician before ordering parts if the diagnosis is incomplete, the system uses an inverter, or the equipment communicates between boards. Variable-speed and communicating heat pumps may require proprietary firmware, programmed memory, manufacturer-specific procedures, and diagnostic tools. A board can fit correctly and still leave the unit disabled or misconfigured. Inverter equipment can also retain hazardous voltage after power is disconnected, so follow the manufacturer's safety procedure rather than treating the board as a simple low-voltage component.
Professional diagnosis is especially appropriate under these conditions:
The breaker tripped before the failure: A short or power problem may have damaged the board, making it the victim rather than the original cause.
Fuses keep blowing: Replacing the fuse or board without locating the short can produce another failure.
The board shows scorching or melted terminals: Wiring, relays, capacitors, grounding, and connected loads all need inspection.
A compressor tests short to ground: This system-level electrical fault can destroy replacement electronics.
The system is under warranty: Unauthorized work may affect coverage. Check the warranty terms before opening the equipment.
Refrigerant-side work is involved: Leak diagnosis, recovery, charging, and sealed-system repairs require qualified handling and may require permits or certification in your jurisdiction.
The unit is communicating or inverter-driven: Manufacturer procedures and tools may be required for setup and final verification.
A board is only one component in a control system. The best repair protects the replacement from the fault that destroyed the original.
A reliable contractor should explain which tests support the board recommendation, who will perform the diagnosis, whether parts and labor are listed separately, and whether programming or configuration is included. Ask about the diagnostic fee, relevant certification, liability insurance, and experience with your exact heat-pump platform. Use this HVAC contractor selection guide to prepare questions before scheduling service.
For Tucson homeowners, Covenant Aire Solutions provides heat-pump troubleshooting, repair, maintenance, and replacement services, including power-supply and circuit-breaker checks. Those checks should come before approving a board when the evidence is incomplete.
Covenant Aire Solutions can diagnose whether your heat-pump control board has failed, verify the replacement part, and test the system after repair. Visit Covenant Aire Solutions to request service in Tucson and surrounding areas, including help with inverter and conventional heat-pump systems.