A Homeowner's Guide to Air sealing a House
- Dec 15, 2025
- 14 min read
Air sealing your home is hands-down one of the most effective ways to slash your energy bills and make your living space more comfortable. It’s all about finding and plugging up the hundreds of little hidden cracks and gaps that let your expensive conditioned air sneak out and the outside air creep in. If you want a truly energy-efficient home, this is where you start.
Why Air Sealing Your House Is Such a Smart Investment
A lot of homeowners jump straight to big-ticket items like new windows or piling on more insulation. But without proper air sealing, you're just not getting your money's worth.
Think of it this way: insulation is like a thick wool sweater, but air sealing is the windbreaker you wear over it. That sweater won’t do you much good on a windy day without the windbreaker to stop the chill from cutting right through. It's the same in your home; when outside air moves freely through your insulation, its effectiveness plummets.
This is exactly why air sealing a house should be the first step in any energy efficiency project. When you stop that uncontrolled air movement, everything else, from your HVAC system to your insulation, just works better.
More Than Just Stopping Drafts
The perks of a well-sealed home go way beyond just feeling less of a draft on a windy day. The return on your investment shows up in a few key ways:
Lower Energy Bills: Your heating and cooling systems won't have to constantly fight to keep the temperature steady. That translates directly into lower monthly utility costs, and it's the first benefit you'll notice.
Enhanced Indoor Air Quality: Sealing up those gaps means you're also blocking dust, pollen, and other pollutants from getting inside. This is a huge deal here in Tucson, where dust feels like a permanent houseguest.
Improved Home Comfort: You get to say goodbye to those annoying drafts and cold spots. Your home will feel more stable and pleasant all year long, from the brutal summer heat to our cooler desert nights.
The Myth of a "Breathing" House
You might have heard someone say that a house needs to "breathe" through all its cracks and gaps. That's a common misconception, but it’s just not true.
Uncontrolled leaks are not a healthy form of ventilation; they're just inefficient. For a deeper dive, understanding the building envelope is key to grasping how your home functions as a system. The modern standard for a healthy, efficient home is a tight building shell combined with controlled, mechanical ventilation.
A Lawrence Berkeley National Laboratory analysis estimated that improving all U.S. homes to an average airtightness level could reduce residential energy demand by over 10%, with potential annual savings reaching $22 billion.
Getting your home's structure and ductwork sealed properly is a game-changer. If you're wondering how duct sealing fits into this, our guide on the https://www.covenantairesolutions.com/post/your-guide-to-the-cost-of-air-duct-sealing breaks down the costs and benefits.
How to Find Hidden Air Leaks Like a Pro

Before you can start sealing up your home, you have to play detective. The drafts you can feel are just the most obvious culprits; the real energy drain often comes from dozens of tiny, hidden gaps all over your house.
Your first step is a simple visual inspection. Grab a good flashlight and start looking for cracks and gaps where different building materials come together. Pay special attention to the big offenders: the attic, basement, crawl spaces, and exterior walls. These are the spots where a house settles and shifts over time, opening up little highways for air to get in and out.
Simple DIY Leak Detection Methods
You don't need a truck full of expensive gear to start mapping out your home's weak points. A couple of old-school, low-tech tests can tell you a surprising amount about where your conditioned air is escaping.
The classic incense stick test is surprisingly effective. Wait for a windy day, then close all your windows and doors. Turn on your kitchen and bathroom exhaust fans, this creates a slight negative pressure that helps pull outside air in through the leaks. Now, just hold a lit incense stick near common problem areas.
Window and Door Frames: Watch the smoke as you move the stick around the edges. If it wavers, billows, or gets sucked toward the frame, you’ve found a leak.
Electrical Outlets and Switches: These are classic weak spots, especially on exterior walls.
Plumbing Penetrations: Check around any pipe that goes through a wall or floor, like under your sinks or behind the toilet.
Recessed Lighting: Those can-lights in the ceiling are notorious for being leaky.
This one simple test gives you a visual roadmap of exactly where to focus your sealing efforts. For more ideas on hunting down these sneaky gaps, check out our in-depth guide on how to find air leaks and save money by sealing your home.
To help you get started, here’s a quick-reference table of the most common leak locations we see in Tucson homes and what we typically use to seal them.
Air Leak Hotspots and Common Sealing Solutions
Leak Location | Common Cause | Recommended Sealing Material |
|---|---|---|
Attic Hatch/Door | Poor weatherstripping or none at all | Foam weatherstripping tape, rigid foam board |
Recessed Lights | Unsealed housing in the attic | Tenmat covers, fire-rated caulk |
Plumbing Vents | Gaps around pipes in the attic floor | Expanding foam sealant, caulk |
Window & Door Frames | Old or cracked caulk, worn weatherstripping | High-quality caulk, new weatherstripping |
Electrical Outlets | Gaps between the drywall and outlet box | Foam gaskets, caulk |
Sill Plate | Gap between foundation and wood framing | Caulk, expanding foam sealant |
Remember, this is just a starting point. Every home has its own unique set of challenges, but these are the areas that almost always need attention.
The Professional Approach: A Blower Door Test
While DIY methods are a fantastic start, the gold standard for a complete analysis is a professional energy audit that includes a blower door test. This is like getting a full diagnostic check-up for your home's airtightness.
A blower door test uses a powerful, calibrated fan mounted in an exterior doorway to depressurize your house. This process makes it easy for an auditor to use tools like smoke pencils or infrared cameras to pinpoint the exact location and severity of every single leak, even the ones hidden inside walls.
The test gives you a precise measurement of your home's air leakage rate, usually in ACH50 (Air Changes per Hour at 50 Pascals). It completely removes the guesswork. Instead of just sealing what you can see, you get a detailed map of your home's biggest energy-wasting problems, allowing you to prioritize the fixes that will give you the most bang for your buck.
Choosing the Right Tools and Materials
Once you've mapped out all the sneaky air leaks in your home, it’s time to gather your supplies. Walking into a hardware store can feel a little overwhelming, but successful air sealing really just comes down to matching the right product to the right gap. Having the correct tools on hand from the start makes the whole process go a lot smoother.
Your goal isn't just to plug a hole; it's to create a durable, flexible seal that's going to last for years. This means knowing the difference between the main types of sealants and where each one shines. Getting this right saves you from redoing the same work in a year or two.
This simple workflow shows the most common tools used for sealing different types of gaps.As you can see, the approach is pretty straightforward. Small gaps get caulk, bigger ones need foam, and any parts that move, like doors and windows, require weatherstripping.
Sealants: Caulk and Foam
For small cracks and joints that don't move, caulk is your best friend. But not all caulk is created equal.
Acrylic latex caulk is what you want for interior trim, baseboards, and the inside of window frames. It's paintable and cleans up easily with water. For areas that see a lot of moisture or big temperature swings, like exterior window trim or around bathroom and kitchen fixtures, go with 100% silicone caulk. It offers far better flexibility and water resistance.
When you run into larger gaps, especially around plumbing pipes, vents, or wiring holes, expanding spray foam is the way to go. Just be sure to grab the right kind. For delicate areas like the small gaps around new window and door frames, use a low-expansion foam so you don’t accidentally bow the frames. For bigger, non-structural voids, a high-expansion foam will fill the space much more aggressively.
Pro Tip: Always air seal before adding insulation. Air moving through insulation can slash its effectiveness. Think of sealing as putting on a windbreaker that allows your home's insulation (the sweater) to actually do its job and keep you warm.
Gaskets and Weatherstripping
Some of the biggest energy-sucking leaks happen in places designed to move, like your doors and windows. This is where weatherstripping and gaskets become absolutely essential.
V-seal or tension-seal weatherstripping is perfect for the sides of double-hung or sliding windows.
Foam tape is a simple peel-and-stick fix for attic hatches and window air conditioning units.
Door sweeps attach to the bottom of exterior doors to block that notorious gap between the door and the threshold.
And don't forget about the small but mighty foam gaskets that fit behind your outlet and switch plate covers on exterior walls. These are cheap, incredibly easy to install, and stop a surprising amount of air from sneaking in.
Tackling these little penetrations is just as important as sealing larger openings, especially when you think about your HVAC's efficiency. For a complete picture of your system, you might find our homeowner's guide to parts of ductwork useful; it can help you spot even more potential areas for sealing.
A Practical Guide to Sealing Key Areas
Alright, with your detective work done, it’s time to roll up your sleeves and get to the real work of air sealing a house. The trick is to break this project down into smaller, more manageable chunks. If you focus on the areas with the biggest impact first, you’ll see significant progress without feeling overwhelmed.
We're going to tackle this by starting at the very top of the house and working our way down. This method directly counters the powerful "stack effect," that natural phenomenon where warm, conditioned air rises and escapes through your attic, pulling unconditioned air in through the lower levels.
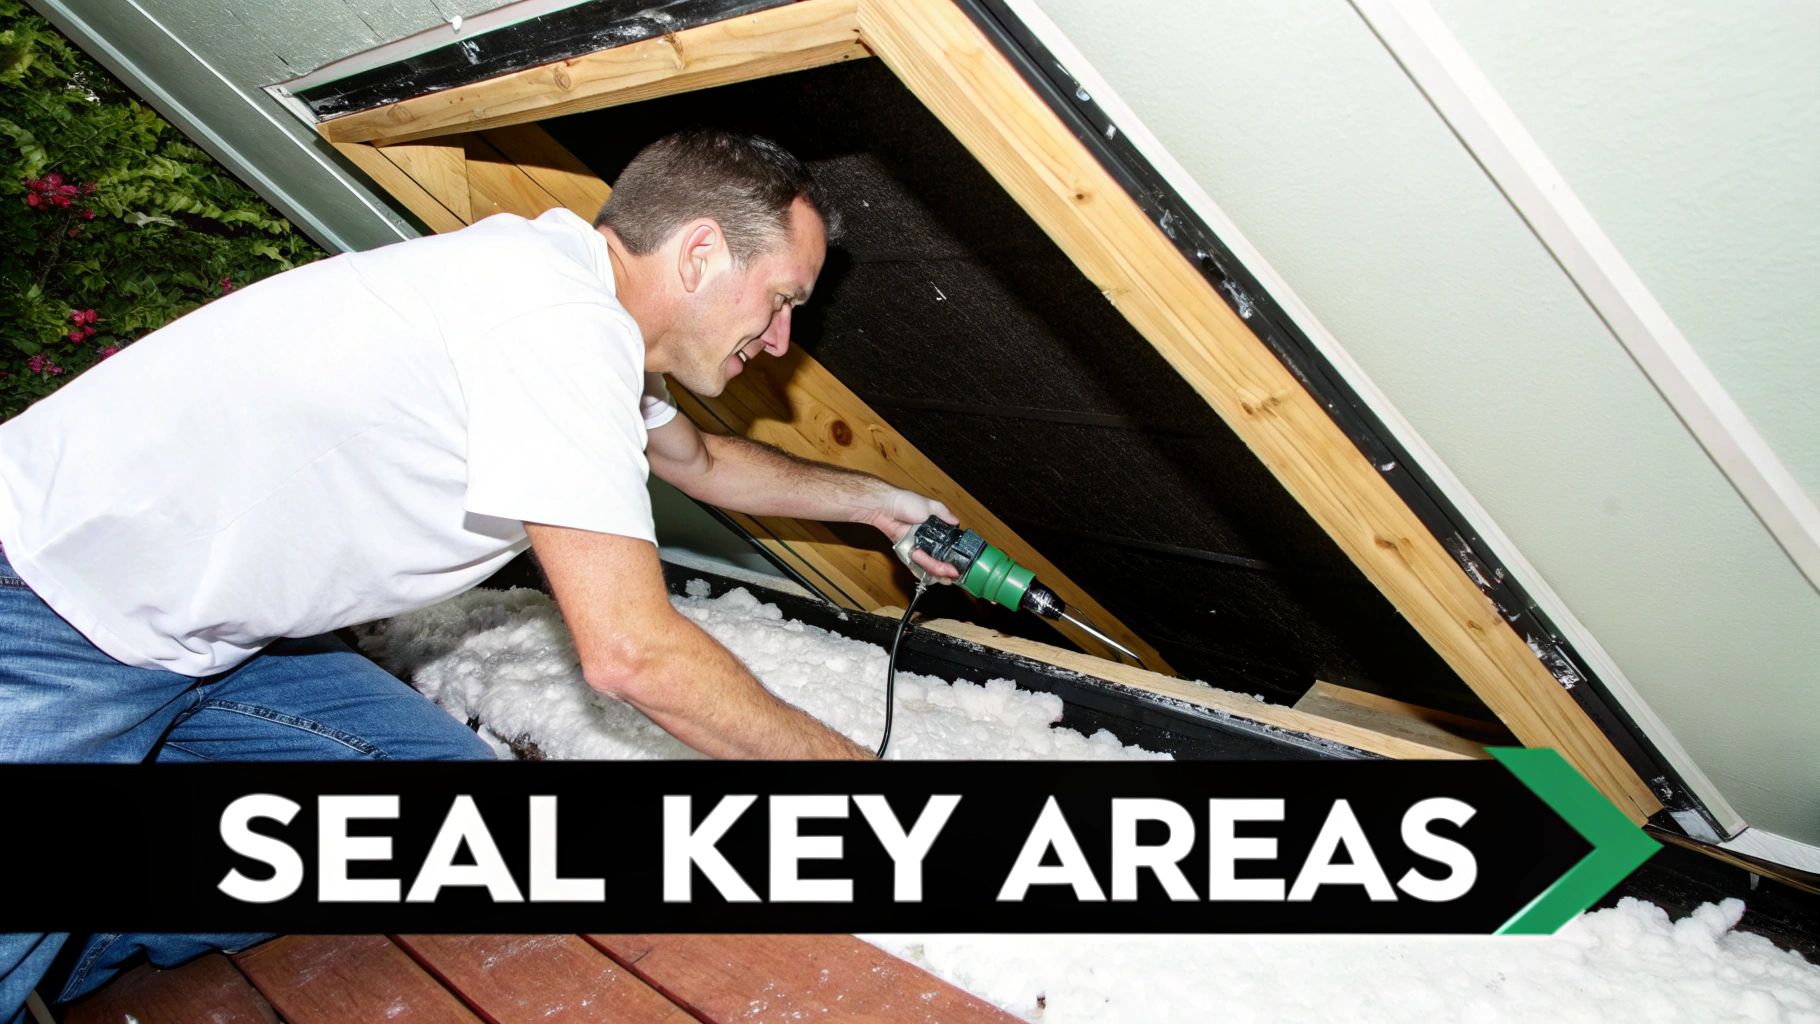
Conquering the Attic Leaks
Your attic is ground zero for major air leaks. It’s usually riddled with holes and penetrations that act like superhighways for your expensive conditioned air to escape. Sealing these gaps before you even think about adding insulation is one of the most effective energy upgrades you can make.
First up, check the attic hatch or access door. This one spot is often a massive source of air leakage. Apply some self-adhesive foam weatherstripping around the perimeter where the door meets the frame. For pull-down stairs, an insulated attic stair cover, basically a pre-made insulated box that fits right over the opening, is a fantastic investment.
Next, you’ll want to locate the top plates, which are the tops of your home’s interior walls. Look for the double row of lumber running across the attic floor. Grab your caulk gun or a can of low-expansion spray foam and seal the long seam where the drywall meets the wood on both sides. It’s a simple step, but it closes off a huge pathway for air.
Finally, hunt down all the penetrations drilled through the attic floor. These are the holes made for things like:
Plumbing pipes and vents
Electrical wiring
Chimney flues
Recessed lighting fixtures
Use spray foam to seal around pipes and wires. Be careful with recessed lights; they can be leaky and a fire hazard. For these, use fire-rated caulk and install airtight covers specifically designed for the job.
Securing the Foundation
Once the attic is buttoned up, the next most critical area is your foundation, specifically where the house framing rests on the concrete. This junction is rarely airtight from the builder and can be a major source of drafts and even moisture.
Your main target down here is the rim joist (sometimes called a band joist). This is the wooden board sitting vertically on top of your foundation wall, forming the outer box of your floor framing. The seams between the rim joist, the sill plate below it, and the subfloor above are notoriously leaky.
According to ENERGY STAR, a focused package of attic and rim-joist air sealing combined with proper insulation can lead to average savings of about 15% on heating and cooling costs. This strategic approach delivers a noticeable reduction in total household energy use.
To seal this area, use expanding foam sealant to fill the gaps between the concrete foundation and the wooden sill plate. Then, apply foam along the top and bottom edges inside each rim joist bay. If you have larger gaps, you can cut pieces of rigid foam board to fit snugly inside the cavity and then seal the edges with foam or caulk.
Sealing Windows and Doors
Windows and doors are the obvious culprits, and for good reason. Even if your windows are relatively new, the original installation might have left unsealed gaps hiding behind the trim. The best defense here is a two-pronged attack using caulk and weatherstripping.
Grab a high-quality, paintable caulk and seal any cracks you find between the window or door frame and the wall on the inside. For the exterior, switch to a durable, exterior-grade silicone caulk to create a waterproof seal that can handle Arizona’s temperature swings.
Next, give your weatherstripping a good look. If it’s compressed, cracked, or missing sections, it’s not doing its job. Replace worn weatherstripping on all your exterior doors and any windows that open. A spot people often forget is the garage door; learning how to install garage door weather stripping can block a massive source of drafts and dust.
Addressing Ducts and Other Missed Spots
Last but not least, don't overlook your HVAC ductwork. Leaky ducts, especially those running through an unconditioned attic or crawlspace, can lose a staggering 20-30% of the conditioned air that moves through them. That's air you're paying to cool that never even reaches your rooms.
Use mastic sealant or specialized foil tape to seal every seam and connection you can safely get to. Properly sealed ducts ensure the air you paid for actually gets where it’s supposed to go. For a deeper dive into this critical task, check out our guide on how to seal air ducts. Tackling these hidden pathways is a crucial final step in a truly complete home air sealing strategy.
Deciding Between DIY and Professional Help
So, you’re ready to tackle those air leaks. The big question now is, should you grab your caulk gun and make it a weekend project, or is it time to call in a pro? The right answer really depends on how deep you want to go and what your comfort level is.
For a motivated homeowner, there are plenty of smaller jobs that are perfect for DIY. You can actually make a pretty significant dent in your home's leakiness with just a few basic skills and one trip to the hardware store.
These are the kinds of high-impact, low-difficulty tasks that are totally within reach:
Caulking around windows and doors. Running a fresh, clean bead of caulk along the interior and exterior trim is a simple but effective fix.
Replacing weatherstripping. If the seals on your doors and windows are cracked, compressed, or falling off, swapping them out is a quick win.
Installing foam gaskets. This is one of the easiest fixes. Just pop off the cover plates on outlets and light switches on your exterior walls and slip these little insulators behind them. It takes minutes.
Knocking out these smaller tasks adds up fast, helping you chip away at drafts and energy loss without a huge investment. But it’s just as important to know when to put the tools down and pick up the phone.
When to Call an Expert
Some air sealing jobs just aren't suited for a DIY approach. They require a deep understanding of building science, specialized tools, and a trained eye to be done correctly and safely. Getting in over your head here can actually create bigger, more expensive problems.
You absolutely want a professional when dealing with complex attic sealing. Navigating around insulation, complex wiring, and ventilation systems is tricky business. And if you have any reason to suspect mold or asbestos, trying to seal those areas yourself can disturb hazardous materials and make the situation much worse.
Most importantly, only a certified technician can perform a blower door test. This is the only way to get a precise, scientific measurement of your home's total air leakage.
Professionals aren't just guessing; they're working toward specific technical standards. Airtightness is measured in air changes per hour (ACH50). For context, the ultra-efficient Passive House standard targets an incredibly low 0.6 ACH50, while many modern energy codes now require new homes to be under 3 ACH50.
This level of precision is exactly why bringing in an expert is often the smartest move. It's especially true for critical systems like your ductwork. Our team specializes in services like Aeroseal duct sealing, a patented process that seals leaks from the inside of the ducts. It’s something you simply can't replicate with tape, and it guarantees comprehensive results for maximum HVAC efficiency.
Got Questions About Air Sealing Your House?
It's totally normal to have a few questions floating around before you dive into a project like this. When it comes to air sealing a house, I hear the same handful of great questions from homeowners all the time. Let's clear them up so you can move forward feeling confident.
One of the first things on everyone's mind is the cost. The honest answer? It really depends. If you’re a weekend warrior tackling some obvious spots with caulk and weatherstripping, you might only spend $100 to $300 on materials.
Things get a bit more involved if you bring in a pro. A full energy audit, complete with a diagnostic blower door test to find every last leak, will typically run you somewhere between $300 and $600. For a comprehensive, professional air sealing job that hits all the tricky spots like attics and crawlspaces, you’re looking at an investment of $1,000 to over $3,000. Think of it as a one-time cost that pays you back year after year in energy savings.
Can My House Become Too Airtight?
This is a fantastic question and a very common concern. The short answer is no, it's incredibly difficult to make a typical existing home "too tight" with standard air sealing methods.
The real goal isn't just to be airtight; it's to control how your house gets fresh air. Uncontrolled drafts from random gaps aren't a healthy or efficient way for a home to "breathe." In fact, modern high-performance homes are built to be extremely tight on purpose. They then use mechanical systems, like an Energy Recovery Ventilator (ERV), to bring in a constant, controlled supply of fresh, filtered air.
For the vast majority of us, sealing up those energy-wasting leaks just stops the bleeding. It doesn't suffocate the house.
Air Sealing Versus Insulation: What’s the Difference?
It’s easy to get these two mixed up, but they do very different jobs. The best way to think about it is that insulation is your home's warm sweater, and air sealing is its windbreaker jacket. On a cold, windy day, you need both to stay comfortable.
Insulation is all about slowing down the transfer of heat through solid things, like your drywall and ceilings.
Air Sealing is about physically stopping air from moving through all the little cracks and gaps in those surfaces.
Air that blows through your insulation (a process called convection) makes it far less effective. That's why we always say you should air seal first, especially in the attic, before adding more insulation. The windbreaker (air sealing) has to go on before the sweater (insulation) can do its job properly.
"What's the difference?" is one of the most common questions I get. Just remember this: Insulation slows heat, but air sealing stops drafts. You can’t have an efficient home without tackling both.
How Often Should I Check My Sealing Work?
Once you've sealed everything up, you don't have to start over every year. A good rule of thumb is to do a quick visual check annually, maybe before summer kicks into high gear or before the first cold snap.
Caulk can shrink and crack over time, and the weatherstripping on a door you use every day will eventually wear out. These are simple things to touch up.
You definitely don't need a professional audit every year. But, it's smart to consider getting another one if you start feeling new drafts, see a sudden jump in your energy bills, or after you've done a major renovation that could have punched new holes in your home's envelope.
Ready to stop guessing where your money is going and start saving? If you want a professional eye to pinpoint exactly where your Tucson home is leaking energy, the team at Covenant Aire Solutions is ready to help. Contact us today to schedule an energy audit and take the first real step toward a more comfortable, efficient home.