A Homeowner's Guide on How to Seal Air Ducts
- Aug 6, 2025
- 11 min read
Updated: Aug 8, 2025
You might not give them a second thought, but those leaky air ducts snaking through your walls and attic are a bigger deal than you think. They can seriously drain your wallet and make your home a lot less comfortable. Learning how to seal them isn't just a minor fix-it job; it's one of the smartest high-impact projects you can tackle to boost your home's efficiency.
Why Sealing Your Air Ducts Is a Smart Investment
Most of us tend to focus on the home improvements we can see, like a new coat of paint or updated fixtures. But that hidden network of ductwork? It has a massive say in your home’s overall health and your monthly budget. When ducts leak, your HVAC system is forced to run constantly, which not only inflates your energy bills but also puts a ton of unnecessary wear and tear on your expensive equipment.
The problem is usually much worse than people realize. It’s not uncommon for 30% or more of the air you’re paying to heat or cool to escape through those unsealed gaps and cracks. That's a huge loss that comes directly out of your pocket every month.
When you take the time to seal these leaks, you're making sure the conditioned air actually gets where it's supposed to go. This translates directly into lower energy use and real, noticeable savings. It’s not a small tweak; it’s a major upgrade to your home's performance.
More Than Just Money Savings
The benefits go well beyond your bank account. Properly sealed ducts deliver real, tangible improvements to your daily life and are a key part of improving overall building energy efficiency. It helps ensure your heating and cooling systems can actually do their jobs effectively.
Here are a few of the biggest perks:
A More Comfortable Home: Sealing leaks is the best way to get rid of those annoying hot and cold spots. You’ll finally get more even, consistent temperatures from one room to the next.
Healthier Indoor Air: Leaks are a two-way street. They don't just let conditioned air out; they also suck in dust, pollen, insulation fibers, and other nasty stuff from your attic, crawlspace, or behind walls. Sealing them cuts down on the amount of junk circulating through the air you breathe.
A Longer-Lasting HVAC System: A sealed duct system means less strain on your furnace and air conditioner. When your equipment doesn't have to work so hard to keep you comfortable, its components last longer, saving you from the headache of a premature, and expensive, replacement.
Getting your ductwork in top shape is really a foundational part of a high-performing HVAC system. If you want to dive deeper into getting the most out of your equipment, check out our complete guide to HVAC system efficiency.
Choosing the Right Tools and Materials for the Job

Before you even think about crawling into that attic or basement, let's talk about supplies. Getting this part right is half the battle. Using the wrong stuff won't just fail to seal your ducts; it can create an even bigger, stickier mess down the road. A trip to the hardware store with the right shopping list ensures your hard work pays off for years to come.
So, what’s the biggest rookie mistake? Grabbing a roll of standard, cloth-backed "duct tape." I know, the name is misleading, but that stuff is genuinely the worst choice for this job. The adhesive just can't handle the temperature swings and humidity inside your ductwork. It gets brittle, cracks, and eventually peels away, leaving your leaks wide open again.
Your goal is a durable, airtight seal that can withstand years of temperature swings. That's why professionals rely on two key materials: mastic sealant and UL 181-rated foil tape. These are the only products you should use for this job.
Mastic: The Hero for Gaps and Joints
Think of mastic sealant as a thick, gooey, rubberized paint for your ducts. This water-based compound is the absolute best thing for sealing up the joints, connections, and any gaps up to a quarter-inch wide. Once it cures, it forms a tough yet flexible seal that expands and contracts right along with your ductwork. It's truly a permanent fix.
Applying it is pretty simple. You can slop it on with a cheap, disposable paintbrush or use a caulk gun for a cleaner bead around connections. Just make sure the tube or tub you grab is specifically rated for HVAC use: this guarantees it's non-toxic and engineered to last in that environment.
Foil Tape for Seams and Small Holes
For those smaller pinholes or for reinforcing long, straight seams, UL 181-rated aluminum foil tape is your best friend. This is not the same as the foil in your kitchen drawer. It’s a heavy-duty, specialized tape with an incredibly aggressive, high-temperature adhesive made specifically for HVAC systems. It creates a solid mechanical bond and a completely airtight barrier.
To make sure you grab the right products, let’s break down what to use and what to leave on the shelf.
Duct Sealing Materials Comparison
Choosing between pro-grade materials and common household stand-ins is a no-brainer when you see how they perform. Here’s a quick guide to help you choose wisely.
Material | Best Use Case | Why It Works | What to Avoid |
|---|---|---|---|
Mastic Sealant | Gaps, joints, and connections where ducts meet. | Cures to a flexible, permanent, and airtight seal that withstands temperature changes. | Standard caulk or silicone, which aren't rated for HVAC temperature fluctuations. |
Foil Tape (UL 181-rated) | Small pinholes and reinforcing seams on flat surfaces. | Has a high-tack, long-lasting adhesive designed for HVAC systems. | Common cloth-backed duct tape, which deteriorates and fails quickly. |
Ultimately, using both mastic for the bigger gaps and foil tape for the smaller fixes will give you a comprehensive, professional-level seal that locks in your conditioned air and saves you money.
How to Find Every Leak in Your Duct System

You can't seal what you can't find. Hunting down every single leak in your duct system is a bit like detective work; you need to look for both the obvious culprits and the sneaky, subtle signs of escaping air. A thorough inspection is the bedrock of a good sealing job, making sure your efforts pay off.
Start with a solid visual check. The first thing I always do is turn on the HVAC system’s fan. This pressurizes the ducts and makes leaks much easier to spot. Get into your attic, basement, or crawlspace and carefully examine all the accessible ductwork, paying extra close attention to the connections and seams.
You're looking for common red flags like:
Disconnected Sections: It sounds obvious, but you'd be surprised how often joints have completely separated. These are huge sources of air loss.
Obvious Gaps or Holes: Look for visible openings, especially where ducts connect to the main unit or where they meet the registers.
Dust Streaks: Escaping air often leaves little tell-tale streaks of dust on the outside of the ductwork right near the leak.
This first pass will probably uncover the biggest problems. But many leaks are too small to see with the naked eye. This is where you need to get a little more creative to find those hidden, energy-sucking gaps.
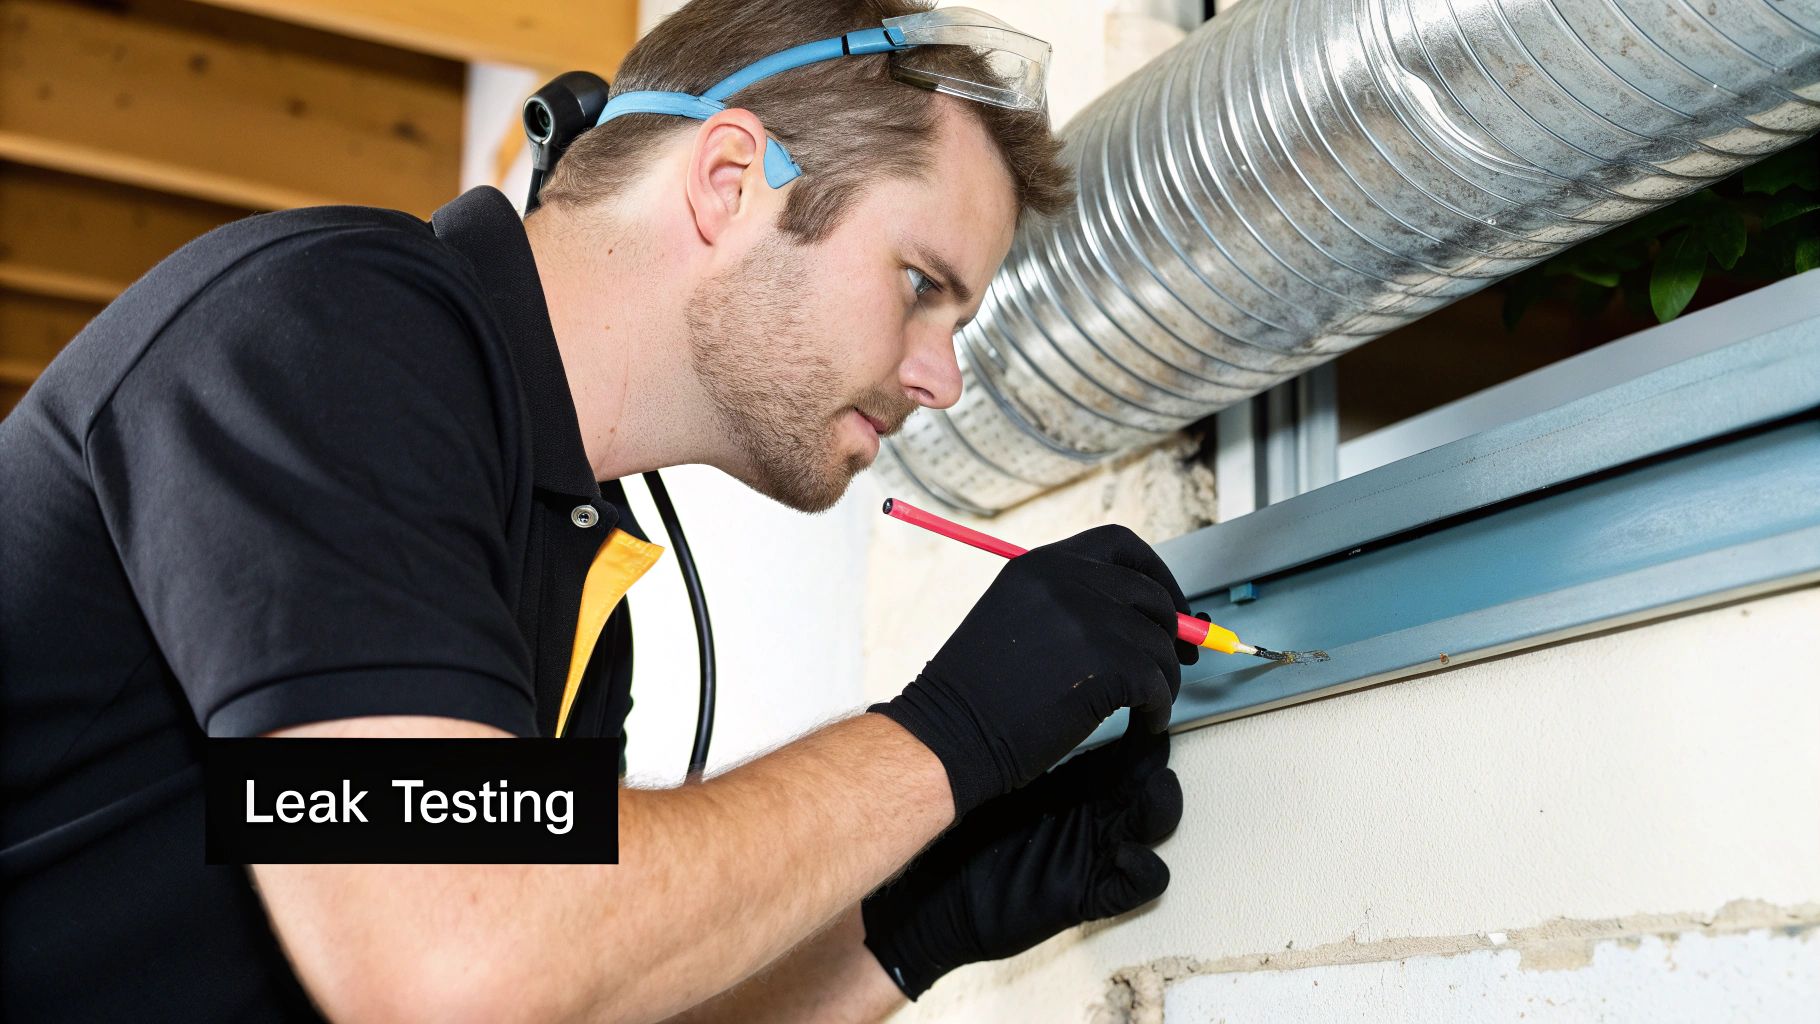
Simple Tricks for Finding Hidden Leaks
For the smaller, less obvious leaks, a simple tool can make all the difference. I recommend lighting a stick of incense or a smoke pen and carefully holding it near the seams and joints of your ductwork. If you see the smoke get blown away from the duct or pulled toward it, you’ve found a leak.
Make sure to mark every leak you find with a permanent marker or a small piece of brightly colored tape. This creates a clear roadmap for when you start sealing everything up. For a deeper dive, our guide on how to find air leaks can help you save money by pinpointing issues all over your house.
The core principles of an airtight system are pretty universal. Even getting some insights into general ducting systems, like those used for kitchen vents, drives home just how important secure connections are. It's a big deal in the industry, too; the global air duct market was valued at USD 13.9 billion in 2021 and is projected to hit USD 22.7 billion by 2031.
Applying Sealant Like a Pro for an Airtight Fix
Alright, you’ve hunted down all the leaks. Now comes the satisfying part: actually sealing them up. This is where all that prep work really shines, turning your leaky, inefficient ductwork into the airtight system it’s supposed to be. The key here isn't just slapping on some goop; it's about the technique. A proper application is what makes the fix permanent and professional-grade.
Before you even think about opening that bucket of mastic, you need to clean the duct surfaces. I can't stress this enough. Ducts get surprisingly grimy with dust and oils, and skipping this step is a rookie mistake. Grab a rag and a basic household cleaner and wipe down every single joint, seam, and hole you marked. A clean surface is non-negotiable if you want the sealant and tape to grab on and create a bond that lasts.
A strong seal is only possible with strong adhesion. Taking just five extra minutes to clean the duct surfaces before applying sealant can be the difference between a repair that lasts for a decade and one that fails in a year.
This visual gives you a great overview of the process, from finding the leaks to using the right materials to get the job done correctly.
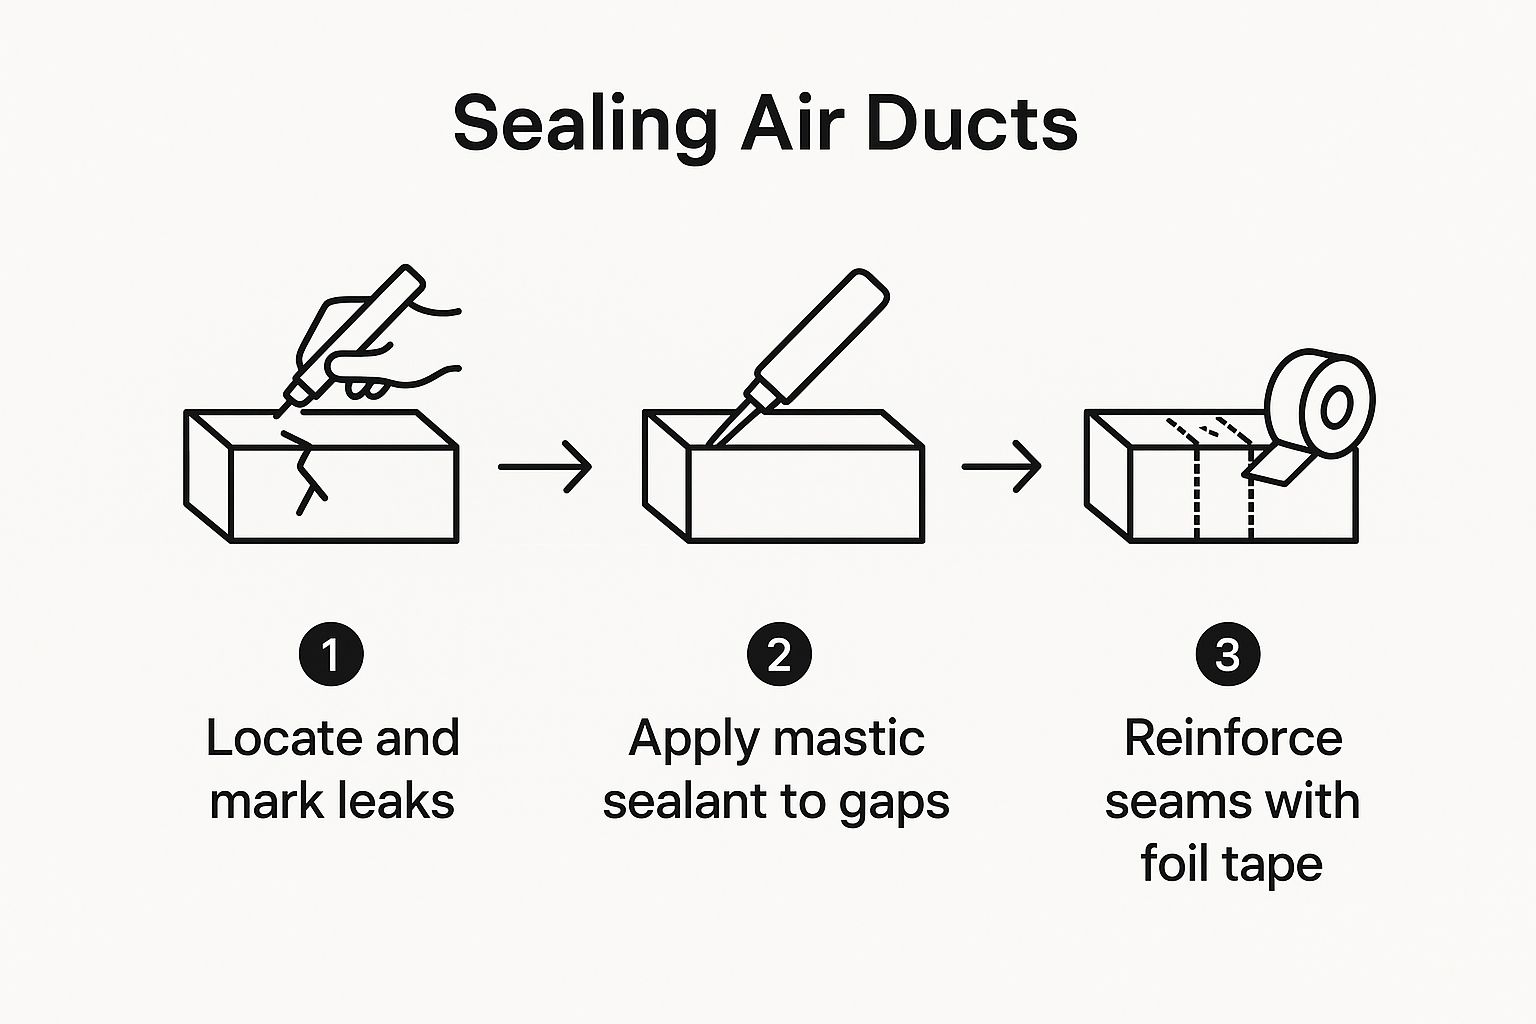
As you can see, sealing is a deliberate process. You have to find the leaks first before you can correctly apply the mastic and tape.
Applying Mastic to Joints and Gaps
Mastic sealant is your heavy hitter for connections, joints, and any gaps up to a quarter-inch wide. Your goal is to apply a generous, even layer that completely covers the seam.
Application Thickness: Aim for a layer about the thickness of a nickel. You want it thick enough to form a solid seal, but not so goopy that it’s dripping everywhere and taking forever to cure.
Spreading Technique: Use a cheap, disposable paintbrush or even your gloved finger to spread the mastic over the connection. Make sure you extend the sealant at least one inch onto the metal on either side of the seam. This creates a wide, robust barrier.
Don't be stingy with it! A common mistake is applying too thin of a layer. A good, thick application ensures the seal can flex as the ducts expand and contract with temperature swings, preventing future cracks.
Using Foil Tape on Holes and Seams
For tiny pinholes or to add extra security over long, straight seams, UL 181-rated foil tape is the tool for the job.
When you put the tape on, press it down hard with a small plastic squeegee or even the back of a spoon. The goal is to smooth out every single air bubble and wrinkle. Those little imperfections can become weak spots in your seal down the road. And just like with mastic, the surface needs to be clean for the tape to stick properly. Speaking of clean, keeping your whole system pristine is a big deal; check out our guide on how to clean air ducts for easy home maintenance for more on that.
Verifying Your Work and Maintaining Your Ducts
Alright, your project doesn't end the moment the sealant dries. The real payoff comes from protecting your hard work, which means running a few final checks and adopting a long-term maintenance mindset. This last step is what ensures the energy savings you just unlocked will stick around for years to come.
After you’ve given the mastic at least several hours (or even a full day) to cure completely, it’s time for a quick post-sealing inspection. Go ahead and turn your HVAC fan back on, then make your way to all the areas you repaired. Run your hand over the sealed joints and seams; you shouldn't feel any air escaping anymore.
This final check is your quality control. It's how you confirm the repairs were effective and gain peace of mind that the major leaks are gone. If you still feel a little draft, don't worry. Just apply another thin layer of mastic or a small piece of foil tape to the trouble spot.
Creating a Long-Term Maintenance Plan
Once you've confirmed your fixes are solid, the goal shifts from repair to prevention. Ductwork isn't static; it can shift and settle over time, and new little issues can pop up. A proactive approach is the best way to catch these small problems before they turn back into major energy wasters.
Taking this proactive approach is becoming more and more common. Driven by a global focus on energy efficiency, the duct sealing system market was valued at USD 2.86 billion in 2024 and is on track to hit USD 3.02 billion by 2025.
A simple yet effective maintenance schedule can make all the difference. Here’s what I recommend:
Annual Visual Inspection: At least once a year, just take a quick look at your accessible ductwork. You're looking for any peeling tape, cracked sealant, or joints that might have separated.
Biannual Professional Check-up: This is the easiest one. Simply align your duct checks with your regular HVAC service. This ensures an expert eye is on your entire system, including the ducts you can't easily see.
This simple routine is the best way to protect your investment. A consistent schedule is the foundation of good HVAC health, and you can learn more by checking out our essential guide on how to maintain your HVAC system. By keeping up with these simple habits, you'll ensure your sealed ducts continue to deliver comfort and savings for the long haul.
Common Questions About Sealing Air Ducts
It’s completely normal to have a few lingering questions before you dive into a project like this. Learning how to seal your own air ducts can feel like a big undertaking, so let's walk through some of the common things that come up. I want to make sure you feel totally confident before you start.
Can You Seal Ducts From the Inside?
This is probably the number one question I get. While there are professional services out there (like Aeroseal) that use a special aerosolized sealant to coat the inside of your ducts, it’s not something you can do yourself. For any DIY project, all effective sealing is done on the exterior of the ducts, right where you can physically see and reach the joints, seams, and connections.
When Should You Call a Pro?
Knowing when to tackle a job yourself versus calling in a professional is key. Sealing up accessible ductwork in a basement or a crawlspace is a fantastic and very manageable DIY project.
But you should seriously think about hiring a pro if:
Most of your ductwork is buried behind drywall or tucked away in a cramped, hard-to-access attic.
You think there might be a major disconnection or serious damage that needs more than just a layer of mastic.
You're looking for a certified test, like a blower door test, to get precise measurements of the air leakage reduction.
The DIY-or-pro decision really boils down to two things: accessibility and the scale of the problem. If you can safely get to most of your ducts, go for it! You can make a huge difference. If not, a pro has the right tools and training to handle it safely and correctly.
How Can You Tell If Sealing Worked?
So, you've put in the work. How do you know if it paid off? The first and most immediate proof will come from your own senses. You should feel a real improvement in the airflow from your vents. Those rooms that always felt stuffy or never quite cooled down should now feel much more comfortable and closer in temperature to the rest of the house.
Next, keep an eye on your energy bills for the next few months. A successful sealing job almost always translates into a noticeable drop in your heating and cooling costs. Your HVAC system just doesn't have to work as hard anymore.
Sealed ducts also drastically cut down on the amount of dust and allergens getting pulled into your home from places like the attic or crawlspace. This is a huge win for your indoor air quality. We've got more top tips for improving indoor air quality in Tucson if that's a priority for you.
What About Insulation?
Finally, a lot of people wonder if they need to insulate their ducts after sealing them. It's a great question. While sealing stops air leaks, insulation prevents heat transfer.
If your ducts run through unconditioned spaces, think attics, crawlspaces, or garages, then adding insulation after you've sealed everything up is the perfect next step. It will lock in those energy savings and boost your home's efficiency even more.
For professional duct sealing, HVAC maintenance, or a comprehensive home energy audit, the certified experts at Covenant Aire Solutions are here to help. Contact us today to ensure your home is comfortable and efficient all year long at https://www.covenantairesolutions.com.