Indoor Air Quality Testing in Tucson | Breathe Healthier
- Jul 17, 2025
- 14 min read
When you hear about "indoor air quality testing," it's easy to picture someone in a lab coat with complex machinery. But at its core, it's simply the process of figuring out what's really in the air you're breathing at home. Using tools, from simple DIY kits to professional-grade monitors, we can measure invisible pollutants like dust, allergens, chemicals, and mold that might be hiding in plain sight.
It’s the first real step you can take to identify specific airborne threats. Once you know what you're dealing with, you can take targeted action to create a genuinely healthier living space.
Why Air Quality Testing Is Crucial in Tucson
The air inside your Tucson home is unlike anywhere else. We live in a truly unique environment where the rugged beauty of the Sonoran Desert collides with modern, energy-efficient home construction. This combination creates a distinct set of indoor air challenges that you just can't afford to ignore.
This isn't about some generic, far-off air pollution. It’s about a specific cocktail of local irritants that find their way inside your home and, more importantly, get trapped there.
The Sonoran Desert's Influence
Think about that fine, reddish-brown dust that seems to settle on everything, no matter how often you clean. That isn’t just dirt. It's a complex mix of particulate matter, minerals, and other microscopic debris unique to our desert. When the wind kicks up or construction starts down the street, it easily infiltrates our homes through the smallest cracks, open windows, and doors.
But it’s not just dust. Our beautiful native plant life—mesquite, palo verde, and ragweed—releases potent pollen that can trigger serious allergic reactions and respiratory issues, even when you're indoors. During certain times of the year, these allergens become a constant, unseen presence in the air we breathe at home.
Monsoon Humidity and Mold Risk
Then comes the much-needed monsoon season. While we all welcome the rain and relief from the summer heat, it brings a sudden surge of humidity into our normally arid climate. This blast of moisture, combined with the warmth inside a typical Tucson home, creates the perfect breeding ground for mold and mildew.
You'll often find it lurking in poorly ventilated spots like bathrooms, laundry rooms, kitchens, and closets.
A musty odor is almost always the first sign of a hidden mold problem. If you start noticing that persistent damp smell after a good monsoon storm, it’s a clear signal that testing your indoor air for mold is a wise move for your family's health.
Modern Homes and Trapped Pollutants
Today’s homes in Tucson are built to be incredibly airtight. This is fantastic for energy efficiency and keeping our cooling bills down. The downside? That tight seal also means that whatever pollutants get inside have no way to get out. What gets in, stays in.
This includes a nasty mix of:
Desert Dust and Allergens: All those local irritants from outside become concentrated indoors.
Volatile Organic Compounds (VOCs): These are chemicals that "off-gas" from everyday items like new furniture, paint, cleaning products, and even those pleasant-smelling air fresheners. They just build up in the air over time.
This growing awareness isn't just a Tucson thing; it's a global movement. In 2025, the market for indoor air quality testing services was valued at around $2.5 billion. It’s projected to climb to nearly $4.2 billion by 2033. This shows a worldwide shift as more and more homeowners recognize the direct link between the air they breathe and their family's well-being. You can dig into the specifics of this market growth and its drivers in recent industry analyses.
Choosing the Right Air Quality Test for Your Home
Figuring out the right way to test your indoor air quality can feel a bit overwhelming. Should you call in the pros, grab a simple DIY kit from the hardware store, or invest in one of those high-tech smart monitors? Honestly, the best answer comes down to what you’re worried about, your budget, and what exactly you’re trying to uncover in your Tucson home.
Making the right call starts with understanding the trade-offs. It's not just about picking a product; it’s about having a smart strategy to get results you can actually do something with.
Professional Services vs. DIY Kits For Indoor Air Quality Testing in Tucson
A professional indoor air quality testing in Tucson is, without a doubt, the most thorough route you can take. Certified technicians show up with calibrated, lab-grade equipment that delivers incredibly accurate data on a whole host of pollutants. This is the best choice for complex issues, for checking if a mold remediation actually worked, or if you need official documentation for a real estate deal. That level of detail, however, comes with a higher price tag.
On the other hand, DIY test kits are affordable and easy to find. They’re usually designed to sniff out one specific thing, like mold or radon.
Think of it this way: if you smell that distinct musty odor in a bathroom after a heavy monsoon storm, a dedicated mold swab kit is a perfect, low-cost first step. It gives you a direct "yes" or "no" answer for that specific concern.
The Role of Smart Air Quality Monitors
For anyone who wants a continuous pulse-check on their home's air, a smart air quality monitor is a fantastic investment. These devices give you real-time data on common culprits like particulate matter (PM2.5), volatile organic compounds (VOCs), and carbon dioxide. They're great for spotting trends, like seeing VOCs spike when you're cleaning or PM2.5 levels climb during a dust storm.
The indoor air quality monitoring market is absolutely booming, projected to grow from USD 9.02 billion in 2025 to USD 12.84 billion by 2030. This explosion is thanks to smarter sensor technology and IoT integration that make these devices more accurate and easier to use than ever. You can learn more about how these technologies are shaping the market.
To help you decide, we've put together a quick comparison of the most common testing methods for homeowners.
Comparison of IAQ Testing Methods for Homeowners
Testing Method | Typical Cost | Key Pollutants Detected | Best For | Primary Limitation |
|---|---|---|---|---|
Professional Service | $400 - $1,000+ | Wide range: Mold, VOCs, Radon, Particulates, Formaldehyde, etc. | Complex issues, post-remediation checks, real estate transactions | Highest cost |
DIY Test Kits | $10 - $100 | Specific pollutants like mold, radon, or lead | Quick, targeted checks for a suspected problem | Limited scope; only tests for one or two pollutants |
Smart Air Monitor | $100 - $300+ | Real-time PM2.5, VOCs, CO2, Humidity, Temperature | Continuous, everyday monitoring and trend spotting | Doesn't identify specific mold types or sources |
This table should give you a clearer picture of which path makes the most sense for your situation. There's no single "best" option—it's all about matching the tool to your specific needs.
This visual decision tree really simplifies the process, helping you connect a specific concern to the right tool.
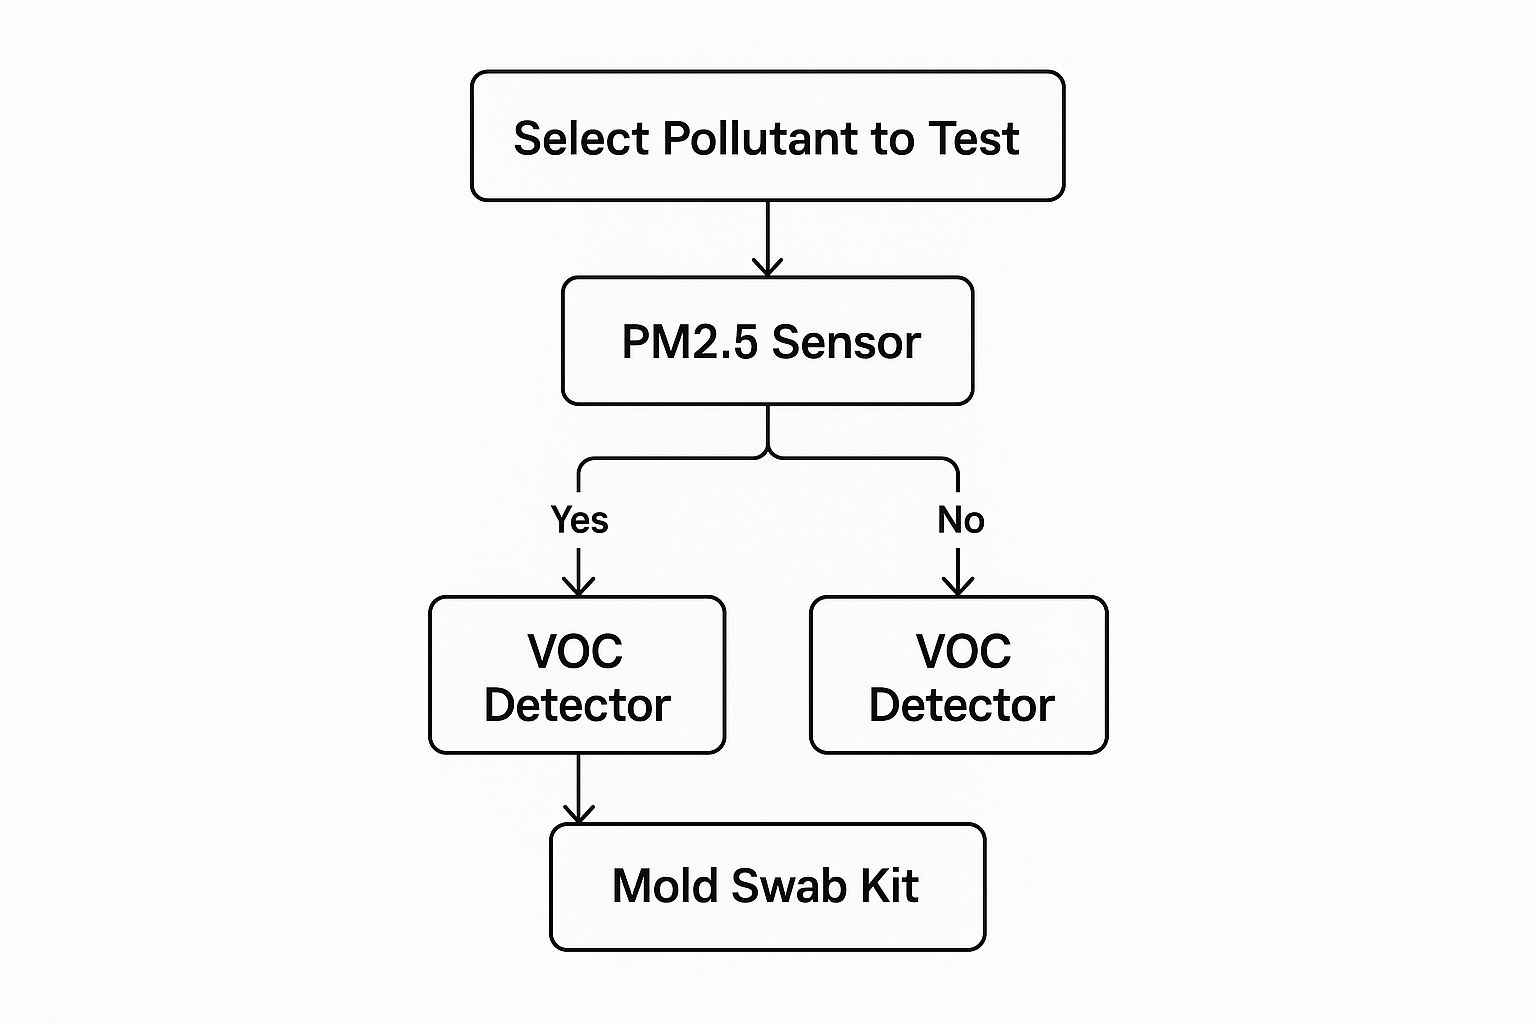
The key takeaway here is to start with your symptom, whether it's excessive dust, a weird chemical smell, or suspected mold, and let that guide your choice.
Ultimately, the goal of any test is to get information that leads to a real solution. Whether your results point to minor tweaks or more significant problems, the next step is always to address the source. If your tests uncover persistent issues, you might need a more robust solution. To see what's out there, check out our guide on choosing whole-house air purification systems, which can tackle a broad spectrum of pollutants across your entire home. This approach helps you move beyond just spot-treating symptoms to creating a consistently healthier environment for your family.
How to Collect an Accurate Air Sample
If you're using a DIY kit, getting reliable data means going beyond the basic instructions on the box. The whole point of testing your indoor air is to get a true snapshot of what you and your family are breathing every single day. To do that, you have to collect your sample under normal living conditions.
This means you shouldn't do anything out of the ordinary. Don't throw open all the windows for hours beforehand if you normally keep them shut. You want to capture the air as it is, not as you wish it were.
Preparing the Room for Testing
Before you even break the seal on your test kit, a little prep work can make all the difference. The goal is to create a controlled environment that accurately reflects your typical day-to-day life inside your Tucson home.
Start by closing all windows and exterior doors in the room you plan to test for at least 12 to 24 hours before you begin. You’ll also want to shut off any portable air purifiers, humidifiers, or dehumidifiers in that specific space. These devices are designed to alter the air, and leaving them on will skew your results, masking the baseline air quality you’re trying to measure.
It's also a smart move to hold off on any activities that can temporarily pump pollutants into the air, such as:
Heavy Cleaning: Using sprays, aerosols, or harsh chemical cleaners will cause a temporary spike in VOCs.
Cooking: Frying or broiling, in particular, can release a surprising amount of particulate matter.
Lighting Candles or Incense: These are direct sources of soot and other airborne particles.
By controlling these variables, you can be confident that the sample you collect represents your home's chronic air quality; not just a reaction to something you did that afternoon.
Proper Placement and Timing for Your Sample
Where you place the sampler is just as important as how you prepped the room. I’ve seen it time and time again: a homeowner puts the test kit in a bad spot and ends up with completely useless data.
The golden rule for placement is to put the sampler in your "breathing zone", about three to five feet off the floor, in an area where your family spends a lot of time, like a living room or bedroom. Keep it away from drafts from open windows, air vents, or doorways.
Be sure to avoid these common placement mistakes:
Next to an air purifier or vent: This will only test the filtered air, not the general air in the room.
In direct sunlight: The heat can sometimes affect the sampling media inside certain kits.
In a corner or behind furniture: You need good, natural air circulation around the sampler for an accurate reading.
The duration of the test is another critical factor. A mold test kit might only need an hour, while a radon test could require several days. Always follow the manufacturer's timing instructions to the letter. Getting the collection time wrong can easily contaminate or invalidate the entire sample.
If your results come back pointing to issues with particulates or allergens, it might be time to take a closer look at your HVAC system's filtration. Understanding what different filters do can make a world of difference. You can learn more by comparing HEPA vs. carbon filters to figure out which type is a better fit for your home's specific needs.
So you’ve run an indoor air quality test, and now you're staring at a report filled with acronyms and numbers. It can feel a little like trying to read a foreign language, but don't worry; that data is the key to understanding exactly what's going on with your home's air.
Think of your indoor air quality testing results as a diagnostic tool. It's designed to pinpoint the hidden issues that could be affecting your family’s health and comfort. Let's break down what those numbers really mean in the real world.
For instance, a sudden spike in VOCs isn't just a random number; it often points directly to something new in your home, like off-gassing from furniture, fresh paint, or even that new cleaning spray you just tried. On the other hand, if you see high PM2.5 levels, that could be anything from cooking smoke and candles to the fine desert dust that’s so common here in Tucson finding its way inside.
Common Pollutants and What They Mean
Your test results will flag a few common culprits, and each one tells a unique story about your home's environment. Think of them as clues that lead you right to the source of the problem.
Here are the main players you’ll almost always see on a report:
Particulate Matter (PM2.5): These are microscopic, inhalable particles from things like desert dust, smoke from wildfires or cooking, and even vehicle exhaust. The EPA considers daily levels below 12 µg/m³ to be good. If you're consistently seeing numbers above 35 µg/m³, it's definitely something to address.
Volatile Organic Compounds (VOCs): These are gases that get released from everyday items like paints, glues, new carpets, and cleaning supplies. While there isn't one single federal standard, anything below 500 µg/m³ is generally considered acceptable. A big jump can often be traced back to a specific new product you've brought into the house.
Carbon Dioxide (CO2): This one's a bit different. It’s not really a pollutant in the traditional sense—it's what we all exhale. But high indoor CO2 levels (anything over 1,000 ppm) are a classic sign of poor ventilation. It means old, stale air is getting trapped inside, and if CO2 is trapped, so are all the other pollutants.
Mold Spores: These results usually come back as a spore count per cubic meter of air. The key here is comparison. You want to see how your indoor levels stack up against the outdoor levels. If your indoor counts are way higher, or if you have mold species inside that aren't present outside, you’ve likely got active mold growth somewhere.
Turning Data into Actionable Steps
Okay, so you have the numbers and you know what they mean. Now what? The next step is connecting the dots.
Did you just paint a room and now your VOC reading is through the roof? That’s a clear sign you need better ventilation. Are your PM2.5 levels consistently high? Here in Tucson, that often means it's time to upgrade your HVAC filter to one that’s better at capturing all that fine desert dust.
Your test results aren't a final judgment; they are a starting point. They give you the power to stop guessing and start tackling the real root causes of poor air quality with targeted, effective solutions.
This focus on air quality is a big deal, and it goes beyond just our homes. It’s a major concern in commercial buildings and schools, too. The market for indoor air quality testing services was valued at around USD 0.7 billion in 2024 and is projected to climb to USD 1.14 billion by 2033. That growth is happening because everyone is recognizing the undeniable link between air quality and well-being. Studies have shown just how much productivity is lost to illnesses stemming from poor indoor air, as detailed in this market analysis.
If you started with a DIY kit and the results are confusing or worrying, don't just guess what to do next. To get a better handle on your options, check out your guide to an air quality home test kit. It can help you figure out if another type of test or a full professional assessment is the right move for your home.
Practical Ways to Improve Your Home's Air Quality
Alright, so you’ve got your indoor air quality test results in hand. That’s a huge first step. But the real win comes from turning that data into action. Think of your report as a personalized playbook; it tells you exactly which pollutants are crashing the party in your home, so you can stop guessing and start fixing.
Now, let's connect those numbers to practical solutions and translate that data into a healthier home.
Solutions for Specific Pollutants
Your action plan should be a direct response to what your report found. For instance, if your tests came back high for desert dust and allergens (a classic Tucson problem), your main focus will be filtration. But if high VOCs are the issue, we'll need to shift our strategy toward ventilation and getting rid of the source.
Scenario 1: Your Test Shows High VOCs
High readings for Volatile Organic Compounds almost always point to chemical off-gassing. We see this a lot with new furniture, a fresh coat of paint, or even certain cleaning supplies. The best, most immediate thing you can do costs nothing: source control and ventilation. Just open windows on opposite sides of your house for 15-20 minutes each day. This creates cross-ventilation that flushes out the stale, chemical-laden air.
For a more permanent fix, it's about being more mindful of what you bring into your home.
Next time you paint, look for low-VOC or zero-VOC options.
Opt for solid wood furniture instead of particleboard, which often contains formaldehyde-based glues.
Ditch the harsh chemicals and switch to simple, natural cleaners like vinegar and water.
Scenario 2: Your Test Shows High Particulates (Dust and Allergens)
For those of us in Tucson constantly battling desert dust and seasonal pollen, the game is all about capture and removal. Your HVAC system is your single most powerful weapon in this fight. A simple upgrade from a basic, flat-panel filter to a high-MERV filter can be a game-changer. I typically recommend a filter rated MERV 11 or MERV 13 for trapping those fine particles like dust, pollen, and pet dander.
Another incredibly effective tool is a standalone HEPA (High-Efficiency Particulate Air) purifier. I always suggest putting one in the bedroom, since you spend a solid chunk of your time there. A true HEPA filter is certified to capture an incredible 99.97% of particles as small as 0.3 microns.
Tackling Mold After a Monsoon
If your indoor air quality testing confirmed you have mold, how you proceed really depends on the scale of the problem. If it's a small, contained spot of surface mold, say, less than 10 square feet on a non-porous surface like bathroom tile, you can often handle it yourself with the right cleaning solution and proper safety gear.
But if the mold is widespread, hiding inside your walls, or growing on porous materials like drywall or carpet, it's absolutely time to call in a professional remediation expert. Trying to DIY a large-scale mold removal can backfire badly, releasing millions of spores into your air and making the problem much, much worse.
To make things even easier, I've put together a quick-reference table. It connects some of the most common pollutants we find in Tucson homes with effective solutions you can start using today.
Common Pollutants and Corresponding Solutions
Pollutant | Primary Source | Low-Cost Solution | Long-Term Investment |
|---|---|---|---|
Particulate Matter (Dust, Pollen) | Desert environment, pets, outdoor air | Upgrade HVAC filter to MERV 11+ | High-quality HEPA air purifier |
Volatile Organic Compounds (VOCs) | Paint, new furniture, cleaning products | Daily ventilation (open windows) | Purchase low/zero-VOC products |
Mold Spores | Damp areas, water leaks after monsoons | Fix leaks, control humidity with a dehumidifier | Professional mold remediation |
Carbon Monoxide (CO) | Faulty gas appliances, attached garage | Install CO detectors on every floor | Annual HVAC & appliance servicing |
This table is a great starting point, but every home is unique. Building a targeted improvement plan based on your specific test results is always the most effective approach.
For an even deeper dive into creating a healthier home environment, check out our top tips for improving indoor air quality in Tucson. It’s packed with more strategies you can implement right away.
Common Questions About Home Air Quality Testing

Probably the number one question I hear is, "How often should I really test my air?" The honest answer is, it depends on your specific situation. As a general rule for peace of mind, running a broad-spectrum test once a year is a great baseline. I often recommend doing it right before or after our intense monsoon season kicks in.
However, some situations are a clear signal to test immediately. Don't wait if:
You notice a new, lingering musty or chemical smell that you can't pin down.
Your home has had any water damage or a leak, no matter how small.
Family members' allergy or asthma symptoms are suddenly getting worse for no obvious reason.
You've just finished a major renovation or brought new furniture or carpet into your home.
Are Smart Air Monitors Really Worth the Money?
This is another big one. Are those smart air quality monitors a useful tool or just another gadget? From my professional experience, they are absolutely worth it for any homeowner who wants to be proactive about their air quality. A DIY test kit is great, but it only gives you a single snapshot in time. A smart monitor, on the other hand, delivers continuous, real-time data right to your phone.
This constant feedback is what makes them so powerful. You can see exactly how everyday activities, like cooking dinner on the stovetop or opening the windows on a dusty day, directly affect your air. It helps you connect cause and effect, turning vague concerns into tangible issues you can actually manage.
When to Skip DIY and Call a Professional
Knowing your limits is key. While DIY kits are fantastic for an initial screening, there are definite times when you need to put down the kit and call a certified professional right away.
These situations demand an expert's touch:
A DIY test comes back with results indicating a significant mold problem.
You need official, legally valid documentation for a real estate sale or a rental issue.
Family members are experiencing unexplained health symptoms that you suspect are linked to your home's air.
A professional service brings a level of accuracy and comprehensive testing that DIY kits simply can't match, giving you definitive answers when it matters most. This professional approach should also include keeping your HVAC system in top shape. A huge piece of that puzzle is simply knowing [how often you should change your AC air filter in Arizona](https://www.covenantairesolutions.com/post/how-often-should-i-change-my-a-c-air-filter-in-arizona)—it's a small task with a massive impact on your air.
Ready to stop guessing and start knowing what's in your air? The team at Covenant Aire Solutions offers professional indoor air quality testing and advanced purification solutions to help your family breathe easier. Schedule your consultation today!