A Homeowner's Guide to Cleaning AC Unit Components
- Oct 20, 2025
- 14 min read
Cleaning your AC unit is one of the single most effective things you can do to boost its efficiency, slash your energy bills, and seriously improve your home's air quality. When you let this simple task slide, dirt and debris pile up, forcing your system to work overtime and dramatically increasing the risk of a costly breakdown.

It's simple: a clean AC is a happy, efficient AC.
Why Cleaning Your AC Is a Smart Investment
Let's be honest, scrubbing your air conditioner probably isn't at the top of your weekend fun list. But what if a little bit of maintenance could be the one thing standing between you and a sweltering summer night without cool air? Or a shockingly high electricity bill?
Regular cleaning is one of the smartest investments you can make for your home's comfort and your wallet.
A clean system has a direct impact on your family’s health, too. All the dust, pollen, and other allergens floating around your home get trapped in a dirty filter. Every time the AC kicks on, it can circulate those irritants right back into the air you breathe. This gunky buildup also creates a damp environment, the perfect breeding ground for mold and bacteria.
The Connection Between Cleanliness and Cost
When coils and filters are clogged with grime, your AC unit has to fight just to pull in air and cool it down. This constant struggle means the system runs longer and uses way more energy to keep your home at the temperature you set on the thermostat.
Think of it like trying to breathe through a stuffy nose; your body has to work much harder for the exact same result.
That extra strain doesn't just inflate your utility bills. It also causes premature wear and tear on critical parts like the compressor and fan motor, ultimately shortening the operational lifespan of the entire unit.
The cumulative effect of neglect is staggering. A poorly maintained air conditioner can suffer a 5% loss in efficiency each year. If left unchecked for five years, that's a potential 20% drop in performance.
Just by cleaning your AC unit regularly, you can lower its electricity consumption by up to 12–15% and extend its lifespan by several years. That makes it a powerful, and surprisingly easy, cost-saving measure.
Benefits Beyond the Obvious
Saving money is great, but a well-maintained AC also provides a more comfortable and consistent living environment. Here are a few key advantages you'll notice right away:
Improved Air Quality: A clean filter and coils mean fewer airborne irritants like dust, pet dander, and pollen are circulating in your home.
Enhanced Cooling Performance: With unobstructed airflow, your system can cool your home faster and more effectively, finally getting rid of those frustrating hot spots.
Fewer Unexpected Breakdowns: Proactive cleaning helps you spot potential issues, like a small leak or a worn part, before they snowball into expensive emergency repairs.
For homeowners who want to maximize these benefits, it's also worth exploring if an AC maintenance plan is worth it. A plan can offer even greater peace of mind and long-term savings. Think of this as your roadmap to better air, lower bills, and a longer-lasting AC unit.
Your Essential AC Cleaning Toolkit
Trying to clean your AC without the right gear is a recipe for disaster. You might get part of the way through, but the results will be messy at best, and potentially dangerous at worst. Pulling together a few key items beforehand is the secret to getting the job done safely, efficiently, and without accidentally breaking something expensive.
We're not talking about a truck full of specialized equipment here. It’s about having the basic tools on hand to protect both you and your HVAC system.
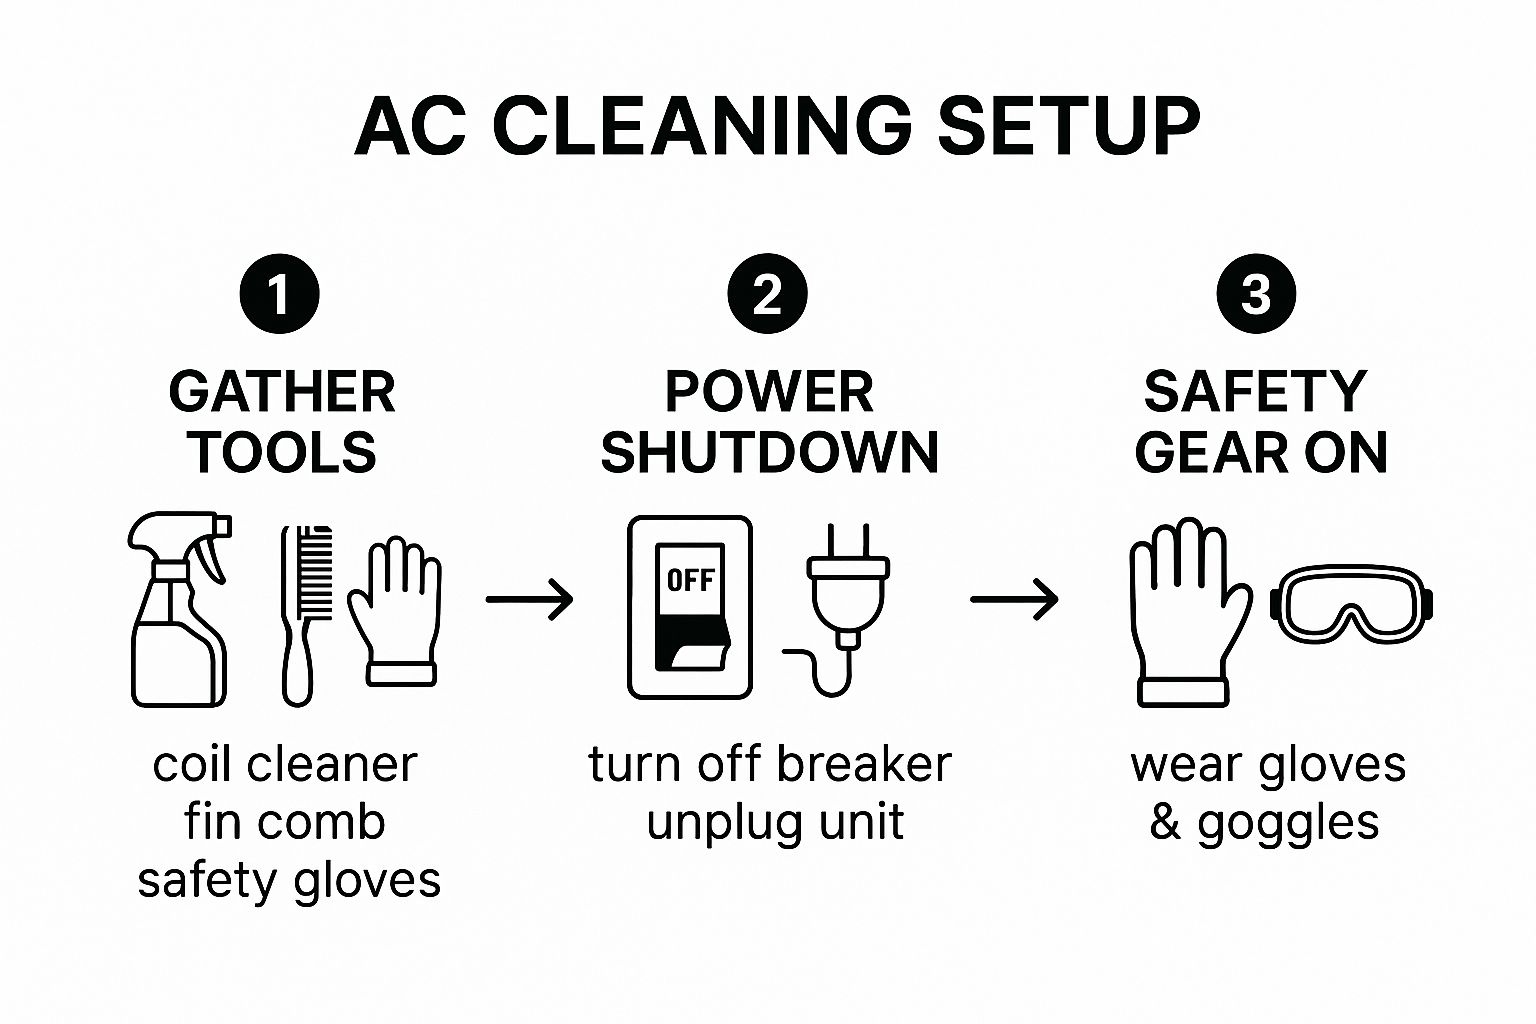
But before you even think about grabbing a screwdriver, there's one step that's absolutely non-negotiable: shutting down all power to the unit.
Prioritizing Safety Above All Else
I can't stress this enough: before you remove a single screw or panel, you must be 100% certain the power is off. Your air conditioner has high-voltage components that can cause serious injury. Skipping this is a gamble you should never take.
Here's the proper shutdown procedure I walk every homeowner through:
Start at the Thermostat: First, just turn the thermostat to the "Off" position. This kills the immediate command for cooling.
Head to the Breaker Box: Next, find your home's main electrical panel. Look for the circuit breaker labeled "AC," "Air Conditioner," or "Condenser" and flip it to "Off."
Find the Outdoor Disconnect: Finally, go outside to the condenser unit. Most have a metal disconnect box mounted on the wall right beside them. Open it and either pull out the disconnect block or flip the switch to "Off."
This simple sequence ensures you have a safe starting point for the whole job.
Following this three-step process creates a secure foundation, minimizing risk from the moment you start until you're completely finished.
Gathering Your Cleaning Supplies
With the power safely cut, it's time to round up your tools. You probably have most of these lying around the garage, but a couple of them are worth a small investment for the huge difference they make.
Having the right tool for the job prevents damage and makes the cleaning process much smoother. Below is a quick checklist of everything you'll need.
Essential Toolkit for AC Cleaning
Item | Purpose | Where to Find |
|---|---|---|
Safety Gloves & Glasses | Protects hands from sharp fins and eyes from debris/cleaner. | Any hardware store |
Screwdriver/Nut Driver | Needed to remove the outer panels or protective grilles. | Your home toolbox |
Soft Brush | Gently removes loose leaves, grass, and cobwebs. | Hardware or cleaning supply store |
Shop Vacuum | Sucks out stubborn debris from inside the unit. | Garage or hardware store |
Garden Hose & Spray Nozzle | Rinses coils gently. NEVER use a pressure washer. | Your backyard or garden center |
Foaming Coil Cleaner | A non-acidic cleaner that lifts grime without damaging metal. | HVAC supply or hardware store |
Fin Comb | A small, inexpensive tool to straighten bent aluminum fins. | HVAC supply or hardware store |
With this kit, you're well-equipped to tackle the job without any last-minute trips to the store.
Using the wrong cleaner can be just as destructive as using too much pressure. Acid-based cleaners can corrode the aluminum fins and copper tubing over time, leading to refrigerant leaks and a complete system failure.
A non-acidic, foaming coil cleaner is specifically made for this task. It expands deep between the fins to chemically lift dirt out without harming the delicate metal.
Likewise, a fin comb is a cheap tool that works wonders. You can use it to gently straighten any bent fins you find, which immediately restores proper airflow and improves efficiency. Speaking of airflow, a dirty filter is the number one cause of poor performance, so it's a good time to check on how often you should change your AC air filter.
Tackling the Outdoor Condenser Unit
Alright, with the power off and your tools handy, let's head outside to the condenser unit. This is the workhorse of your AC system, the part that sits outside and gets blasted by everything nature throws at it: grass clippings, dirt, leaves, and that fuzzy cottonwood stuff that gets everywhere. Giving this unit a good, deep clean is one of the single best things you can do for your AC's health and efficiency.

Our main mission here is to clear out all the gunk that’s clogging the condenser fins. Those thin metal plates are how your AC releases all the heat it has pulled out of your house. When they’re covered in grime, that heat gets trapped, forcing your entire system to work much harder than it should.
Getting Inside the Unit
First things first, we need to get access to the inside. Most condenser units have a protective cage on top that also holds the fan motor. It's usually secured by a handful of screws along the top rim.
Using your screwdriver or nut driver, carefully remove those screws. I always recommend putting them in a magnetic tray or a cup so they don't get lost in the lawn. As you lift the top cage assembly off, go slowly and be mindful of the fan's wiring. There's typically enough slack in the wires to let you gently set the cage off to the side without disconnecting anything, but you don't want to yank it.
With the top off, take a look inside. It’s pretty common to find a whole season's worth of leaves, twigs, and other yard debris piled up at the bottom.
Grab your shop vacuum and suck all of that junk out. Clearing this stuff is important because it prevents a damp, moldy mess from forming and ensures water can drain properly out the bottom.
How to Clean Condenser Fins the Right Way
This next step is the most important part of the whole process. The aluminum fins that wrap around the unit are extremely delicate. You can bend them with your thumb, so your cleaning technique really matters.
The biggest mistake I see homeowners make is grabbing a pressure washer. That high-pressure blast will flatten those delicate fins in seconds, killing your airflow and causing serious, sometimes permanent, damage. All you need is a regular garden hose with a decent spray nozzle.
For the most effective clean, you want to spray from the inside out. This technique pushes all the trapped dirt, pollen, and grime away from the unit, rather than packing it deeper into the fins. Just work your way around the entire unit, spraying from the interior until you see the water running clear down the outside. It’s a pro tip that makes a world of difference.
If you want a more detailed walkthrough, we have a great DIY guide specifically for how to clean condenser coils.
Straightening Bent Fins and Putting It All Back Together
While you’re cleaning, you’ll probably spot some areas where the fins have been bent or crushed. It happens all the time from things like hail, weed eaters, or even just leaning something against the unit. Straightening them is a quick fix that really helps improve efficiency.
Get your fin comb. This is a small, inexpensive tool designed specifically for this job.
Carefully insert the comb into a section of straight fins just above or below the damaged area.
Slowly and gently pull the comb through the bent fins. Let the tool do the work; you don't need to apply a lot of force.
This focus on proper upkeep isn't just a homeowner trend; it's a massive global industry. The HVAC cleaning services market was valued at roughly USD 15 billion in 2024 and is expected to grow to USD 27 billion by 2034. This growth is largely driven by a greater public understanding of how indoor air quality affects our health.
Once the coils are sparkling and the fins are straight, it's time to reassemble. Carefully place the top fan cage back into position, making sure you don't pinch any wires. Then, secure it with the screws you set aside. Just like that, your outdoor unit is clean and ready to run efficiently.
Maintaining Your Indoor Evaporator Unit
Alright, with the outdoor unit taken care of, let's head inside. Your indoor evaporator unit is the other half of the cooling equation, and it's just as important. This is the part that directly handles the air circulating through your home, so keeping it clean isn't just about efficiency, it's about the air your family breathes every single day.
We're going to walk through a few key tasks. We'll start with the easiest and most impactful job: changing the air filter. Then, I'll show you how to safely get to and clean the delicate evaporator coils and, maybe most importantly, how to clear out that notorious condensate drain line to prevent a watery disaster.
The First Line of Defense: Your Air Filter
Think of your HVAC air filter as the gatekeeper for your entire system. Its job is to trap dust, pollen, pet dander, and all the other gunk floating in your air before it gets sucked into the air handler and smothers the sensitive evaporator coils. When that filter gets clogged, it chokes the system, strangling airflow and forcing it to run much longer just to cool your home.
Finding the right filter is a piece of cake. The size is almost always printed right on the side of the one you have, like 16x25x1. When you're picking out a replacement, you'll also see a MERV rating (Minimum Efficiency Reporting Value), which usually goes from 1 to 16. For most homes, a filter in the MERV 8 to 11 range is the sweet spot; it does a great job of filtering particles without being so dense that it restricts airflow.
Gently Cleaning the Evaporator Coils
With the power still off, you need to find the access panel on your indoor air handler. This is the big metal cabinet, usually tucked away in a closet, the attic, or your garage. Once you remove the screws and set the panel aside, you’ll see the A-shaped evaporator coils.
These coils are extremely fragile, just like the ones outside. If you just see a light coating of dust, a soft-bristled brush will do the trick. Just be sure to always brush in the same direction as the fins. For heavier buildup, your best bet is a can of no-rinse, foaming evaporator coil cleaner. You just spray it on, and the foam will expand into the fins, lift the grime, and then liquefy, dripping harmlessly into the drain pan below.
Be extremely careful here. Do not use any harsh chemicals or stiff brushes on these coils. Bending the fins or, worse, causing a puncture can lead to an expensive refrigerant leak, a repair that is definitely not a DIY job.
Clearing the Condensate Drain Line
As your AC works its magic, it pulls a ton of humidity out of the air. All that moisture collects on the evaporator coils and drips into a drain pan. From there, it flows out of your house through a condensate drain line, which is usually just a PVC pipe. This dark, damp environment is a perfect breeding ground for algae, sludge, and mold, which can quickly form a nasty clog.
A clogged drain line is one of the most common reasons people call us for emergency service. When the water can't escape, it backs up, overflows the drain pan, and can cause thousands of dollars in water damage to ceilings, walls, and floors.
The good news? Clearing it is a pretty straightforward DIY task. One of the most effective ways to do it is with a wet/dry shop vacuum.
Find the pipe outside. Locate where the PVC drain pipe exits your house. It's usually near the outdoor condenser unit.
Create a good seal. Use your hand or even a bit of duct tape to form a tight seal between the shop vac hose and the end of the PVC pipe.
Suck out the clog. Turn the vacuum on for about a minute. You'll be amazed (and maybe a little grossed out) by the gunk and sludge it pulls out of the line.
For a deeper clean, you can pour a solution of one part distilled white vinegar and one part water down the line from the indoor unit's access point. This will kill off any lingering algae. You can find more pro tips in our complete guide on how to clean an AC condensate drain line. Trust me, this simple maintenance trick can save you from a major headache down the road.
When to Call in the Pros
Knowing your limits is just as important as knowing how to do the job right. While routine AC cleaning is a powerful DIY skill, some issues are clear signals to step back and let an expert take over. These red flags often point to problems far more complex than simple dirt and debris.
Attempting to fix serious electrical or mechanical failures without proper training and tools is just plain risky. You could cause expensive damage or, worse, create a major safety hazard for your family.
Red Flags That Demand an Expert
If you notice any of the following symptoms, your next step should be calling a licensed technician, not grabbing your toolbox. These signs often indicate deep-seated issues with refrigerant, electrical systems, or major mechanical components that are way beyond the scope of a standard cleaning.
These specific problems require specialized diagnostic equipment and certified knowledge to resolve safely and correctly.
Hissing or Bubbling Sounds: This is the classic signature of a refrigerant leak. Refrigerant is a hazardous substance, and handling it legally and safely requires an EPA certification. Don't mess with this one.
Loud Grinding or Squealing Noises: These awful sounds almost always point to failing bearings in the fan motor or a serious problem with the compressor.
Constantly Tripping Circuit Breaker: If the AC immediately trips the breaker the second it tries to start, there's likely a serious electrical short or a failing motor.
Ice Buildup on Coils: While sometimes caused by a dirty filter, persistent icing often signals low refrigerant levels or other systemic problems that a simple cleaning won't fix.
No Cool Air After Cleaning: If you've done a thorough job cleaning the unit and it still blows warm air, the problem lies deeper within the system.
Remember, the goal of DIY cleaning is preventative maintenance. It's not a substitute for professional diagnostics when your system shows clear signs of malfunction.
While many AC cleaning tasks are DIY-friendly, some situations just warrant a professional. The logic behind knowing when to call a professional for cleaning services applies to many parts of your home, not just your AC.
A professional tune-up goes far beyond just cleaning. For a complete overview, check out our 2025 air conditioner tune-up checklist. This will help you understand the full scope of what a technician inspects to ensure your system is running safely and efficiently.
Got Questions About AC Cleaning? We've Got Answers.
Even with the best guide, you're bound to have a few questions pop up. It happens to everyone. When it comes to cleaning your own AC, a few common ones surface time and again.
Let's clear up any lingering doubts. Think of this as the quick-reference part of the job, where we tackle how often you really need to do this, if those fancy cleaners are a gimmick, and what your next move should be if the cool air still isn't flowing.
How Often Should I Be Cleaning My AC Coils?
This is easily the most common question, and the answer isn't one-size-fits-all. The standard advice is to clean your AC unit, both the inside and outside coils, once a year. For most people, a good spring cleaning is perfect to get the system ready for the summer marathon.
But your environment is the real boss here. Your schedule might need to be more aggressive if you're dealing with:
Pets in the House: Fur and dander are notorious for clogging up filters and coils. If you have furry family members, you might be looking at a cleaning every six months.
High-Pollen Zones: Live near a lot of trees or open fields? Pollen and other plant gunk can quickly plaster your outdoor unit.
The Dreaded Cottonwood: If you have cottonwood trees nearby, you know the drill. That fluffy white stuff can blanket your condenser fins in just a few days, demanding much more frequent attention.
Here's a pro tip: Get in the habit of just glancing at your outdoor unit once a month when it's running hard. If you see a visible blanket of dirt, grass clippings, or fuzz on the fins, it’s time to clean it, no matter how long it's been.
Are Those Expensive Coil Cleaning Sprays Really Worth It?
When you walk down the HVAC aisle, the number of coil cleaners can be overwhelming. So, are they worth the money? While you don't need the priciest can on the shelf, using a proper, non-acidic foaming coil cleaner is absolutely the right move.
These sprays are engineered to do something plain water can't. They foam up and expand deep between the fragile metal fins, chemically breaking down and lifting out stubborn, embedded grime. More importantly, they do it without causing corrosion to the aluminum and copper parts. Never, ever reach for household products like dish soap or kitchen degreasers. Their leftover chemical residue can cause serious, long-term damage.
What If My AC Still Isn't Cooling Right After a Deep Clean?
You've put in the work. The coils are sparkling, the drain line is clear, but the air coming from your vents is still disappointingly lukewarm. What gives?
If a thorough cleaning doesn't fix the problem, it’s a big red flag that the issue is more than just surface dirt. You're likely dealing with something deeper inside the system.
In this situation, the usual suspects are low refrigerant from a leak, a bad capacitor that isn't starting the fan or compressor, or a compressor that's on its last legs. These are definitely not DIY territory. Problems like these require specialized tools and diagnostic expertise, so it's time to call in a certified professional to figure it out and fix it safely.
When your DIY efforts hit a wall, you need a pro you can count on. Covenant Aire Solutions offers expert HVAC diagnostics and repairs to get your home back to comfortable in no time. Schedule your service with us today.