AC Blowing But Not Cold? Here's What to Do
- Nov 16, 2025
- 17 min read
Updated: Nov 18, 2025
When your AC is running, but the air puffing out of the vents feels lukewarm, it's a special kind of summer frustration. More often than not, the culprit is something simple, like a clogged air filter or an incorrect thermostat setting. In my experience, these two issues account for a huge number of service calls, and the good news is you can often fix them yourself in just a few minutes.
Why Your AC Is Blowing Warm Air and What to Check First
Feeling the fan whirring but getting zero relief from the heat is something no homeowner wants to deal with. But an AC that’s blowing warm air doesn’t automatically signal a catastrophic failure. Before you start thinking about worst-case scenarios and expensive repairs, let's walk through the most common problems, starting with the easy stuff.
This systematic approach can save you time, money, and the sweaty discomfort of a warm house. We'll start with the simple oversights before we even get into the more complex mechanical issues.
Starting With the Simplest Checks
Always, always start at the thermostat. It sounds almost too obvious, but you’d be surprised how often settings get accidentally changed. Someone might have bumped it, a brief power flicker could have reset it, or the kids might have been playing with the buttons again.
First, make sure your thermostat is set to COOL, not "Fan" or "Heat." If it’s on the "Fan" setting, the system is doing exactly what you told it to: circulating air. The problem is, it's doing it whether the cooling components are active or not, which just pushes room-temperature air around your house.
Next, look at the temperature setting. For the cooling cycle to actually kick in, the set temperature must be lower than the current room temperature. If you have it set to 78°F and your house is already a comfortable 75°F, that AC is going to stay off.
This infographic gives you a quick visual guide for troubleshooting these first few steps.

As you can see, checking your thermostat and air filter are the foundational first steps. Nail these down before you start worrying about bigger problems that require a professional.
Before diving deeper, here’s a quick checklist to run through. These are the initial, easy-to-check steps any homeowner can take before picking up the phone.
Quick Diagnostic Checklist for Warm AC Air
What to Check | What It Means | Your Next Step |
|---|---|---|
Thermostat Mode | If it's on "Fan" or "Heat," it won't cool. | Set it to COOL. |
Thermostat Temp | If the set temp is higher than the room temp, it won't turn on. | Lower the set temperature a few degrees below the room's current temp. |
Air Filter | A thick layer of gray dust means it's clogged. | Replace it with a new filter. This should be done monthly. |
Circuit Breaker | A tripped breaker for the outdoor unit cuts power. | Check your electrical panel and reset the breaker if tripped. |
Outdoor Unit | Debris, leaves, or dirt can block airflow. | Gently clear away any visible obstructions from around the unit. |
This table covers the basics. If you've gone through these checks and the air is still warm, it's time to consider some of the other common culprits.
Common Culprits Beyond the Thermostat
If your thermostat settings are spot on, the next major suspect is your air filter. A clogged filter is hands down one of the most frequent reasons an AC system stops cooling properly. It literally suffocates your system by restricting airflow, preventing it from pulling in enough warm air to cool down.
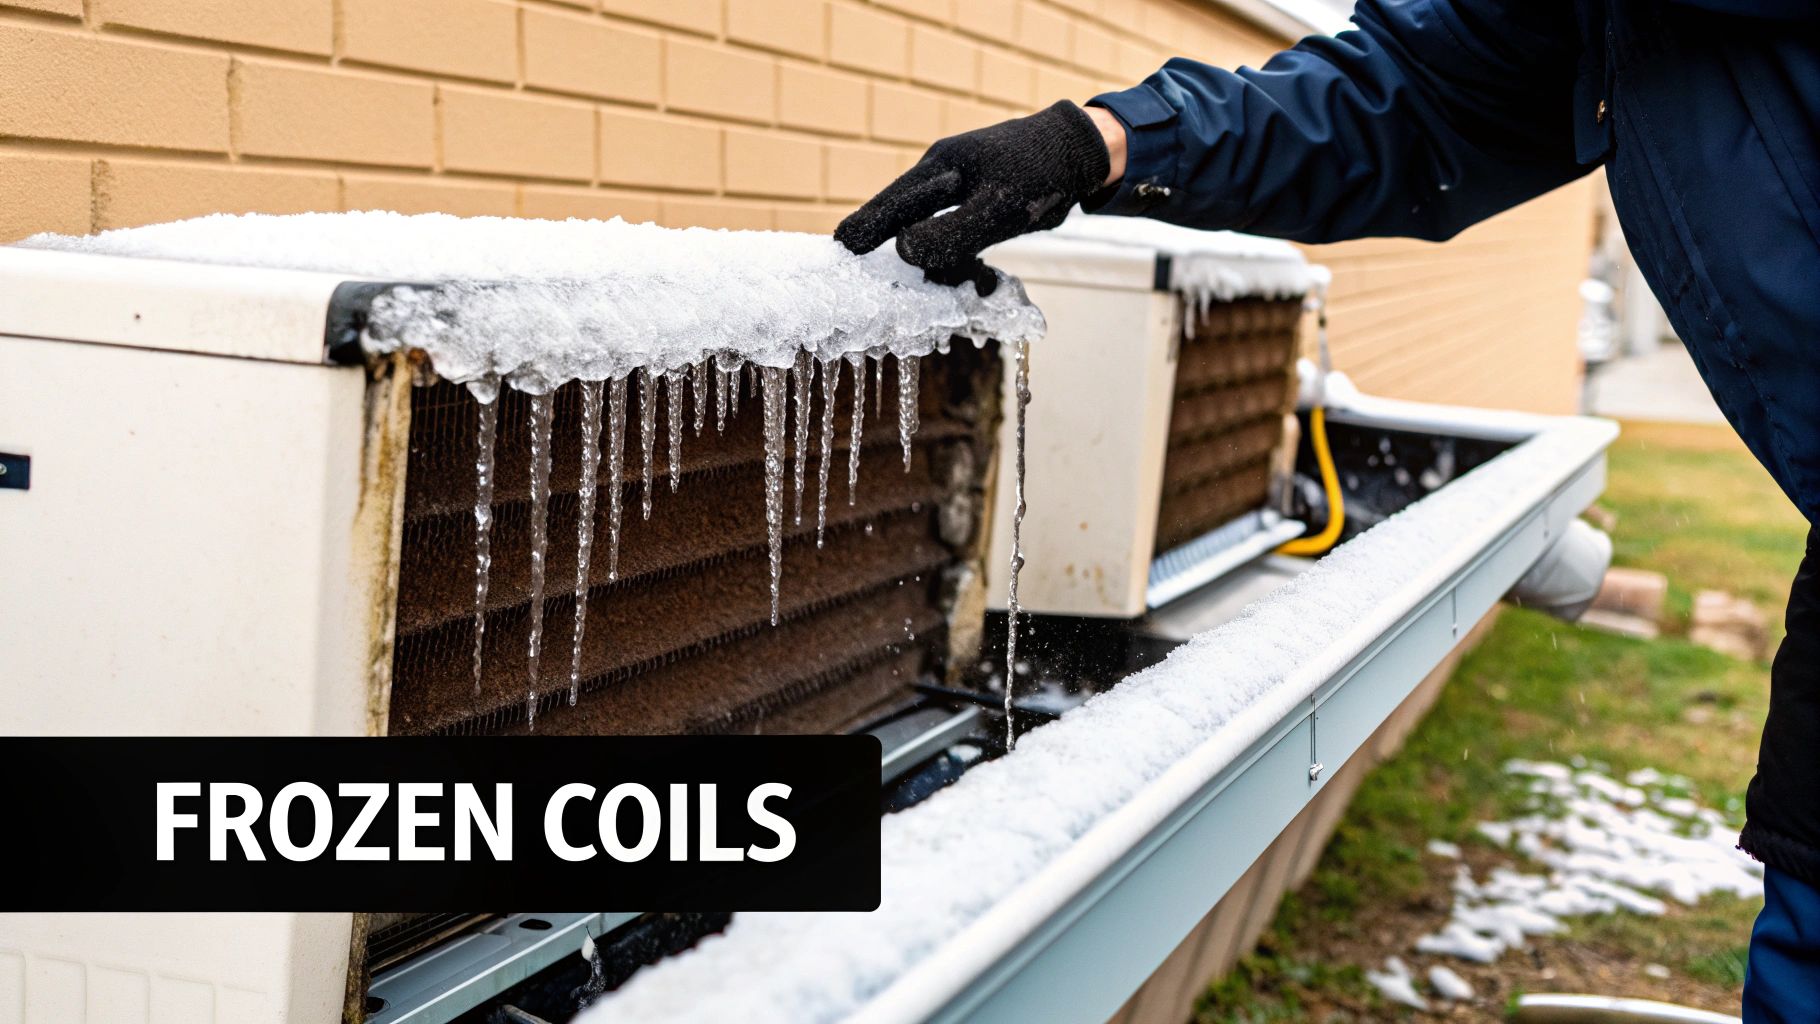
This lack of airflow triggers a chain reaction of problems. The most common one? The evaporator coils inside your unit freeze into a solid block of ice, which brings the entire cooling process to a screeching halt.
Key Takeaway: A dirty air filter is more than an inconvenience. It can lead to frozen coils, put massive strain on your compressor, and make your energy bills skyrocket. Checking it monthly is one of the most important pieces of preventive maintenance you can do.
When an air conditioner is blowing but not cooling, the problem often boils down to three main issues: refrigerant leaks, compressor failures, or clogged filters. Industry data shows that refrigerant leaks are a leading cause, accounting for nearly 30% of residential AC repair calls. A dirty filter is right behind, affecting roughly 20% of systems, while compressor failure happens in about 10-15% of cases. The good news? Regular professional maintenance can slash the likelihood of these issues by almost 40%, highlighting just how crucial preventive care is. You can find more insights on global AC maintenance trends on polytechnique-insights.com.
A Practical Guide to Inspecting Your AC System
When your AC is blowing air but it isn't cold, a little hands-on inspection can often get you straight to the root of the problem, no special tools required. Many of the most common issues are surprisingly simple to spot and even fix yourself. This guide will walk you through a safe, methodical check, starting inside your home and then moving to the outdoor unit.
We’re going to focus on the visual and auditory clues you can pick up on. Following these steps will help you either pinpoint the issue or, at the very least, arm you with valuable information for a technician if you need to make that call.
Checking Your Indoor Equipment
Your troubleshooting journey starts inside, where the most frequent culprits often hide in plain sight. These checks are easy, perfectly safe, and can sometimes solve the problem in just a few minutes.
Your first stop should always be the thermostat. It's the brain of your entire HVAC system, and an incorrect setting is a classic oversight that results in warm air coming from the vents.
Confirm the Mode: Double-check that the system is set to COOL. If it's on "Fan Only," the blower will run, but it’s just circulating room-temperature air without actually engaging the cooling components.
Check the Temperature: Make sure the temperature you've set is lower than the current temperature in the room. If you have it set to 75°F and your home is already 72°F, the cooling cycle simply won't kick on.
After you've confirmed the thermostat settings are correct, your next stop is the air filter. This is hands-down the most critical piece of maintenance for any homeowner. A dirty, clogged filter chokes your system's airflow, which is a primary reason for an AC blowing warm air.
Hold the filter up to a light. If you can't easily see the light passing through it, it's toast. A severely clogged filter can cause the indoor coil to freeze over, completely blocking its ability to cool the air.
Pro Tip: When your AC is running, listen closely. Do you hear any unusual sounds, like a rattling from the vents or a loud humming noise from the indoor air handler? These kinds of noises can be early warning signs of loose parts or a motor that’s starting to struggle.
Inspecting the Outdoor Condenser Unit
Once you've ruled out any issues inside, it's time to head outdoors to the condenser unit. This is the part of your system responsible for releasing all the heat it has pulled out of your home. This is critical: before you touch anything on the outdoor unit, you must shut off its power at the circuit breaker.
Your home's electrical panel will have a breaker specifically labeled for the AC or condenser. Flip it to the "Off" position. This is a non-negotiable safety step to prevent electrical shock or serious injury from the fan blades.
With the power safely off, you can start your visual inspection. The main goal here is to make sure nothing is blocking airflow to the unit.
Clear Debris: Get rid of any leaves, grass clippings, weeds, or branches that are packed around or on top of the condenser. You need at least two feet of clear space around the entire unit for it to breathe properly.
Inspect Condenser Fins: Take a look at the delicate metal fins that wrap around the unit. They should be clean and straight. If they're caked with a layer of dirt, dust, or cottonwood seeds, their ability to release heat is seriously compromised.
A dirty condenser forces your system to work way harder than it should, leading to poor efficiency, higher energy bills, and eventually, a total breakdown. If you see a thick blanket of grime, that’s a clear sign it's time for a good cleaning.
For a detailed walkthrough on how to safely wash your outdoor unit, check out our homeowner’s guide to cleaning AC unit components. That guide gives you specific, step-by-step instructions to help get your system's performance back on track.
Listening for Clues
After you’ve cleared away debris and given the unit a visual once-over, you can head back to the breaker and restore power. Stand back at a safe distance and have someone inside turn the AC on from the thermostat.
Now, listen carefully to the sounds the outdoor unit makes as it tries to start up.
Humming or Clicking: If you hear a distinct hum or a clicking noise but the fan doesn't start spinning, you could be looking at a failed capacitor. This is a really common failure and a relatively inexpensive fix for a professional.
Loud Grinding or Squealing: These are serious red flags. Grinding or squealing noises often point to a major problem with the compressor motor or the fan motor bearings. If you hear these sounds, shut the AC off immediately to prevent catastrophic damage and call a pro.
By taking a few minutes to perform these simple checks, you can often figure out exactly why your AC is blowing but not cold. Sometimes, a fresh filter or a quick cleanup of the outdoor unit is all it takes to feel that cool air flowing again.
What to Do About Frozen Coils and Refrigerant Leaks
Alright, so you’ve already checked the thermostat and swapped out that dirty air filter, but the air coming from your vents is still lukewarm. Now we’re getting into the more serious stuff. Two of the biggest culprits at this stage are frozen evaporator coils and refrigerant leaks, and they often show up together.
These aren't simple maintenance fixes. When you see signs of freezing or suspect a leak, it’s a clear signal that something more significant has gone wrong inside your AC system.
A frozen evaporator coil is exactly what it sounds like: a block of ice where there definitely shouldn't be one. This coil is supposed to absorb heat from your home's air, but when it’s encased in ice, air can't flow through it. The result? Your blower fan just pushes room-temperature air through the vents. Think of the ice as a symptom, a big red flag telling you there's an underlying problem that needs attention.
Spotting the Signs of a Frozen Coil
You don't need to be a pro to spot a frozen coil. The evidence is usually pretty obvious once you know where to look.
Ice, Ice, Baby: You might actually see frost or a solid layer of ice on the copper lines connected to your indoor or outdoor unit.
Mysterious Puddles: When the AC cycles off, that ice starts to melt. If it melts too fast for the drain pan to handle, you'll find water pooling around your indoor air handler.
Weak Airflow: With the coil essentially clogged by ice, the airflow from your vents will feel noticeably weaker than normal.
If you find any of these signs, your first move is to shut the AC system off completely at the thermostat. Next, switch the fan setting to "On." This will blow room-temperature air across the coil, helping it thaw out much faster. Be patient, as this can take several hours. Whatever you do, don't keep running the air conditioner with a frozen coil, you risk causing catastrophic damage to the compressor.
We've got a whole article dedicated to the different reasons this happens, which you can check out here: why an AC unit freezes up.
The Truth About Refrigerant Leaks
The other major reason your AC might be blowing warm is low refrigerant. A lot of people think air conditioners "use up" refrigerant over time, like gas in a car. That's a myth. Your AC is a closed-loop system, meaning the amount of refrigerant it has from day one should last its entire life.
If your system is low, it means you have a leak. Period. This is a big deal, not just because your house isn't getting cool, but because it puts a massive amount of stress on the compressor. That component relies on the flow of refrigerant to help it stay cool, and running without enough is a recipe for disaster.
Key Takeaway: Low refrigerant is always caused by a leak. Simply calling someone for a "top-off" without finding and fixing the source of the leak is a waste of money. It’s a temporary patch that ignores the real problem and is harmful to the environment.
Finding a refrigerant leak on your own is tough, but there are a couple of tell-tale signs to listen and look for:
Hissing or Bubbling: A faint but distinct hissing sound near your indoor or outdoor unit can be the sound of refrigerant gas escaping.
Oily Gunk: Refrigerant is mixed with a special oil to lubricate the compressor. If you see an oily residue on the copper lines or fittings, that's a dead giveaway you've got a leak.
The global demand for air conditioning is exploding, with some experts projecting the number of units to nearly triple to 5.5 billion by 2050. This surge puts a huge strain on our energy grid and highlights just how critical proper maintenance is. A huge chunk of system failures, like the ones that leave you with warm air, come directly from preventable issues like refrigerant leaks.
If you suspect low refrigerant, you'll need professional AC Gas Refilling services, but only after a certified technician has found and repaired the leak. Handling refrigerant requires specialized tools and an EPA certification, so this is definitely not a DIY job.
Understanding Electrical Failures Like the Compressor and Capacitor
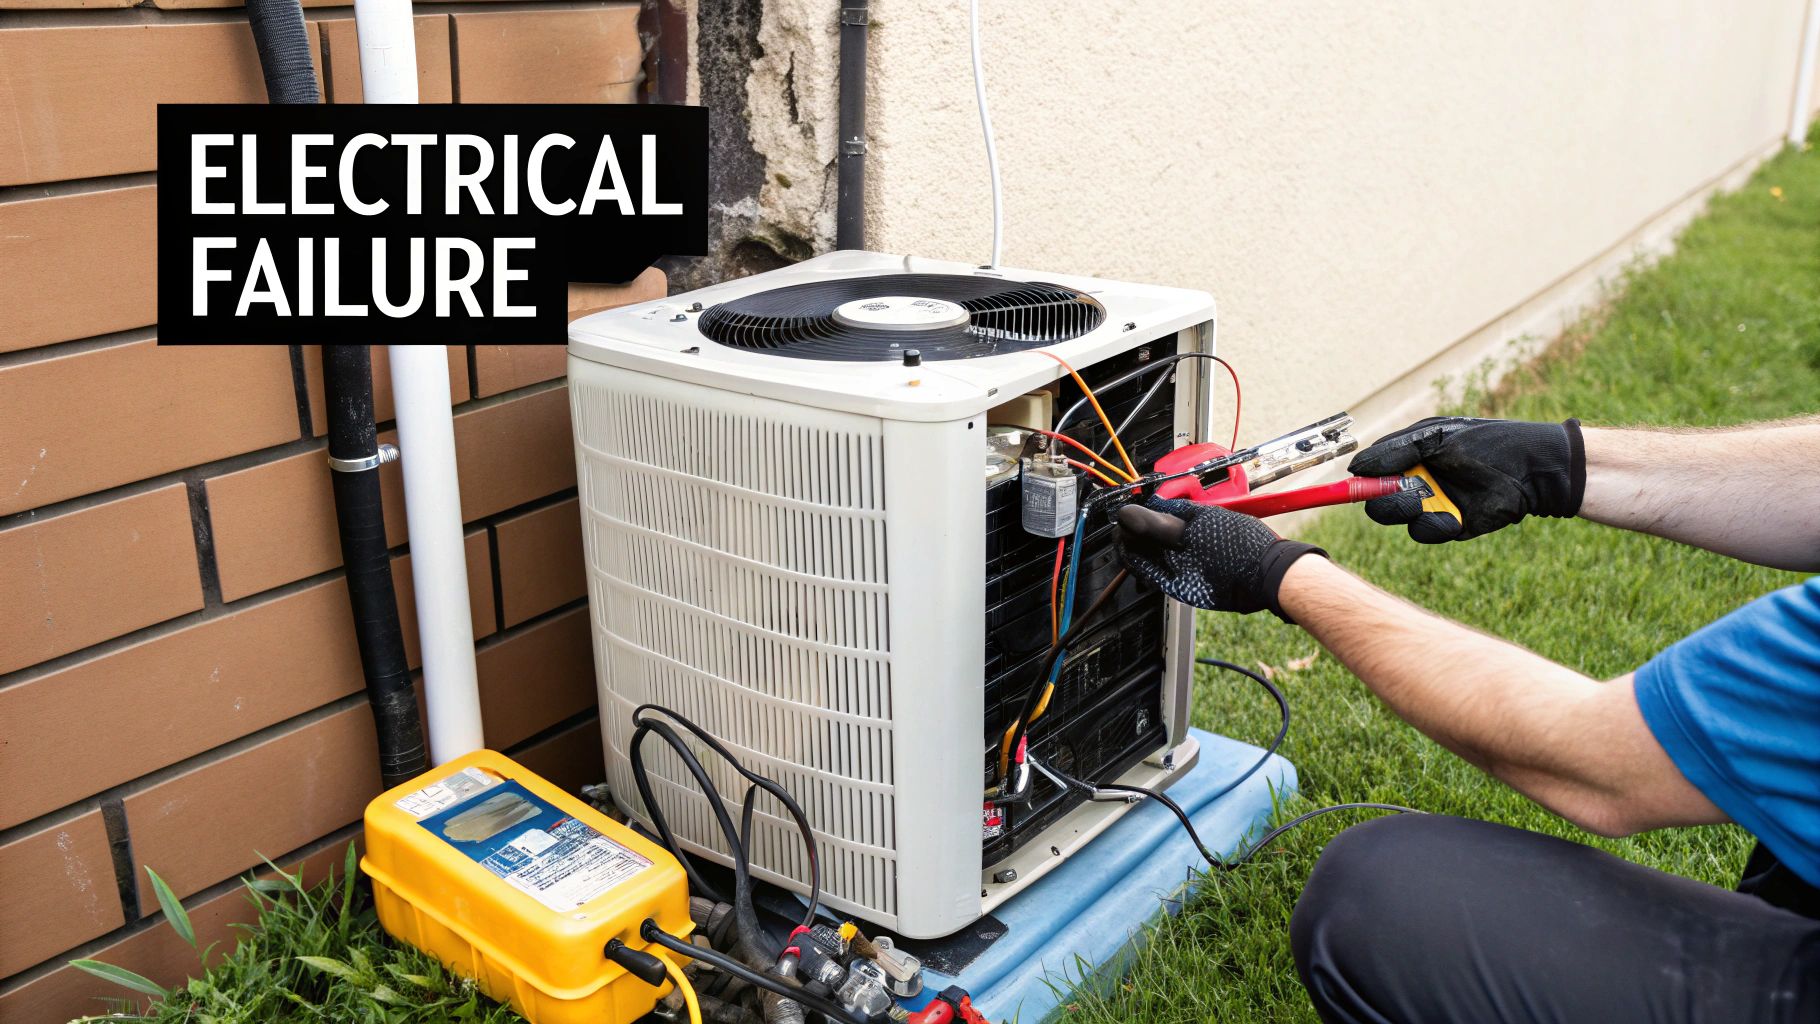
So, you've checked the thermostat and the coils aren't a block of ice, but warm air is still coming through the vents. At this point, we need to look at the possibility of an electrical issue. Tucked away inside your outdoor condenser unit are two workhorses: the compressor and the capacitor. If either one of these gives up the ghost, your system’s cooling ability comes to a screeching halt, even if the fans are still spinning.
Think of the compressor as the heart of your entire air conditioning system. Its one job is to pressurize and circulate refrigerant, the lifeblood that carries heat out of your home. When a compressor fails, that critical heat exchange process stops dead in its tracks. All you’re left with is a glorified fan blowing lukewarm air.
Identifying a Failing Compressor
A failing compressor rarely dies in silence. It almost always gives you warning signs before it completely quits, and recognizing these clues can save you from a much bigger headache down the road. A dead compressor is a major repair, so catching it early is a huge advantage.
One of the most telling signs is a loud, jarring noise coming from the outdoor unit when the AC tries to kick on. We’re not talking about the normal hum of operation. This is a violent shaking, a metallic clanking, or a painful grinding sound. It’s an unmistakable, alarming noise that screams of serious mechanical trouble.
Another major red flag? Your circuit breaker tripping over and over again. The compressor needs a huge jolt of electricity to start up. If it's on its last legs, it can pull way too much current, causing the breaker to trip to protect your home’s electrical system. If you reset the breaker only for it to trip again moments later, that’s a very strong hint that a major electrical fault is happening, and it often points directly to the compressor.
The Role of the Capacitor
Working hand-in-hand with the compressor is the capacitor. If the compressor is the heart, the capacitor is the defibrillator; it delivers the powerful jolt of energy needed to get the heart pumping and keep it running smoothly. This small, cylinder-shaped part stores and releases electricity, giving the compressor and fan motors the kick they need to start.
Capacitor failure is one of the single most common reasons we see for an AC blowing but not cold. Heat is a capacitor’s worst enemy, and the intense Arizona sun is notorious for weakening them over time until they fail. The good news? Swapping out a bad capacitor is a relatively quick and affordable fix for a professional.
A classic symptom of a bad capacitor is a distinct humming or buzzing from the outdoor unit, but the fan and compressor never actually start. You’re hearing the motors trying to turn on, but they lack that essential electrical kick to get going. You might even hear a faint clicking as the system tries, fails, and tries again. Because these electrical parts are so interconnected, it can be tricky to pinpoint the exact issue without the right tools. To see how these components fit together, check out our guide on how to read HVAC wiring diagrams.
Safety Warning: Working on compressors and capacitors involves high voltage and is extremely dangerous. These components can hold a powerful electrical charge even when the power is off. Never attempt to diagnose or replace these parts yourself. This is a job that must be left to a licensed and insured HVAC professional to avoid serious injury or electrocution.
Knowing When to Call an AC Repair Professional
While there's a certain satisfaction in fixing something yourself, especially when it gets that cool air flowing again, it's just as important to know your limits. Some AC symptoms are more than just a minor hiccup; they're clear warning signs that you're dealing with something beyond a simple DIY fix. Trying to push through these issues on your own can quickly turn a manageable repair into a catastrophic failure, not to mention create some serious safety risks.
Knowing when to put down the tools and pick up the phone is a skill in itself. The real goal isn't just to solve the immediate problem, but to protect your home, your family, and your investment in the long run.
Red Flags That Demand an Expert
Let's be clear: some AC problems are non-negotiable. They involve high-voltage components, hazardous materials like refrigerant, or complex machinery that requires specialized diagnostic tools. Trying to tackle these is a recipe for disaster.
If you spot any of the following, it’s time to call in a pro, no questions asked:
You Suspect a Refrigerant Leak: Hear a hissing sound near your AC lines? See a greasy, oily residue on the copper tubing? These are classic signs of a refrigerant leak. Handling refrigerant is not a DIY job; it requires an EPA certification and specialized equipment to do it safely and legally.
Electrical Gremlins: If the outdoor unit just hums without kicking on, or your circuit breaker keeps tripping every time the AC tries to start, you're looking at a serious electrical problem. This could be a failed compressor or a bad capacitor, both of which are high-voltage and dangerous to handle without training.
Ice Keeps Coming Back: A one-time freeze-up can sometimes be chalked up to a dirty filter. But if you’ve thawed the coils and replaced the filter, and the ice returns, it points to a deeper problem. This is often caused by low refrigerant or a significant airflow obstruction that an expert needs to diagnose.
Loud, Unsettling Noises: Your AC unit should hum, not scream. Any loud grinding, squealing, or metallic clanking sounds are the system’s way of crying for help. It could be a failing motor or a compressor on its last legs. Shut the system down immediately to prevent it from tearing itself apart.
These symptoms go way beyond basic maintenance. Our emergency air conditioning repair guide has more info on how to handle these urgent situations until help arrives.
When the Problem Isn't Obvious
Sometimes, your AC is blowing warm air for reasons that have nothing to do with a single broken part. The issue can be more systemic, tied to the overall design and health of your entire HVAC network. This is where a technician's diagnostic experience really shines.
For instance, your ductwork could be the secret villain. Leaky, poorly insulated, or improperly sized ducts can bleed a shocking amount of cold air into your attic or crawlspace before it ever reaches your rooms. You could have a perfectly good AC unit working its heart out, but if the delivery system is compromised, your home will never feel comfortable.
Another classic issue we see all the time is an improperly sized AC unit. If the system is too small for your home, it will run constantly and never hit the target temperature. If it's too big, it will blast the house with cold air so quickly that it shuts off before it has a chance to remove any humidity, leaving you with that cold, clammy feeling. A professional can run a proper load calculation to make sure your equipment is the right fit.
The Value of a Professional Diagnosis
When you call Covenant Aire Solutions, you're getting more than just a quick fix. Our certified technicians perform a comprehensive diagnostic check to pinpoint the root cause of the problem, not just the symptom. This ensures the repair is effective and prevents you from calling us again for the same issue a month later. It's also a chance to spot smaller, developing problems that could leave you stranded in the middle of a brutal Tucson summer.
Keep in mind, our reliance on air conditioning has a huge environmental footprint. Cooling appliances already account for about 20% of global electricity consumption in buildings. With household AC use projected to jump from 27% to 41% by 2050, the strain on our electrical grid and our individual systems is only going to get worse. This increased demand makes issues like an AC blowing warm air even more common, especially for units that aren't running at peak efficiency. Professional maintenance isn't just about comfort, it's about responsible energy use.
Still Have Questions? Here Are Some Common Ones
Even after checking the usual suspects, it's normal to have a few more questions floating around. Homeowners often ask us about repair costs, safety, and best practices. We've put together some straightforward answers to the questions we hear most often to help you figure out what to do next.
Think of this as a quick chat with a pro, giving you the clarity you need before making a decision.
How Much Is This Going to Cost Me?
The cost to fix an AC blowing warm air can be all over the map; it really depends on what’s broken. A simple DIY fix, like grabbing a new air filter, is usually under $50. When you need to call in a professional, the price range gets a lot wider.
Here's a realistic breakdown of what you might be looking at:
Minor Electrical Fixes: One of the most common culprits is a bad capacitor. For a trained technician, this is a relatively quick job, typically running between $150 and $400.
Refrigerant Leak Repairs: This is where things get more involved. The technician has to find the leak, patch it up, and then recharge the system. This can cost anywhere from $400 to over $1,500, depending on how hard the leak is to find and fix.
Major Component Failure: The compressor is the heart of your AC, and replacing it is the most expensive repair you can face. This job can range from $1,800 to $4,000. Honestly, for older units, putting that much money into a repair often doesn't make sense, and it's better to invest in a new, more efficient air conditioner.
Always get an upfront, transparent quote from a professional you trust. A clear diagnosis helps you avoid surprise costs and ensures you're paying for a real solution, not just a quick fix that will fail again.
Can I Just Add More Refrigerant Myself?
In a word: no. You should never, ever try to handle refrigerant on your own. First off, it’s illegal for anyone without an EPA certification to buy or handle refrigerant. It’s a controlled substance for a reason, and it requires specialized gauges and equipment to charge a system correctly.
More importantly, your AC is a sealed system. If you're low on refrigerant, it means you have a leak. Period. Just adding more is like pouring water into a leaky bucket, it's an expensive, temporary "fix" that's also terrible for the environment. A certified pro will find the leak, repair it properly, and then charge the system to the exact level the manufacturer requires.
How Often Should I Really Change My Air Filter?
This depends on your filter and what’s going on inside your house. Those basic, 1-inch fiberglass filters need to be changed every 30 days. If you use the thicker, pleated filters, you can often go longer, sometimes up to 90 days.
But, you’ll need to change it more often if:
You Have Pets: All that fur and dander clogs up a filter in no time.
You Live in a Dusty Area: More dust outside means more dust getting pulled into your system.
Someone Has Allergies or Asthma: Clean filters are your first line of defense for good indoor air quality.
The best rule of thumb is to just look at it every month. Hold it up to a light. If you can’t see the light through it, it’s time for a new one, no matter how long it’s been. For more deep-dive maintenance advice, check out our ultimate AC troubleshooting guide.
Does It Hurt Anything to Keep Running the AC if It’s Not Cooling?
Yes, absolutely. Continuing to run your AC when it’s blowing warm air can turn a small problem into a huge, expensive one. For example, if the issue is a frozen coil, forcing the system to run puts a massive amount of strain on the compressor, the single most expensive part of your unit.
Similarly, if you have a refrigerant leak, running the system with low levels can cause the compressor to overheat and burn out. The safest and smartest thing to do is turn the system off at the thermostat and call a professional. This simple step can prevent a minor repair from snowballing into a full system replacement.
Don't let a stubborn AC get the best of you. If you've gone through the basics and you’re still sweating it out, the certified experts at Covenant Aire Solutions are here to help 24/7. We’ll give you an honest diagnosis and a reliable repair to get your cool back.