How to Clean a Central Air Conditioning Unit for Peak Performance
- Jan 26
- 17 min read
For any homeowner in Tucson, a central air conditioner is less of a luxury and more of a lifeline against the blistering summer heat. Learning how to clean a central air conditioning unit isn't as complicated as it sounds. It’s a pretty straightforward process that breaks down into preparation, cleaning, and reassembly, and doing it right can dramatically boost your AC's efficiency and your home's comfort.
Why a Clean AC is a Tucson Homeowner's Best Friend
When an AC unit gets dirty, it has to work much harder to cool your home. That extra effort drives up your energy bills while delivering weaker, less refreshing air right when you need it most. This guide is your practical, real-world roadmap to cleaning your system and keeping it in fighting shape against the intense Arizona climate.
This simple diagram breaks down the core process of cleaning your central air conditioning unit.
As you can see, the whole project really just boils down to those three key phases. You'll gather your tools and get the unit ready, perform the actual cleaning, and then put everything back together correctly.
To give you a better high-level view, here’s a quick overview of the project from start to finish.
Central AC Cleaning Project Overview
Cleaning Stage | Key Objective | Essential Tools |
|---|---|---|
Preparation & Safety | Safely power down the unit and gather all necessary cleaning supplies. | Screwdriver set, work gloves, safety glasses, shop vacuum |
Cleaning | Thoroughly remove debris, dirt, and buildup from both outdoor and indoor components. | Garden hose, coil cleaner, fin comb, soft brush, drain line tablets |
Reassembly & Testing | Correctly reassemble all components and test the system to ensure proper function. | Screwdriver set, owner's manual (for reference) |
This table maps out the journey, but the real value comes from understanding why each step matters.
The Value of Regular Maintenance
Preventive care isn't just about avoiding problems; it translates directly into lower energy costs, fewer emergency repair calls, and much better indoor air quality. Here in Tucson, where our AC units are running almost nonstop for months, skipping this task is a surefire recipe for sky-high utility bills and an eventual system failure.
It's surprising, but statistics show that only 43% of Americans have yearly maintenance performed on their AC units. Yet, those who do see their systems last approximately 40% longer than those that receive no regular care.
For Tucson residents, proactive cleaning before the summer heat arrives isn't just a good idea; it's an essential survival strategy. A clean system is far less likely to break down during a critical heatwave, saving you from miserable days and expensive emergency service fees.
A well-maintained unit doesn't just cool your home more effectively; it also improves the very air you breathe. By clearing out all the dust, pollen, and other gunk, you’re taking a huge step toward a healthier home. If you're interested in going further, check out our other top tips for improving indoor air quality in Tucson.
Now, let's get into what you'll need to get this done.
Gathering Your Tools and Prepping for a Safe Cleanup
Before you even think about picking up a tool, let's talk about the single most important part of this whole process: creating a safe workspace. Seriously, this isn't just a friendly suggestion, it's the non-negotiable first step that keeps you safe and makes sure the job gets done right. A few minutes of prep here will save you a world of headaches later.
Your absolute first move is to kill the power to your outdoor condenser unit. Don't rush this. Central air conditioners run on high voltage, typically 240 volts, which is more than enough to cause a very bad day. To be 100% certain the unit is dead, you need to cut the power at two different spots.
Your Safety-First Power-Down Procedure
First, find the circuit breaker for your air conditioner in your home's main electrical panel. It’s almost always a big, double-pole breaker and should have a label like "AC," "Air Conditioner," or "Condenser." Flip that sucker to the "OFF" position.
Next, go outside to your condenser. You'll see a metal shutoff box mounted on the wall right next to it. Open that box. Inside, you'll either find a disconnect block you can pull straight out or a switch to flip to "OFF." With both the breaker and the exterior shutoff disabled, the unit is finally safe to work on.
This two-step power-down is your most critical safety net. Never assume the unit is off just from flipping the breaker inside. Always, always confirm it at the outdoor shutoff box, too. It’s a simple habit that completely eliminates the risk of electrical shock.
Now that the power is safely off, you can get your gear together and prep the area. Having everything you need within arm's reach means you won't have to stop halfway through to go digging through the garage.
Assembling Your AC Cleaning Toolkit
Think of this as your mission kit. The right tools make any job faster and easier, and this one is no different. You don't need a truck full of specialized equipment, but a few key items are essential for getting a deep clean.
Here's what I recommend having on hand:
Work Gloves: Good, sturdy gloves are a must. They'll protect your hands from the sharp metal fins and any cleaning chemicals.
Safety Glasses: You don't want dirt, leaves, or cleaner spray getting in your eyes. This is a non-negotiable.
Shop Vacuum with a Soft Brush Attachment: This is perfect for sucking up all the loose stuff, like leaves, grass clippings, and cobwebs, from inside and around the unit.
Garden Hose with a Spray Nozzle: You'll need this for rinsing. A crucial tip: Never use a pressure washer. It's way too powerful and will absolutely destroy the delicate aluminum fins.
Commercial AC Coil Cleaner: Get a can of non-acidic, foaming cleaner made specifically for HVAC coils. The foam clings to the fins and does a great job dissolving built-up grime.
Fin Comb: This little tool is a lifesaver. It’s cheap and perfect for gently straightening out any bent fins on the coils.
Screwdriver or Nut Driver: You’ll need this to take the top grille and fan assembly off.
With your tools gathered, there's just one last prep step: clear the area. Your AC needs to breathe. Trim back any bushes, weeds, or other plants to create at least two feet of clear space on all sides of the unit. This simple bit of yard work makes a huge difference in airflow and efficiency.
If you're curious to learn more about how all these pieces fit together, our homeowner's guide to the parts of a central air conditioning unit is a great resource.
Cleaning Your Outdoor Condenser Unit
Alright, with the prep work done, it's time to get your hands dirty and clean the heart of your outdoor system: the condenser unit. Think of this metal box as the lungs of your AC. It’s constantly breathing in the Tucson air, which, as we know, is full of dust, pollen, leaves, and all sorts of other debris.
Over time, that junk builds up and acts like a thick, insulating blanket, forcing your AC to work way harder than it should to push heat out of your home. Getting this part clean is probably the single most impactful thing you can do for your system's efficiency.
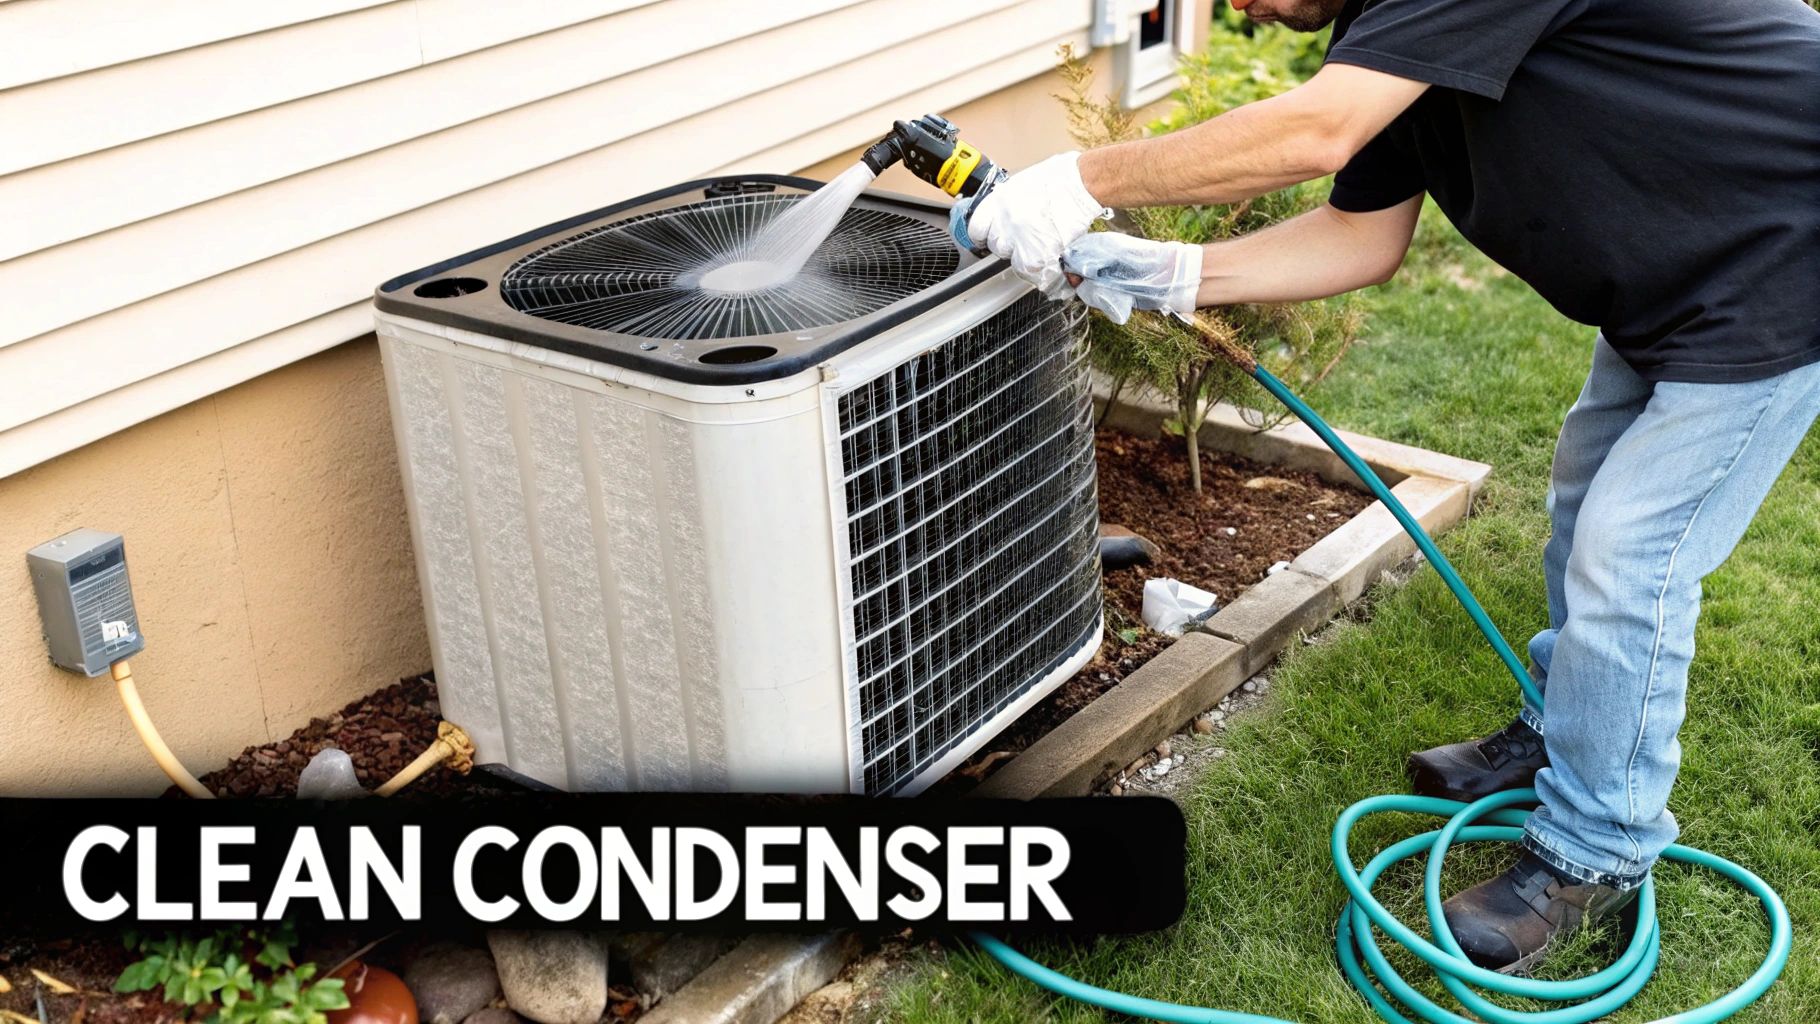
This isn’t just a quick hose-down, though. There are a few key steps to make sure you do it right and, more importantly, safely. Let’s walk through how to get this crucial component back in peak fighting shape.
Removing Debris and Opening the Unit
First things first, let’s clear the surface. Grab your shop vacuum with a soft brush attachment and go over the entire exterior, getting all the loose stuff off the fins. You want to suck up all those cobwebs, dried leaves, and grass clippings before you even think about opening it up.
Next, you’ll need to take off the top grille and the fan that's attached to it. You'll usually find a few screws holding it in place around the top rim of the unit. Carefully remove them and put them somewhere you won’t lose them; a magnetic parts tray or even just an old cup works great.
With the screws out, you can gently lift the whole top assembly off. Be extremely cautious here. The fan is still wired to the unit, so you don't want to yank on those connections. Just carefully set the fan and grille assembly to the side, giving yourself enough room to work inside.
Now, peer inside. You'll almost certainly see a mess of leaves, dirt, and other gunk that's collected at the bottom. Use your shop vacuum to get every last bit of it out of there. This stuff can trap moisture and cause corrosion, so it’s critical to clear it out completely.
Applying a Commercial Coil Cleaner
With the unit open, you have a clear view of the condenser coils from the inside. This is where the real deep cleaning happens. Those thin aluminum fins are designed for maximum heat exchange, but that intricate design also makes them a magnet for grime that water alone can't touch.
For this part of the job, you’ll need a commercial, no-rinse, foaming coil cleaner made specifically for HVAC systems. You can pick it up at any big-box home improvement store.
Here's the right way to apply it:
Spray from the inside out: Standing over the unit, spray the cleaner generously all over the inside surface of the coils.
Get even coverage: Make your way around the entire unit, ensuring the foam gets deep into the fins. It will expand and literally push the dirt and grime out from between the fins.
Let it do its thing: Give the cleaner about 10-15 minutes to work. You'll actually see the foam dissolve the stubborn buildup.
The foaming action is what makes this so effective. It gets into all those tiny spaces between the fins and chemically breaks down the grime that's been choking your system's airflow and tanking its efficiency.
Rinsing the Coils and Fins
Once the cleaner has worked its magic, it's rinsing time. Now, listen closely: never, ever use a pressure washer. That high-pressure blast will bend and flatten the delicate aluminum fins in a heartbeat, causing serious damage. A simple garden hose with a gentle spray nozzle is all you need.
It's helpful to have a basic knowledge of understanding different exterior cleaning methods to appreciate why a gentle approach is so important here. While pressure washing has its place, your AC unit demands a much softer touch.
Start from the inside of the unit and gently spray the coils in a downward motion. This washes the foam and all that loosened crud out through the exterior fins. This "inside-out" method is absolutely critical, as it pushes debris away from the unit instead of forcing it deeper into the coils. Keep rinsing until the water running off the unit is completely clear. For a closer look at this process, check out our easy DIY guide on how to clean condenser coils.
Straightening Fins and Reassembly
With the coils sparkling clean, take a minute to inspect the fins. It's really common for them to get bent by hail, flying debris from a lawnmower, or even an accidental bump. Bent fins block airflow just as much as dirt does.
Grab your fin comb and gently insert its teeth into an undamaged section of fins just above or below the bent area. Then, carefully pull the comb through the bent fins to straighten them. This takes a delicate hand, so don't force it. They don't need to be perfect, but getting them mostly straight will make a real difference in performance.
Finally, it’s time to put it all back together.
Carefully place the top grille and fan assembly back on top.
Line up the screw holes and put the screws back in. Tighten them so they're secure, but don't crank down on them too hard.
Double-check that no wires are getting pinched or left exposed.
Once everything is buttoned up, you’re ready to restore power and fire up your freshly cleaned, happy AC unit. This deep clean ensures your system can breathe easy and run at its best.
Improving Indoor Air Quality and Efficiency
Alright, with the outdoor condenser sparkling, it’s time to head inside. This is where we get into the components that directly affect not only how well your AC cools but the very air you breathe day in and day out. If you skip this part, you're setting yourself up for poor airflow, lukewarm air, and even some nasty water damage.
Let's walk through the two most important indoor jobs any homeowner can tackle: swapping the air filter and clearing out the condensate drain line. These might seem small, but believe me, they deliver a huge return on performance and air quality.
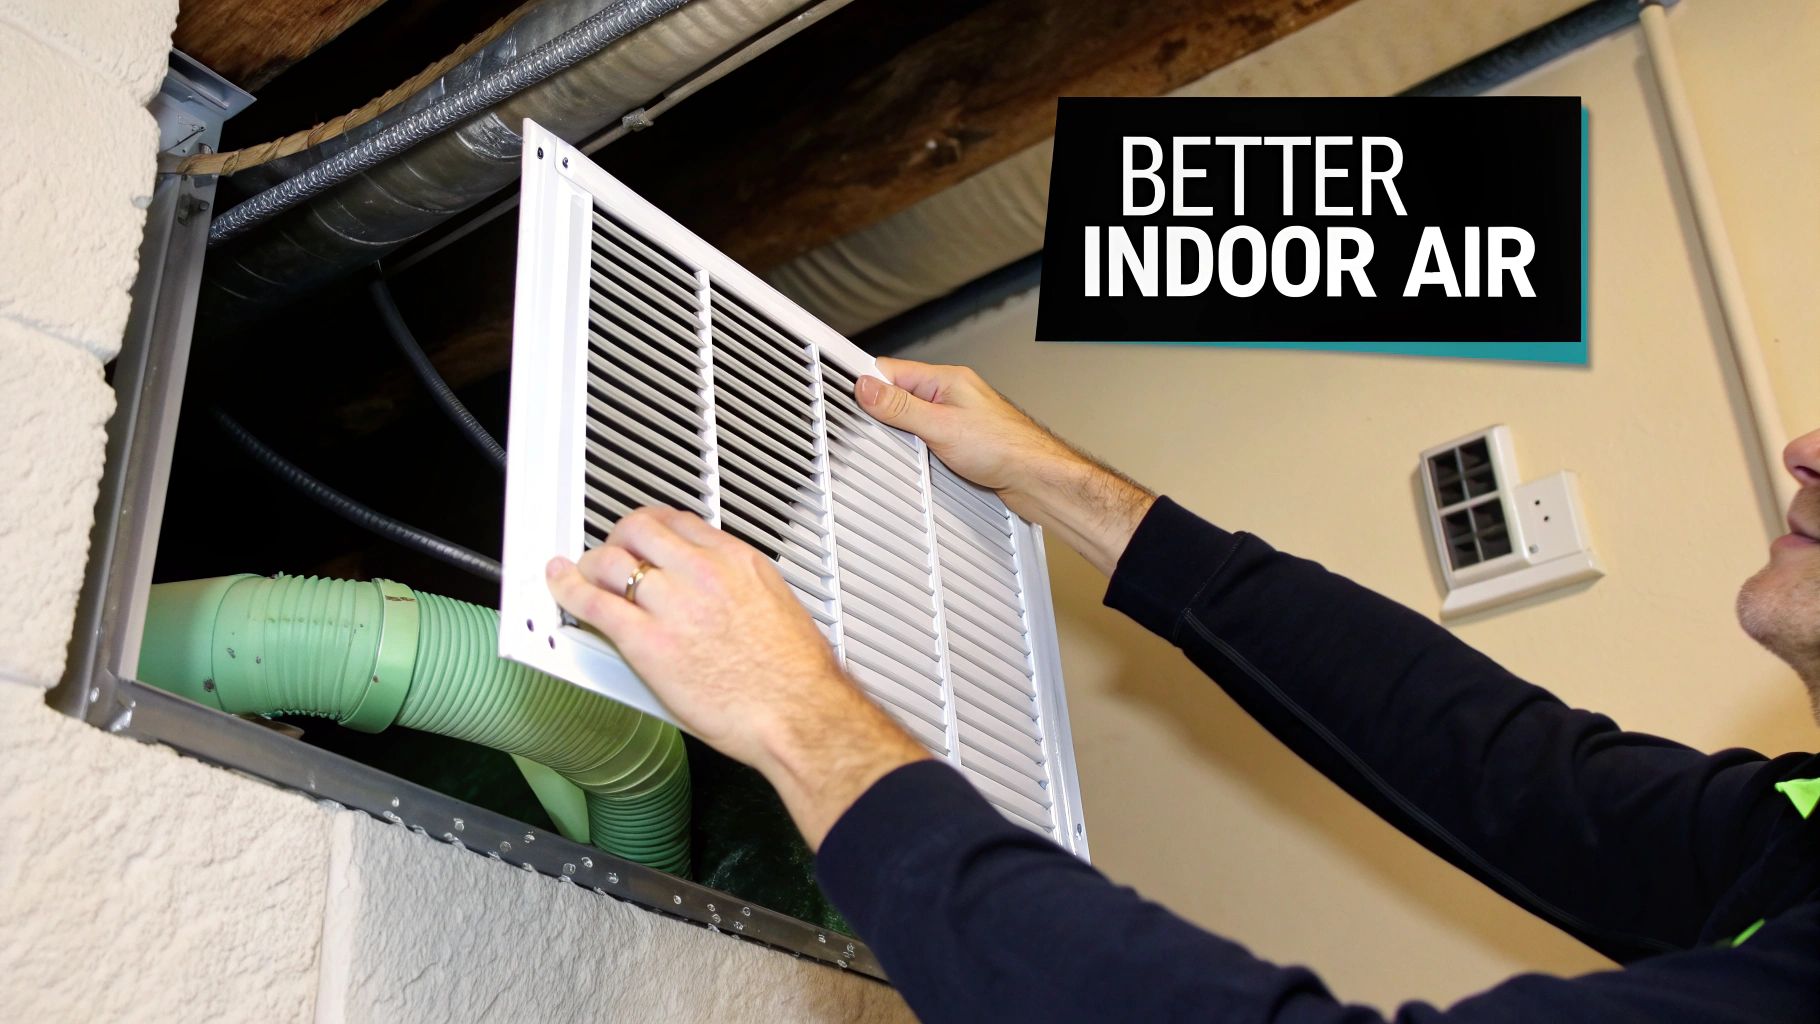
The First Line of Defense: Your Air Filter
Think of your HVAC system's air filter as the unsung hero of your home. Its one job is to snatch dust, pollen, pet dander, and all sorts of other gunk out of the air before it gets recycled through your house, or worse, cakes up the sensitive parts of your air handler. A dirty, clogged filter is one of the biggest problems we see.
When that filter is packed with debris, it basically chokes your system. The blower motor has to strain just to pull air through, which skyrockets your energy use and puts a ton of unnecessary stress on the equipment. In fact, the U.S. Department of Energy says that just by swapping out your filters regularly, you can cut your AC's energy consumption by 5% to 15%.
This is, without a doubt, the single most impactful and easiest piece of maintenance you can do. Make it a habit to check your filter every month and replace it every 1 to 3 months. It's a small task that pays off big time in efficiency, a longer system life, and cleaner air.
Understanding MERV Ratings
When you go to buy a new filter, you'll see a MERV rating. That stands for Minimum Efficiency Reporting Value, and it’s a simple number (usually between 1 and 16 for homes) that tells you how good the filter is at trapping different-sized particles.
Here’s a quick rundown of what those numbers mean:
MERV 1-4: These are your basic filters. They'll catch the big stuff like dust and pollen but offer minimal filtration in exchange for maximum airflow.
MERV 5-8: This is the sweet spot for most homes. They grab smaller things like mold spores and pet dander without choking your system.
MERV 9-12: If you've got allergy sufferers in the house, this is a great choice. These filters trap much finer particles, including dust mite debris.
MERV 13+: These are high-efficiency filters that can even capture bacteria. The downside is they can restrict airflow so much that older HVAC systems can't handle them.
For most of us here in Tucson, a filter somewhere in the MERV 8 to 11 range strikes the perfect balance between clean air and healthy airflow. If you really want to get into the details, you can learn more about choosing the best HVAC filters for allergies in our complete guide.
Clearing the Condensate Drain Line
As your air conditioner pulls heat out of the air, it also wrings out humidity. That water drips down the indoor evaporator coil into a pan and then flows outside through a PVC pipe, the condensate drain line. But over time, that dark, damp pipe becomes the perfect home for algae, mold, and sludge to build up and create a clog.
A clogged drain line is bad news. It causes water to back up, overflow the pan, and potentially cause some serious water damage to your ceilings, walls, or floors. A lot of modern systems have a safety switch that will just shut the whole AC down if it senses a clog, leaving you hot and bothered until it’s fixed.
The good news? Keeping this line clear is really simple.
Locating and Cleaning Your Drain Line
Find the Line: First, find your indoor air handler (it's usually tucked away in a closet, the attic, or the garage). Look for a white or black PVC pipe coming out from the bottom; that's your drain line.
Access the Port: You should see a T-shaped vent piece on the pipe with a cap on top. That's your cleaning access port.
Pour Vinegar: Once a month when it’s hot, just pop that cap off and slowly pour about a cup of distilled white vinegar down the pipe. Vinegar is a mild acid, and it does a great job of killing off that nasty sludge and algae.
If you think you've already got a clog, a wet/dry shop vac is your best friend. Take the vacuum hose to where the drain line ends outside your house, use your hand or a rag to make a tight seal, and let it run for a couple of minutes. This will usually suck the whole blockage right out. If you're concerned about mildew around the unit, some people also use a natural mould killer for extra peace of mind.
Safely Cleaning the Evaporator Coils
Inside your air handler is the evaporator coil, which is where the real cooling magic happens. It looks a lot like the condenser unit outside, but instead of getting hot, it gets ice-cold. If dust manages to sneak past a dirty filter, it will stick to this damp coil and form a gross, insulating blanket.
This layer of grime basically suffocates the coil, making it way less effective at absorbing heat and cooling your home. A quick, safe cleaning can bring its performance right back. If your coil is easy to get to (check your owner's manual, as there's often a removable panel), you can clean it yourself.
Start by using a soft brush to gently wipe away any loose dust. For a more thorough job, grab a can of no-rinse, foaming evaporator coil cleaner and apply it just like you did on the outdoor unit. It’s a simple step that ensures you’re getting maximum cooling power from your system.
When to Put Down the Tools and Call a Professional
Knowing how to clean your central air conditioning unit is a great skill that saves you money and keeps your system humming along. But even the most dedicated DIYer needs to know when it's time to hang up the tools and call in a certified HVAC technician.
Think of it this way: professional service isn't a sign that your DIY efforts failed. It's a crucial part of a smart, long-term strategy for your AC's health. Ignoring serious red flags, especially during a brutal Tucson summer, can turn a simple fix into a catastrophic, and very expensive, system failure.
Recognizing Serious Red Flags
Some problems go way beyond what a good cleaning can solve. These are the warning signs of a deeper issue that requires specialized tools, diagnostic gear, and the kind of expertise that only comes with professional training.
Don't hesitate to call for service if you spot any of these issues:
Strange Noises: Your AC will always make some noise, but loud grinding, squealing, or metallic banging sounds are definite trouble. These often point to failing motor bearings, a bent fan blade, or a serious problem with the compressor.
Electrical Problems: If your AC is constantly tripping its circuit breaker, you have an electrical fault. This is a major safety concern that could be anything from a failing capacitor to a short in the wiring.
Weak or Warm Airflow: You've cleaned the unit from top to bottom and put in a fresh filter, but the air coming from your vents is still lukewarm or weak. This usually means the problem is internal, like a refrigerant leak or a failing compressor.
Odd Smells: A burning smell is an urgent red flag for an electrical issue. A persistent musty odor could mean you have mold growth deep within your system where a surface cleaning just can't reach.
A professional tune-up before the summer hits is one of the smartest investments a Tucson homeowner can make. Ensuring your system can handle the intense, prolonged demand of our climate is critical for avoiding a mid-summer breakdown when you need your AC the most.
Why Some Jobs Are for Pros Only
Let's be clear: some tasks are simply off-limits for DIY maintenance. This is due to serious safety risks and the need for specialized, expensive equipment. For example, handling refrigerant is not only dangerous but illegal without the proper EPA certification. It requires specific gauges and recovery machines that professionals are trained to use.
Diagnosing and replacing parts like a failing compressor or capacitor means working with high-voltage components. This requires a deep understanding of HVAC electrical systems. Trying to tackle these repairs without training is extremely dangerous and can cause permanent, costly damage to your unit. If you're unsure what counts as an emergency, our guide on emergency air conditioning repair for homeowners can help you decide.
The Financial Case for Professional Maintenance
Putting off a professional service call might feel like you're saving money now, but it almost always leads to much higher costs down the road. It's a fact: Americans spend a collective $14 billion on HVAC services each year, a number that really drives home the importance of proper system care.
Emergency repairs can easily cost 50% to 100% more than a standard service call. Worse, running a system until it completely fails can be up to 10 times more expensive than sticking to a proper maintenance schedule. You can learn more about the staggering financial impact of deferred maintenance and see for yourself why proactive care is so critical.
To help you sort it all out, here’s a quick breakdown of which tasks are generally safe for you to handle and which ones really demand a professional.
DIY Cleaning vs Professional HVAC Service
Maintenance Task | Recommended for DIY | When to Call a Pro |
|---|---|---|
Changing Air Filters | Yes | If the filter area shows signs of moisture or mold. |
Cleaning Outdoor Coils | Yes | If coils are heavily damaged or show signs of icing up. |
Clearing Condensate Drain | Yes | If the line is severely clogged and cannot be cleared easily. |
Checking Refrigerant Levels | No | Always; this requires specialized tools and certification. |
Repairing Electrical Parts | No | Always; this involves high voltage and is extremely hazardous. |
Diagnosing System Faults | No | When basic cleaning doesn't solve performance issues. |
Ultimately, knowing which tasks to tackle yourself and when to bring in an expert is the key to keeping your AC running efficiently and safely for years to come.
Common AC Cleaning Questions From Tucson Homeowners
After going through the cleaning process, you probably have a few questions rattling around. That's completely normal, especially considering the unique beatdown our AC units take here in the Arizona desert. We get these questions all the time from folks around Tucson, so let's clear the air and get you some straightforward answers.
How Often Should I Clean My AC Unit in Tucson?
Living out here means your AC is in a constant battle with dust and scorching heat, so cleaning it more often is just smart.
For the big outdoor condenser unit, we always recommend giving it a really thorough cleaning every spring. This gets rid of all the gunk and dust that’s settled in over the fall and winter, basically getting it battle-ready for the summer onslaught.
Then, just before the monsoon season rolls in, it’s a good idea to check and clear out the indoor condensate drain line. That sudden jump in humidity is the perfect recipe for algae growth, and a clog can happen fast if the line isn’t clear.
Now, air filters are a whole different ballgame.
Give them a monthly peek: Seriously, just pull the filter out once a month and see what it looks like.
Swap them out regularly: Plan on putting in a fresh filter every 1 to 3 months. If you’ve got pets, live near a dusty road, or have anyone with allergies in the house, you’ll definitely want to lean closer to that one-month mark.
Is It Safe to Use a Pressure Washer on AC Coils?
We hear this one constantly, and the answer is a firm, absolute no. Firing up a pressure washer on your AC unit is probably the quickest way to cause thousands of dollars in damage.
That high-pressure spray will instantly flatten and crush the delicate aluminum fins on the condenser coils. Those fins are everything when it comes to getting rid of heat. When they're mashed down, they block airflow entirely. This makes your compressor work dangerously hard, leading to sky-high bills, overheating, and eventually, a dead system.
Always stick to a regular garden hose with a gentle spray nozzle. You want just enough pressure to rinse the dirt away, not blast it off. And remember the golden rule: spray from the inside of the unit pushing out. This pushes debris away from the core of the system, not deeper into it.
What Are the Signs I Need More Than a Cleaning?
A good cleaning can work wonders, but it's not a magic fix for everything. Sometimes, the symptoms you're seeing are red flags for a much deeper problem that a hose and some elbow grease just can't solve. A deep clean won't fix a busted motor or a refrigerant leak.
It’s time to put the tools down and call in a pro if you notice any of these things:
Your AC is blowing warm air: If the unit is spotless and the filter is brand new, but you're still not getting cold air, you're likely dealing with a refrigerant leak or a problem with the compressor.
You hear loud or weird noises: Any grinding, squealing, or banging is a bad sign. It often points to a failing motor, a bent fan blade, or another serious mechanical issue.
The system is short-cycling: Does your AC kick on and off way more than it used to? This can be caused by anything from an electrical fault to an improperly sized system.
There's a sudden spike in your utility bills: If your energy costs jump for no apparent reason, it’s often a sign that a part is failing and sucking down extra power just to keep running.
These are signs that the real problem is beyond the scope of a DIY cleaning. More and more, homeowners are seeing the value in professional, preventive care. In fact, the global market for HVAC maintenance was valued at USD 92.8 billion in 2024, with preventive services making up 38 percent of that total. As you can find out by exploring the growing HVAC maintenance market on stellarmr.com, this trend shows a smart shift toward proactive care to keep systems running longer and more efficiently. Calling a professional when you spot these signs is the right move.
When a simple cleaning doesn't cut it, you need a team you can count on. The certified technicians at Covenant Aire Solutions are experts at diagnosing and fixing any HVAC problem to keep your Tucson home cool and comfortable. For expert service you can trust, visit us at https://www.covenantairesolutions.com.