
Rooftop Unit Maintenance: Schedule, Checklist and Steps
You get the call in August because one zone won't hold temperature, and the tech on the roof finds a filter that's been loaded since spring. The unit never stopped running, so nobody treated it as a failure. It just ran longer, moved less air, and delivered less cooling while the complaints built up below.
That's the pattern good rooftop unit maintenance is meant to break. The U.S. Department of Energy identifies rooftop units as the most common heating and cooling system used in commercial buildings, while space conditioning represents approximately 40% of commercial energy consumption in the United States, according to the Department of Energy HVAC accelerator fact sheet. When that much energy rides on equipment sitting out of sight, you can't run it on memory and emergency calls. You need a schedule with measured triggers, a checklist you can complete on the roof, and a way to rank soft faults, the quiet problems that waste capacity, against visible failures that stop a unit outright.
Rooftop Unit Maintenance Schedule by Task
Say it's August and your tech opens an RTU that's run on a clogged filter since spring. Airflow is down, runtime is up, and the filter looks like the cause, not a symptom. A calendar alone wouldn't have caught the loading early, and changing every filter on a fixed date would waste labor on clean units. The schedule below pairs a baseline interval with a measured trigger, so you can copy it straight into a work order.
The Schedule to Copy Into Your Work Orders
Task | Frequency | Typical owner |
|---|---|---|
Filter inspection and replacement | Monthly, or per manufacturer interval; sooner under heavy dust or high outdoor-air use | Building staff |
Panel, duct and condenser coil check | Quarterly | Building staff or technician |
Condensate pan and drain cleaning | Quarterly | Technician |
Condenser coil wash | Start and end of cooling season | Technician |
Belt inspection | Quarterly, with replacement every year | Technician |
Economizer and damper test | Before each cooling season | Technician |
Refrigerant charge and electrical check | Seasonal commissioning | Licensed technician |
The Department of Energy recommends inspecting and cleaning or replacing filters monthly, or according to the equipment manufacturer's instructions, in its Department of Energy HVAC guide. Use the shorter interval if the manufacturer calls for one. Your trigger for replacement is measured pressure drop against the manufacturer's approved limit, not the date. That keeps a clean filter in service and pulls a loaded one before airflow suffers. Heavy dust or high outdoor-air intake justifies shorter intervals between checks, especially in Tucson where long cooling seasons load media fast.
Quarterly work has its own baseline. The Department of Energy recommends conducting preventive ventilation maintenance on a quarterly basis, including cleaning condensate pans, checking belts for wear, replacing belts annually, and washing condenser coils, and it notes that dirty condenser coils can consume up to 37% more energy, in the Department of Energy ventilation assessment guide. Read that belt rule as written: inspect quarterly, replace every year whatever the belt looks like. Cheap belts protect expensive motors and compressors.
Rows That Break the Calendar Rule
Wash condenser coils at the start and end of the cooling season, not just when they look dirty from the hatch. Before cooling season, have a technician test the economizer and dampers, check refrigerant charge and electrical connections, and verify thermostat schedules and unoccupied fan control. A stuck economizer or a fan running all night won't show up as a breakdown, but both show up on the utility bill.
Shorten any interval after two consecutive inspections show unacceptable condition or performance. Name an owner for each row so building staff and licensed technicians know their part, and don't assume a service contract removes the staff filter checks between visits. It doesn't. If you're building the broader calendar around these tasks, this preventive maintenance schedule guide helps you place them across the year.
Practical rule: I would judge the schedule by three signs, filters changed on a measured trigger, coils holding airflow between washes, and no repeat calls for the same fault.
Safety Steps Before Any Rooftop Unit Work
Your Tucson crew is set for a filter change. The unit has a gas section, and a live disconnect sits a few feet from the curb. The job stays routine only if nobody opens the wrong panel on an energized unit. Use the same order for a minor task as for a major one.
A quiet fault that only shows up on the power bill does not lower the bar. Lockout still comes before the panel comes off.
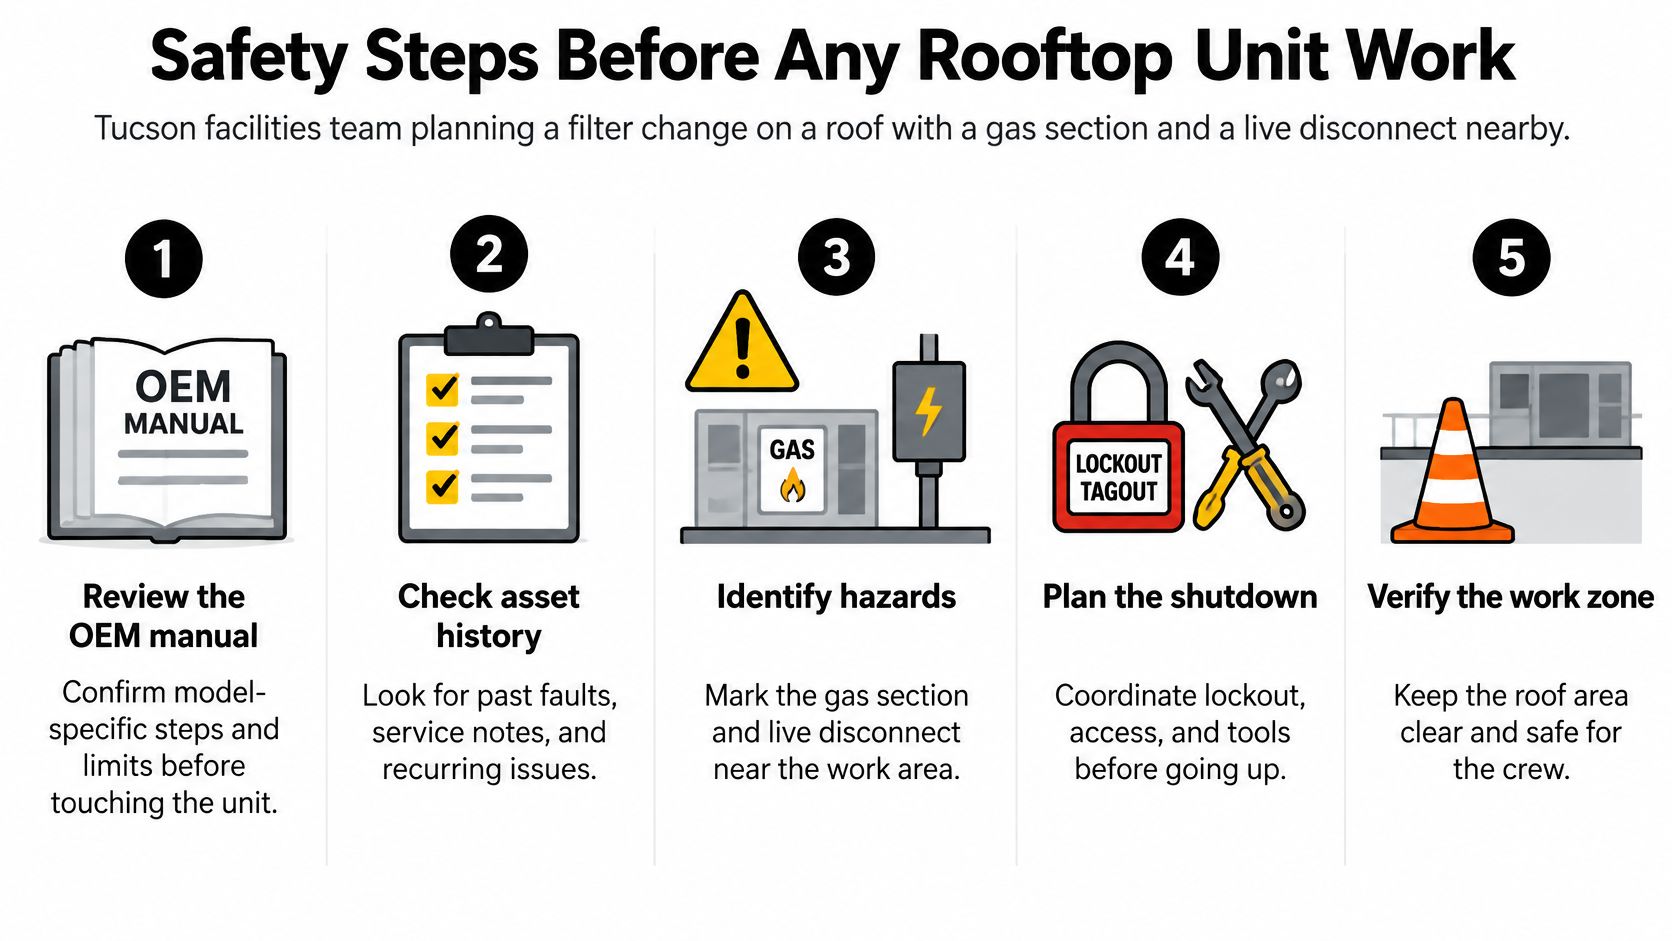
The Five Step Safety Sequence
Review the paperwork first. Read the OEM manual, asset history, operating hours, and prior deficiencies so you know the unit's weak points before anyone climbs.
Lock out and tag out. Isolate power at the disconnect, then prove the unit is dead with a meter before any panel opens. Switch position alone is not proof.
Check the roof itself. Confirm access, fall protection, and anchor points, and pick a dry weather window. Wet or icy decking is a reason to postpone.
Keep gas and refrigerant closed. Smell for gas before you approach that section, and stop on any odor or an active fault light. Refrigerant lines and recovery stay with a certified technician. Opening them vents refrigerant and can cause frostbite.
Do a visual safety inspection. Walk access panels, the roof curb, wiring, the condensate system, refrigerant piping, and weather seals before any hands-on task. The ASHRAE Standard 180 addendum puts the OEM manual, asset history, and lockout/tagout ahead of inspection work.
Building staff can handle filter changes and visual checks inside this sequence. Electrical testing, refrigerant work, and gas work stay with licensed technicians, including on small jobs.
In hot months, put roof time in the early morning. Heat shortens attention, and slips pile up when someone is rushing to get off the roof.
Inspection Checklist for Each RTU Component
Walk the unit in the order you reach components on a roof visit: filters, evaporator and condenser coils, belts and sheaves, fan and motor, condensate drain and P-trap, refrigerant system, economizer and dampers, electrical connections, gas section where fitted, and finally the roof curb and weather seals. That order keeps you from backtracking with panels off and tools scattered.
The Department of Energy's commercial HVAC maintenance practice identifies refrigerant charge, filters, bearings, fan belts, P-traps, coils, oil level, and fan blades as specific rooftop-unit inspection items, in the Department of Energy standard practice for commercial HVAC inspection and maintenance. Each item affects cooling capacity, condensate drainage, mechanical reliability, or airflow, so skipping one leaves a whole failure path unexamined. The table turns that list into checks with a clear service trigger for each component.
Component Checks and Service Signs
Component | What to check | Sign it needs service |
|---|---|---|
Filters | Fit, bypass around the rack, pressure drop against the manufacturer limit | Pressure drop above the approved limit or gaps around the filter rack |
Condenser coil | Dust, fouling, bent fins, leaks | Restricted airflow or a dirty coil that raises energy use |
Evaporator coil | Dust loading, damage, leaks | Damage or leaks outside operating limits |
Belts and sheaves | Wear, cracking, tension, alignment | Glazing, cracks, squeal, or a belt past its annual replacement |
Fan and motor | Rotation, bearings, blades, amperage | Vibration, noise, or high amp draw |
Condensate drain and P-trap | Flow, slope, mold or fungus | Standing water, slow drainage, or biological growth |
Refrigerant system | Charge, oil level, leak indicators | Reduced cooling capacity or signs of a leak |
Economizer and dampers | Damper position, actuator response | Stuck damper or incorrect outdoor air mix |
Electrical connections | Tight terminals, contactors, labeling | Burn marks, loose wiring, or overheating |
Roof curb and weather seals | Gaps, panel fit, water entry points | Water inside the unit or visible gaps |
Start with filters because they're reached first and mislead most often. Check fit, bypass around the rack, and pressure drop against the manufacturer's approved limit, not just how the media looks. A filter that appears clean but sits crooked lets unfiltered air straight past it.
For coils, look for dust, fouling, bent fins, and leaks, then check whether the outdoor-air screen is blocked. A clean coil behind a plugged screen still starves for air. For belts, check glazing, cracks, tension, and alignment, then compare the install date against the annual replacement. A belt can pass a visual check and still be due.
Use the sign column as your decision point. When a reading or observation matches a sign, log it and escalate rather than waiting for the next scheduled visit. If you want the system context behind these components, this overview of how a commercial HVAC system works connects the rooftop parts to the air below.
Record measured values such as pressure drop, amperage, and supply-air temperature, not the word OK, so the next inspection shows whether a component is getting worse.
How to Clean Coils, Replace Filters and Clear Drains
These three tasks deliver most of the day-to-day value in rooftop unit maintenance, and they're also where rushed work does quiet damage. Follow the steps in order, because the early readings are what prove the later work helped. Each step carries its reason and the slip I would watch for most.
The process visual below maps the order before you start, so the crew sequences tools and readings correctly.
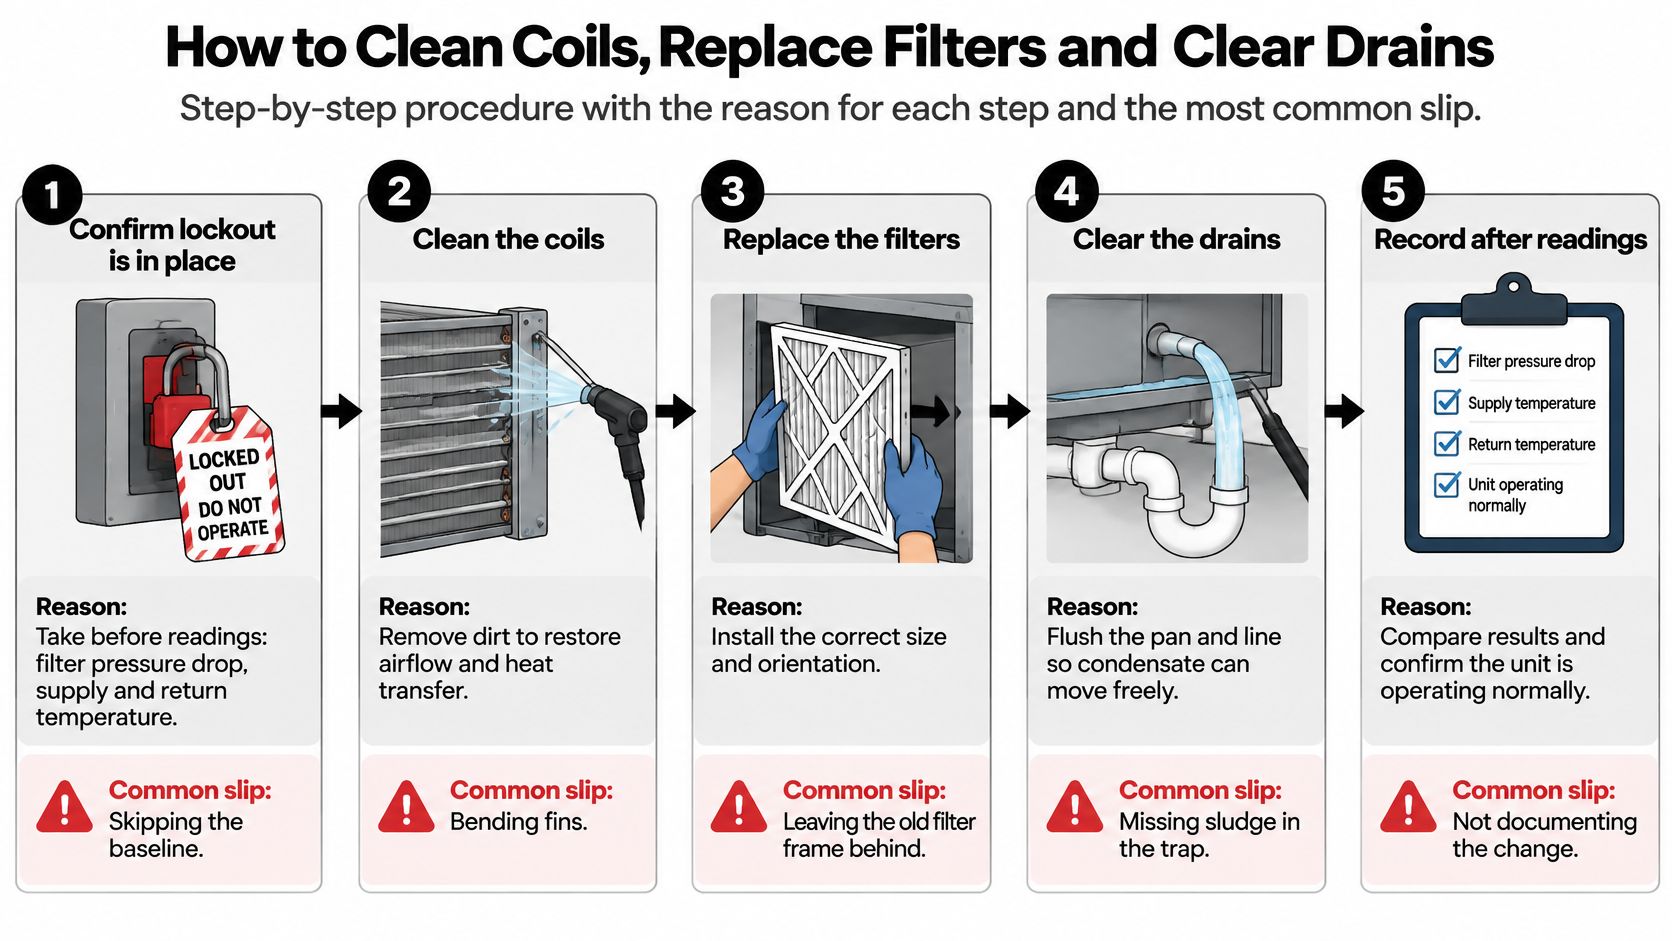
Numbered Procedure With Reasons and Common Slips
Confirm the lockout and take before readings: Verify power is isolated, then record filter pressure drop, supply and return temperature, and amp draw. You need this baseline to prove the job worked later. The common slip is skipping straight to cleaning, which leaves you with no evidence the unit improved.
Remove the filter and inspect the rack: Pull the old filter, check the rack for gaps and damaged gasketing, and fit the replacement so it seals on all sides with airflow arrows pointing the right way. Forcing a filter into a rack that doesn't fit, or squeezing a thicker high-efficiency filter into a shallow slot, lets unfiltered air bypass the media and can choke airflow. Confirm the blower and rack can handle a higher-rated filter before you upgrade one.
Clean the condenser coil gently: Use a soft brush to lift surface debris, then rinse with low pressure from the inside out so dirt exits the way it entered. Work with the fin direction, not across it. High pressure is the classic mistake here, since it folds fins flat and drives debris deeper into the coil where rinsing can't reach it. Use a coil cleaner approved for the coil material when fouling is greasy, and rinse it fully.
Straighten fins and clear the screen: Run a fin comb matched to the coil's fins per inch through bent sections, then check the outdoor-air screen for blockage. Cleaning the coil while ignoring a blocked screen wastes the wash, because the unit still can't breathe. Clear leaves, plastic, and cottonwood type debris from around the cabinet base while you're there.
Clear the condensate pan and P-trap: Scrub the pan, flush the drain line with water, and confirm the line slopes continuously toward the drain outlet. Prime the trap so it holds a water seal. Cleaning the pan but leaving a dry or misaligned trap lets odors and water back into the unit, and a sagging line will hold sludge no matter how well you flush it today. Pour water through and watch it discharge before you call the drain clear.
Check belt tension and sheave alignment: Deflect the belt at mid-span, compare tension with the manufacturer's spec, and sight along the sheaves for alignment. Note wear against the annual replacement date. Over-tightening is the slip to avoid, since an overtight belt loads motor and fan bearings and trades a cheap part for an expensive one.
Restore power and verify against your baseline: Restart the unit and measure airflow indicators, temperature split, amperage, drain flow, and control response. Compare each value with your before readings while the unit settles into a steady cooling call. If the split or amp draw barely moved after a coil wash, you haven't found the true restriction yet.
Closing the Loop
Don't leave the roof on a visual pass. A coil can look clean and still move poor air if fins are folded deep in the bank, and a new filter means little if the rack leaks around it. The after readings are your verification, not paperwork for its own sake.
Log every reading with the date, the unit identifier, and the work performed. That record lets the next visit show whether the fix held, and it turns a slow drift in amp draw or pressure drop into an early warning instead of a surprise failure in peak season.
Prioritizing Repairs When Several Units Fault
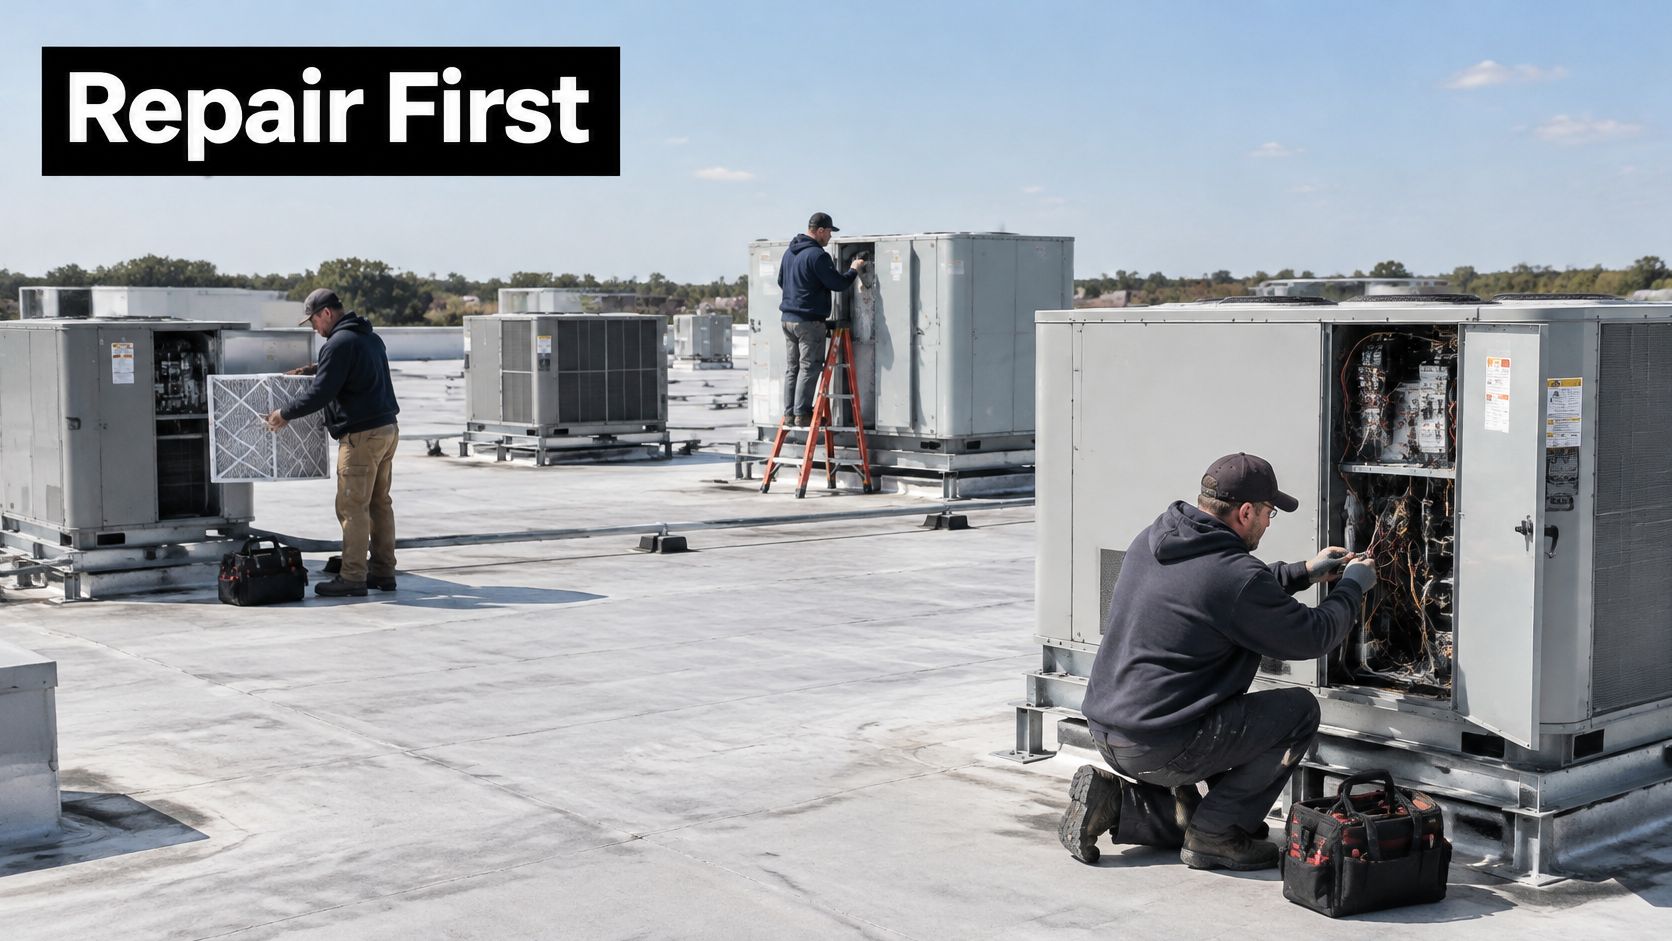
Say you manage a property with five rooftop units and three of them show problems on the same inspection day. One trips on a safety, one runs warm, and one has a filthy coil and a glazed belt. Treating all three with equal urgency sounds fair, but it spreads your crew thin and fixes cheap faults late. The photo below shows the kind of multi-unit roof where that triage call happens.
Field research on light-commercial systems found approximately 70% of investigated systems had at least one fault, about 40% had multiple faults, and only about 40% justified immediate service under the study's economic criteria, according to the ACEEE field study of light-commercial system faults. The same research found average power-consumption reductions of about 15% after fault correction, while cooling-capacity degradation averaged 32%, so a unit can keep running while delivering substantially reduced cooling.
Soft Faults Versus Visible Failures
A visible failure announces itself: a dead compressor, a snapped belt, a unit down on a safety. A soft fault doesn't. Incorrect refrigerant charge, restricted airflow, fouled coils, and a failed economizer rarely trigger an emergency call, but they raise runtime, cut capacity, and shorten equipment life. In a hot climate, a soft-faulted unit hits comfort and peak demand costs long before it stops. When a fault does cross into no-cooling territory, treat it through your commercial HVAC emergency service path rather than the planned queue.
The walkthrough below shows how technicians sort active faults on a working roof before committing repair hours.
I would triage in this order: inspect high-runtime or high-load zones first, compare supply-air temperature and electrical demand across similar units, log recurring alarms, and review trend data before approving major replacement work. Rank every fault by safety risk, comfort impact, energy waste, and likelihood of failure, and fix the highest combined score first. That ranking beats a fixed inspection order because it puts repair dollars where the building feels them.
Upkeep Costs, Service Times and When to Replace Units
A 12-year-old rooftop unit can still start every morning and still be the expensive machine on the roof. Visit price and visit length have no single published figure that holds from one building to the next. Both move with region, tonnage, roof access, and how many faults a technician finds once the panels come off.
Price follows the roof, not a national average. Ask for an itemized quote that separates inspection, coil cleaning, parts, and after-hours labor. Match each line to the component checklist before you sign. Missing economizer testing or drain work shows up as a later ticket, so a low bid that skips those tasks only defers the spend.
Service time moves the same way. A seasonal visit with clean access is shorter than a call where airflow, charge, and controls all need attention after the covers come off. The quote should name the tasks in the window so the schedule matches the work.
Published Figures for Life and Energy
Measure | Published figure | Note |
|---|---|---|
Useful service life | 15 to 20 years | Typical for rooftop units |
Energy waste, inefficient units over 10 years old | $1,000 to $3,700 per unit per year | Depends on location, size, and equipment type |
Energy savings from replacing units over 10 years | Up to 44% | Compared with Standard 90.1-2010 baseline |
Energy savings from advanced controls, units over seven tons | Up to 57% | Payback as short as two years |
The Replace or Maintain Decision
Rooftop units commonly last about 15 to 20 years, but energy cost often turns earlier. The Department of Energy rooftop unit replacement guide reports that inefficient units more than 10 years old may waste about $1,000 to $3,700 per year each, depending on location, size, and equipment type. The same guidance reports that replacing those older units with high-efficiency equipment can cut energy cost by up to 44% versus the Standard 90.1-2010 baseline, and that advanced controls on newer units larger than seven tons can save up to 57%, with payback as short as two years.
Decision rule: When a unit is past 10 years, keeps faulting on the same component, or needs repeated coil and control work, get a replacement estimate alongside the repair quote.
Run both numbers before you authorize another major repair. Controls on a sound newer unit can beat a full swap, especially above seven tons, where that payback can be about two years. On an older unit that still runs but wastes energy every hour it operates, another compressor or coil repair can be the expensive choice: you pay for the part and keep the utility penalty.
I would not wait for a no-cool day to order a crane. When the estimate points to replacement, plan the swap through a structured rooftop unit replacement scope so capacity, curb fit, and crane time are set before peak season.
Decide Between In-House Checks and a Maintenance Contract
The split is straightforward. Building staff run filter, visual, and drain checks between visits, since those tasks need frequency more than licensing. Licensed technicians handle electrical, refrigerant, gas, economizer, and seasonal commissioning work, where certification and calibrated instruments matter. A contract makes sense when your team lacks licensed staff, runs several units, or needs a guaranteed response in peak season.
Our Covenant Comfort Maintenance Plan shows what to compare against: a 21-point inspection, two free system check-ups per year in spring and fall, free condenser coil cleans, and free 24/7 priority service. When a unit fails in mid-summer or mid-winter, we're typically on site within 24 hours of the call. Hold any agreement, including a commercial HVAC maintenance contract, against the component checklist: confirm the scope covers each listed component, coil cleaning is included, filter changes between visits stay your job, and the response time is written in, not promised verbally.
Contracts also fail on communication, not just scope. If missed calls and slow callbacks are your bottleneck, this breakdown of HVAC receptionist setup and ROI from Mercateer is a useful way to check whether your front office can feed the maintenance schedule you've built.
If your Tucson building runs several rooftop units and soft faults keep surfacing as comfort complaints, we can put those units on a measured schedule with two check-ups a year, coil cleaning, and priority response when one fails in peak season. Visit Covenant Aire Solutions to set up rooftop unit maintenance that ranks repairs by impact, documents real readings, and keeps small faults from becoming August emergencies.