
When to Replace Ductwork: Signs, Tests and Costs in 2026
In typical homes, 20% to 30% of air moving through ductwork is lost through leaks, holes, and poorly connected sections, according to the ENERGY STAR duct sealing flyer. That same guidance says leaky ducts can reduce heating and cooling system efficiency by as much as 20%. You're paying to cool or heat air that never reaches the room, and your equipment runs longer trying to close the gap.
That loss is why I don't decide when to replace ductwork by age. I decide by test results. If sealing and insulation can recover the performance because the material is still sound, repair is the honest answer. If leakage, damage, or bad sizing persists after proper sealing, you're patching a distribution system that can't deliver what the equipment produces.
Signs Your Ductwork Needs Replacement at a Glance
Ductwork needs replacement when measured leakage, physical damage, or contamination can't be corrected by sealing and repair. A birthdate on a flex run doesn't tell you that. A crushed liner, a disconnected plenum, or a leakage test that stays high after sealing does.
Start by matching what you're feeling in the house to what it usually points to. One symptom is a reason to test. Several symptoms across many runs point toward replacement, especially in attics, crawlspaces, and garages where temperature extremes punish weak ducts. If you're weighing the repair path first, review what's involved in air duct repair options before you authorize larger work.
Ductwork Symptoms and the Action Each One Calls For
Symptom | What It Usually Means | First Action |
|---|---|---|
Rooms that stay hot or cold | Leaks, disconnected sections or undersized runs | Test airflow and leakage |
Energy bills rising without a change in use | Leakage or heat loss through duct walls | Measure total leakage |
Crushed flexible duct or missing insulation in attic | Physical failure in an unconditioned space | Repair if sections are sound, replace if widespread |
Musty or dusty air from vents | Contamination or moisture in duct walls | Inspect, clean, then replace contaminated runs |
Rust, holes or collapsed metal runs | Corrosion or structural failure | Replace affected sections |
Age alone, with no other symptom | Lifespan only | Test before deciding |
Practical rule: Don't sign a replacement contract on a symptom alone. Get the number that confirms it.
A hot bedroom might be one disconnected boot. Hot bedrooms, rising bills, dusty supply air, and torn insulation in the attic together describe a system problem. That's the pattern that justifies replacing sections or the whole layout.
How Age, Corrosion and Physical Damage Point to Replacement
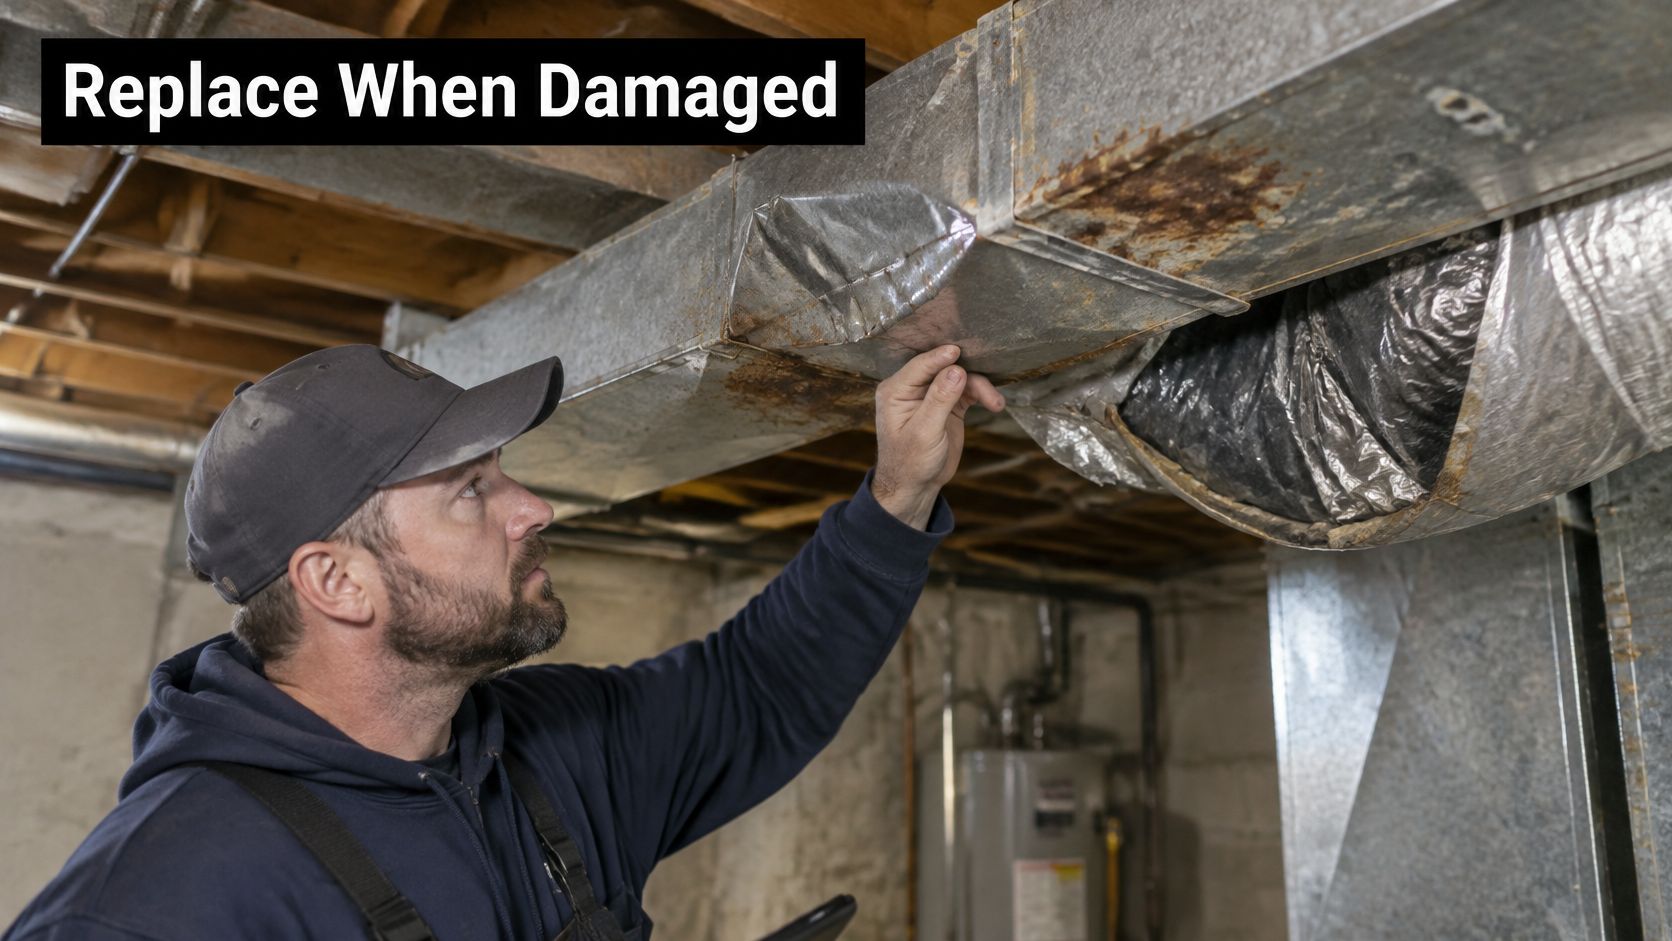
Walk the attic the way a technician would, from the air handler outward. Follow the main trunk, then each branch to its register boot. You're looking for flex duct that's torn, crushed, or sagging between supports, metal that has rusted through near seams, and insulation that's collapsed, wet, or missing in stretches.
A hands-on check takes minutes where access is safe. Pull back insulation on an accessible run and press the flex liner. It should spring back. If it stays flattened, feels brittle, or tears under light pressure, that section won't hold shape or airflow. Look under joints for rust stains and water marks, then check whether boots at the ceiling, floor, or wall have pulled away and left gaps.
Before you judge any of that damage, look at what visible deterioration looks like in a residential space.
What Sealing Can and Can't Fix at a Joint
Joint condition often settles the repair question. The DOE Building Science guidance on tight duct sealing says seams wider than 1/8 inch should first be covered with fiberglass mesh tape before mastic is applied, and boot gaps larger than 3/8 inch require both fabric and mastic. Ordinary cloth-backed duct tape is specifically discouraged because its adhesive can dry out and fail quickly.
So an isolated small gap is a sealing job with UL-approved mastic or UL 181 tape. Widespread open seams, badly damaged liners, and connections too large for durable sealing point toward replacing affected sections. Age matters only because older materials are more likely to reach that state.
Photograph every problem with its location, run length, and nearby landmarks visible. Write down which room each run serves. Those notes turn a vague quote into a scoped one, and they let a second contractor verify the same findings without starting over.
How Leaks Waste Energy, Airflow and Air Quality
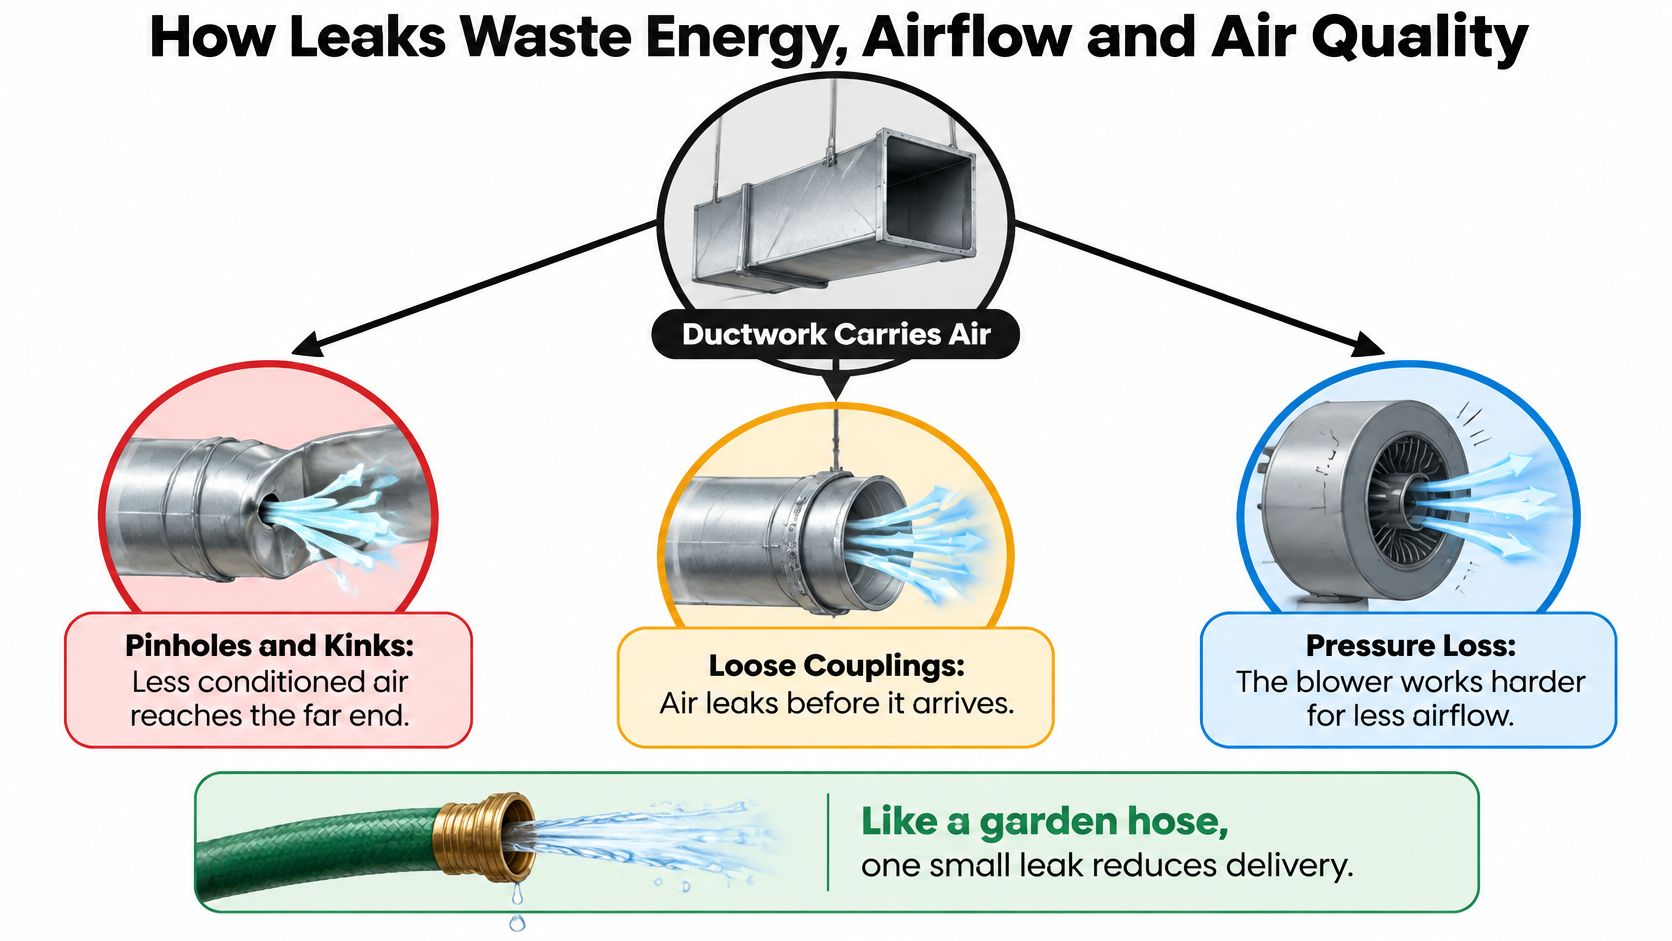
Think of ductwork as a garden hose. A pinhole sprays water sideways, a kink chokes the flow, and a loose coupling loses pressure before the far end. Your blower can work perfectly and the last room still gets less air than it needs.
This diagram maps how those three failures steal delivery from the rooms at the end of a run.
What Leaked Air Costs You
The U.S. Department of Energy reports in its Building America duct diagnostic guide that typical duct systems lose 25% to 40% of their energy through a combination of air leakage and heat conduction through duct walls. Supply leaks dump conditioned air into attics and wall cavities, so the compressor and blower run longer to make up the difference. Leaks nearest the air handler waste the most because static pressure is highest there.
Location makes it worse. The Department of Energy presentation on HVAC distribution systems reports DOE retrofit research found leaky ducts in attics or crawlspaces can account for 20% or more of a home's heating and cooling energy losses. In a Southwest study of six homes, 30% to 40% of the thermal energy delivered to ducts passing through unconditioned spaces was lost, and sealing and insulating those ducts reduced overall duct leakage by approximately 64%.
Say a three-bedroom home has one supply branch leaking into the attic. That end bedroom stays warmer every summer afternoon, the thermostat keeps calling, and the whole house pays for air delivered to the attic. Proper ductwork sealing fixes that if the duct itself is sound.
Watch how leakage shows up during a professional inspection before you decide the branch is fine.
Return leaks create a different problem. They draw attic dust, insulation fibers, humidity, and pest debris into the air stream and push it through your supply registers. Condensation on cold ducts can wet insulation and support mold growth inside the duct wall. Households sensitive to dust often notice that first. Tape won't fix a contaminated liner; that section needs cleaning or replacement.
A few leaks at reachable joints is a repair problem. Leakage spread across the layout, or caused by undersized and badly routed runs, is a design problem.
Diagnostic Checks That Separate Repairs From Replacement
Work in order, cheapest first. Each step either clears the duct or gives you a specific reason to replace it. Don't skip to pricing until you've finished the sequence.
Inspect accessible runs: Look for disconnected joints, crushed or sharply bent flex duct, and damaged insulation.
Measure register airflow: Compare rooms to find which branches deliver the least air.
Check static pressure: Measure at the air handler, where restrictions and major leakage show up first.
Run a duct-blaster test: Measure total leakage at 25 pascals as a share of fan flow.
Review the design: Ask for a Manual D review to confirm sizing and layout match the equipment.
The U.S. Department of Energy duct retrofit decision guide states leakage to outdoors should not exceed 5% of total system airflow, while broader duct-system guidance targets total leakage below 10% of fan flow. It also identifies R-6 as a typical minimum for ducts in unconditioned spaces, while newer high-performance specifications commonly require R-8. Persistent leakage above these levels after professional sealing indicates replacement or major reconstruction may be more effective than repeated patching.
Duct Diagnostic Tests and Replacement Triggers
Test | What It Measures | Replacement Trigger |
|---|---|---|
Visual inspection of accessible runs | Disconnected joints, crushed flex, damaged insulation | Widespread damage across several runs |
Duct-blaster leakage test at 25 pascals | Total leakage as a share of fan flow | Above 10% after professional sealing |
Outdoor leakage test | Leakage to outside the conditioned space | Above 5% of total airflow |
Airflow measurement at registers | Delivered airflow per room | Persistent shortfall after balancing |
Manual D design review | Whether duct sizing and layout match the equipment | Undersized or poorly routed layout |
Insulation check in attic or crawlspace | Insulation level in unconditioned space | Below R-6 and not upgradable |
Static pressure at the air handler | Restriction or leakage near the equipment | Still outside equipment limits after sealing and removing restrictions |
Minor defects found early often correct with mastic, approved sealants, insulation repairs, and reconnection. That's a repair verdict, and it's a good outcome. If you want the testing method explained before a technician arrives, read how pressure testing ductwork produces the leakage number.
A system that passes after sealing only needs repair. A system that is undersized, poorly balanced, or still failing thresholds after sealing won't reach design airflow with more patches. I would replace that system rather than seal it a third time.
Replacement Cost Ranges and Repair vs Replace Checklist
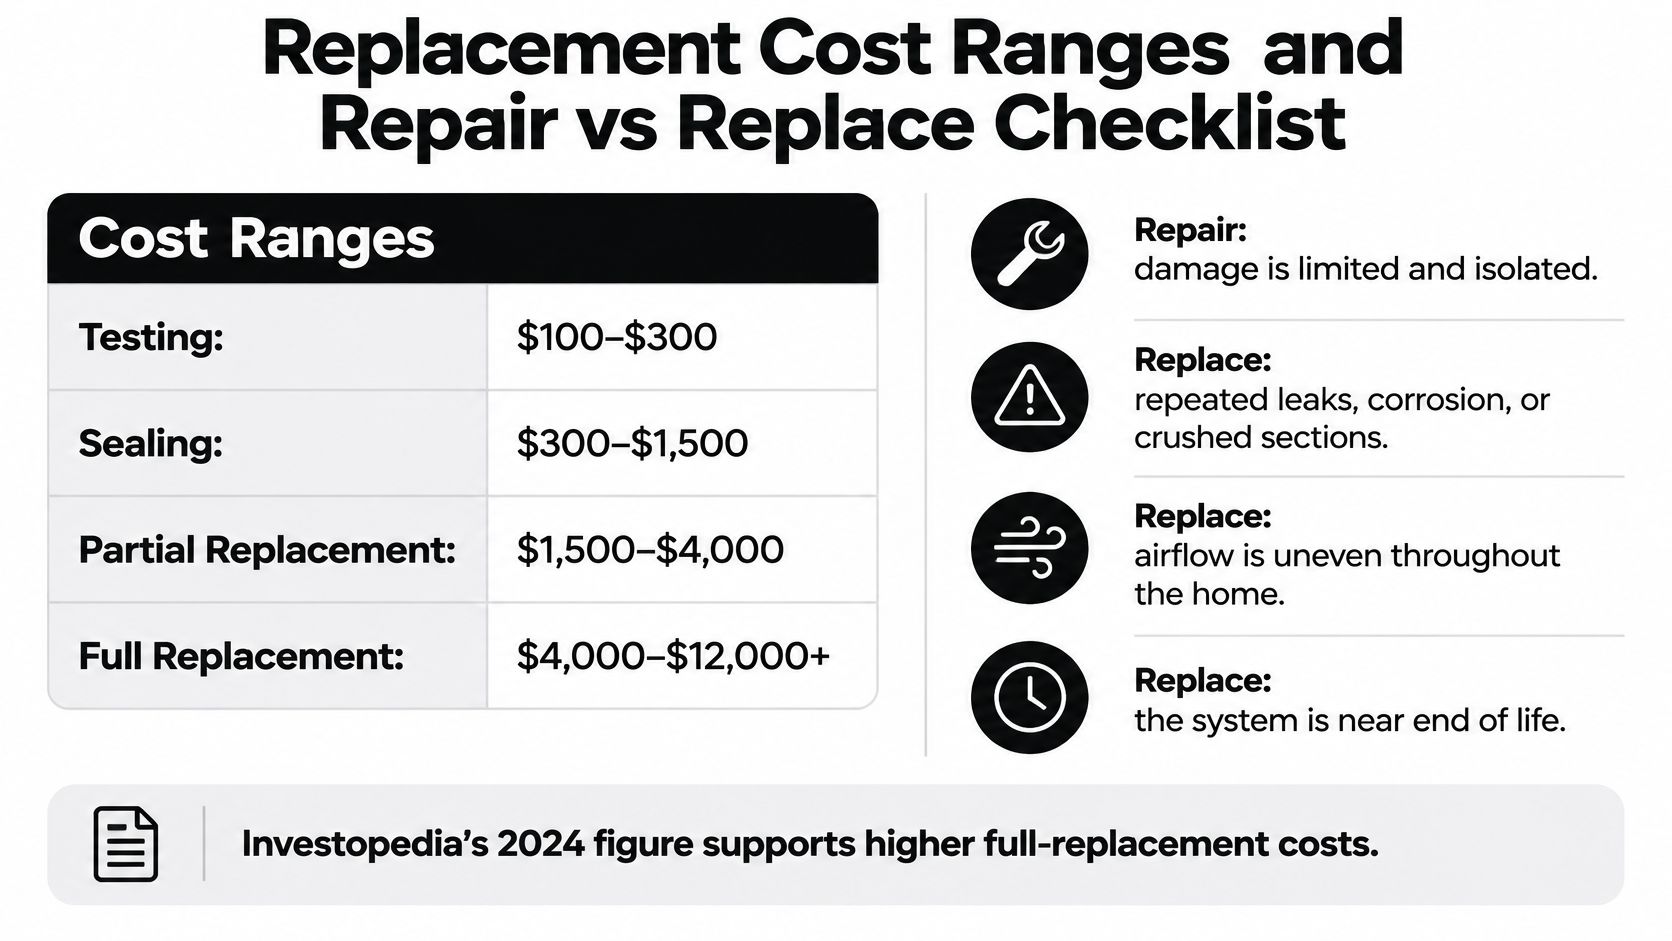
Price the options in tiers, because they solve different problems. Testing tells you which tier you need. Paying for full replacement when targeted sealing would pass is wasteful, and paying for sealing twice on a failed layout is wasteful in the other direction.
The visual below puts the cost tiers beside the checklist so you can match your test results to a budget range.
Ductwork Cost Options Compared
Option | When It Fits |
|---|---|
Visual inspection and leakage test | Before any repair or replacement decision |
Targeted duct sealing and insulation | Sound duct material with leaks at reachable joints |
Partial duct section replacement | Localized crushed, corroded or contaminated runs |
Full ductwork replacement | Widespread damage, undersized layout or contamination |
Complete HVAC system with ductwork | Failing equipment and ducts needing replacement together |
For the top tier, Investopedia's 2024 home maintenance budget guide reported replacing an HVAC system with ductwork generally costs $7,000 to $16,000 in the United States. Duct-only pricing shifts with home size, number of runs, attic access, insulation, and materials, so compare itemized quotes rather than lump sums. For the repair side of the ledger, check how much ductwork repair costs against any quote you receive.
How to Work Out Payback
Divide the project cost by the yearly savings you can verify from your utility bills. Then compare that payback period with how long you expect to stay in the home. Two verified anchors help you sanity check a contractor's savings claim.
U.S. Department of Energy guidance summarized in its ducts in conditioned space report reports duct sealing in a Phoenix study reduced leakage by 30% and saved about $80 per home annually. Separately, the ENERGY STAR efficient duct systems feature sheet reports a typical homeowner once spent more than $600 annually on space heating and cooling, while tightly sealed and insulated ducts could reduce annual utility costs by $120 or more.
Use that math. Sealing that recovers lost air can pay back within a few seasons. Replacement pays back slower, through shorter run times, fewer repeat repairs, and equipment performing close to its rating.
Lean toward replacement when:
Tests still fail: Leakage stays high after professional sealing.
Insulation can't reach standard: Attic runs can't be brought to the required level.
Sizing is wrong: A design review shows an undersized or poorly routed layout.
Contamination is widespread: Several runs show moisture or debris in the duct wall.
Repairs keep recurring: You've sealed the same problems within two years.
New equipment is coming: The new system needs ducts that can deliver its rated airflow.
Lean toward repair when leaks sit at reachable joints and the material springs back, holds its insulation, and passes a retest after sealing.
What to Expect From Duct Replacement Day to Finish
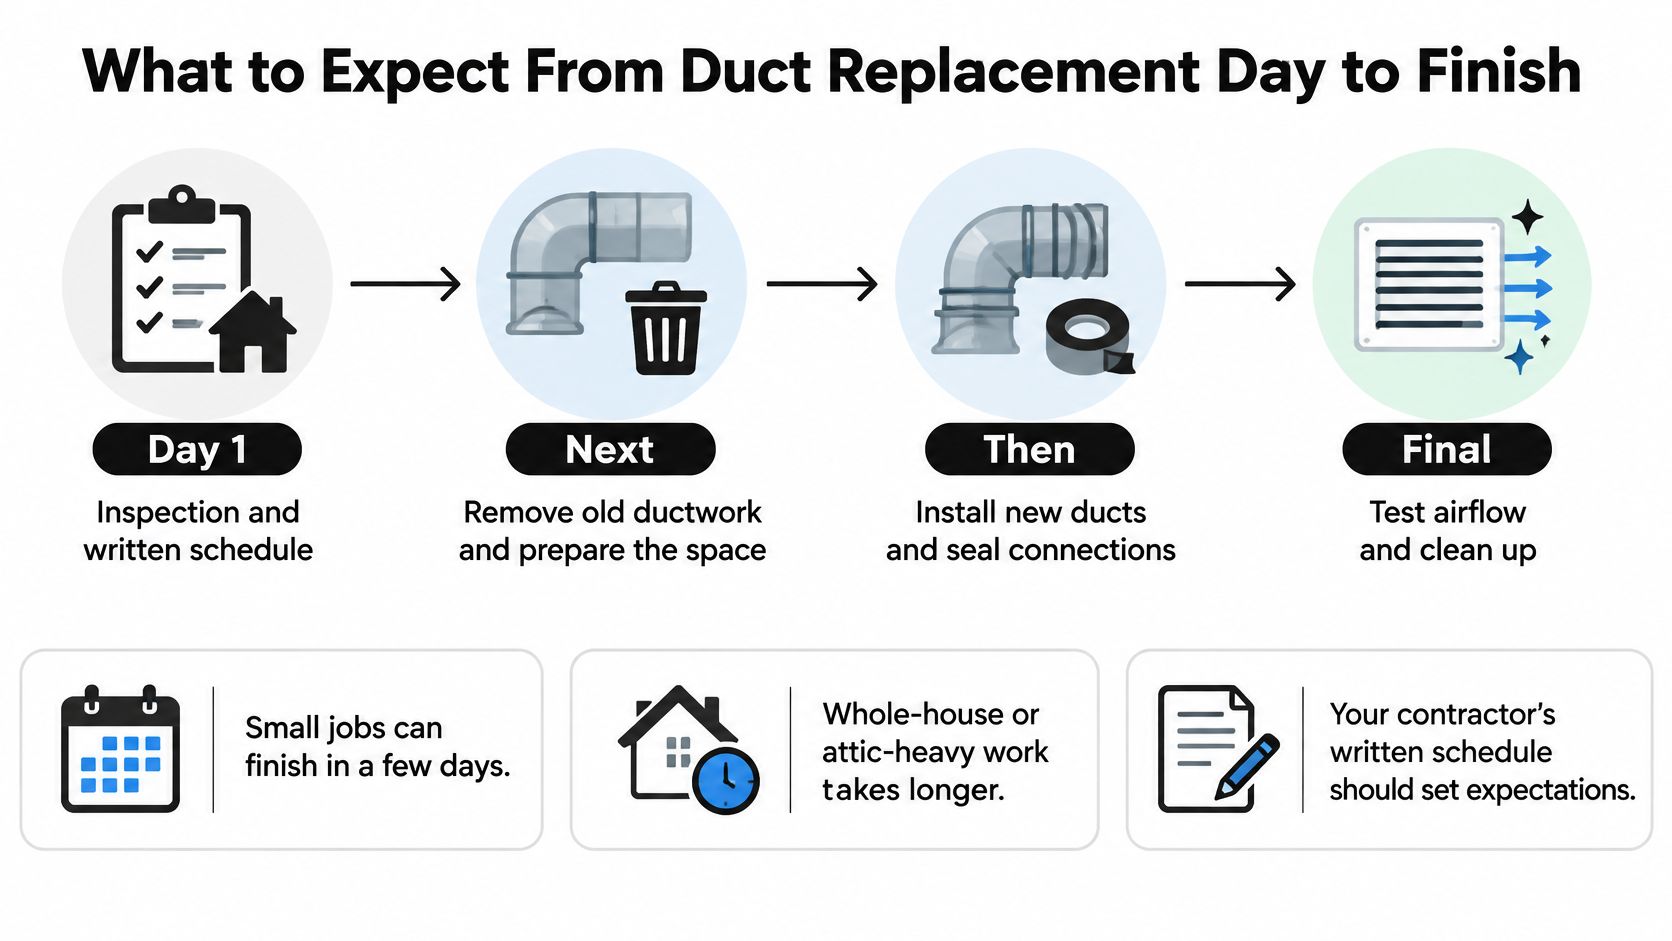
A small partial job can finish in a few days. Whole-house or attic-heavy work takes longer, especially in Tucson summer heat when attic hours are limited for crew safety. Your contractor's written schedule should set the dates, not a verbal estimate at the kitchen table.
This timeline shows the order a well-run job follows from inspection to cleanup.
The Job in Order
Get results in writing: Test numbers and a written scope come before demolition.
Confirm the design: Layout and sizing get checked against the equipment.
Plan the logistics: Access routes, power shutoffs, and temporary heating or cooling needs.
Remove old runs: Crews pull failed sections and inspect the plenum and air handler connections.
Install and seal: Every joint gets approved mastic or UL 181 tape, not cloth tape.
Insulate unconditioned runs: Attic and crawlspace ducts get sealed and insulated as a system.
Retest and balance: Total leakage gets measured again and airflow balanced room by room.
Review and clean up: You walk the results, warranty terms, and cleanup before final payment.
Expect dust, attic noise, and no heating or cooling on install days while sections are open. Keep attic access, the air handler area, and register locations clear so crews aren't moving your belongings. Ask who patches any ceiling or wall openings if boots need resizing, because that detail causes more disputes than the duct itself.
Confirm in writing before work starts: the schedule, cleanup standards, disposal of old material, and who handles access problems if a run turns out to be buried or damaged behind a wall. A contractor who plans retesting into the schedule is planning to prove the result. One who doesn't mention it is asking you to trust the install blind.
Hire a Qualified Pro and Test Before You Sign
Hire on evidence, not urgency. A contractor who recommends replacement before measuring leakage is selling you a conclusion without the work that supports it. Use this checklist on every bidder, including us.
License and insurance: On file and current before anyone enters your attic.
Written test results: Leakage and airflow numbers before any replacement quote.
Design review: Sizing checked against your equipment, not copied from the old layout.
Itemized quote: Materials, labor, sealing, and insulation priced as separate lines.
Clear warranty: Coverage for materials and workmanship stated in writing.
Recent references: Duct jobs specifically, not just equipment installs.
If you're comparing companies for the first time, how to choose an HVAC contractor covers the screening questions in more depth. Bring your photos, suspect run locations and lengths, and recent utility bills to the first call. That preparation shortens the diagnostic visit and makes quotes comparable.
Your Decision After Testing
We service all makes and models of HVAC systems, and our technicians arrive on time, maintain a clean work environment, and explain each step of the service. Our indoor air quality work includes air duct cleaning, Aeroseal duct sealing, and air purification systems, which matters when contamination is part of the finding. Confirm any specific service directly with Covenant Aire Solutions before relying on it for your home.
Test first, then decide. The numbers protect you from both overselling and underfixing.
Book the leakage and airflow test. If results confirm the replacement triggers, schedule the work with a written scope and a retest built in. If they don't, seal and insulate the reachable defects, then retest after a season to verify the repair held. Either way, you'll know when to replace ductwork in your home because you measured it, not because someone guessed.
If your test results point to sealing, partial replacement, or a full duct redesign, Covenant Aire Solutions can inspect the system, explain the findings, and scope the work in writing. Visit Covenant Aire Solutions to schedule a duct leakage and airflow evaluation for your Tucson home.