How to Install a Split AC System A DIY Homeowner's Guide
- Feb 12
- 18 min read
Installing a split AC system is a serious project. It's a blend of standard construction work, like mounting and drilling, and highly specialized HVAC tasks that demand precision. To get a safe, efficient, and long-lasting setup, you need to nail both aspects.
Your Essential Pre-Installation Game Plan

Before you even think about picking up a drill, know this: a successful split AC installation is won or lost in the planning phase. This is your roadmap. It's where you figure out the best spots for your units, gather all the right gear, and map out a clear strategy. Trust me, skipping this step is a recipe for frustration, extra trips to the hardware store, and mistakes that can cripple your system’s performance.
There's a reason these systems are so popular. Homeowners love them for their quiet operation and impressive efficiency. In fact, the North American market for split air conditioners hit USD 29.23 billion in a single year and is on track to blow past USD 50.66 billion by 2032. That's a massive trend, all driven by the comfort and energy savings these units deliver.
A solid plan is your best defense against getting halfway through the job only to realize you're missing a critical part. To get a feel for the entire process, it's always a good idea to review an expert AC installation guide before you start.
Conducting a Thorough Site Assessment
First things first, you need to scout your locations. This isn't just about finding some open wall space. It’s a strategic decision that will directly impact your AC's performance and how easy it is to service down the road. The right placement is everything.
As you walk the property, keep these critical points in mind:
Indoor Unit Location: Your indoor air handler needs to be mounted high up on an exterior wall. Keep it away from direct sunlight or other heat sources. Critically, you must leave at least six inches of clear space on all sides for good airflow and future maintenance access.
Outdoor Unit Location: The condenser outside needs a solid, perfectly level spot, like a concrete pad. It requires plenty of breathing room, clearance from walls, fences, and landscaping, so it can pull in air and dissipate heat without obstruction.
Proximity and Access: The distance between the indoor and outdoor units determines how long your refrigerant lines need to be. Shorter is always better for efficiency. You also have to think about getting power to the outdoor unit.
One of the most common mistakes I see is forgetting about noise. Sure, modern split systems are quiet, but putting the condenser right under a bedroom window is still going to be noticeable. Always consider the impact on both your family and your neighbors.
Assembling Your Tools and Materials
Once you've picked your spots, it's time to gather your supplies. Getting everything you need laid out before you start makes the whole installation process infinitely smoother. It prevents those momentum-killing interruptions and ensures you have the right tool for every single task.
The checklist below covers the essentials. Having everything on hand before you begin will make the installation process much more efficient and less stressful.
Essential Tools and Materials for Your Split AC Installation
Category | Item | Key Consideration |
|---|---|---|
Drilling & Mounting | Drill with various bits | A hammer drill is essential for masonry or concrete walls. |
Core drill bit (3-inch) | For creating the hole through the wall for the lineset. | |
Stud finder | Absolutely critical for safely mounting the indoor unit. | |
Level | Ensure both indoor and outdoor units are perfectly level. | |
Mounting brackets | Use the manufacturer-supplied bracket for the indoor unit. | |
HVAC Specific | Flaring tool kit | For creating perfect, leak-proof flares on the copper tubing. |
Tube cutter & deburring tool | For clean, precise cuts on the refrigerant lines. | |
Torque wrench | Prevents over-tightening and damaging flare nuts. | |
Vacuum pump | Non-negotiable for evacuating moisture from the lines. | |
Refrigerant manifold gauge set | To properly measure pressure during evacuation and charging. | |
Electrical | Wire strippers/cutters | For preparing the electrical connections. |
Multimeter | To verify voltage and ensure proper electrical connections. | |
Electrical conduit & fittings | To protect the outdoor wiring from the elements. | |
Disconnect box | A safety requirement for the outdoor unit. | |
General & Safety | Safety glasses & gloves | Protect yourself from debris and sharp edges. |
Wrenches (adjustable & open-end) | For tightening fittings and mounting bolts. | |
PVC pipe & cement | For the condensate drain line. | |
Leak detector solution | To check for refrigerant leaks after charging. |
Gathering these items is a crucial part of the prep work. It’s the foundation for a professional-quality installation.
Of course, planning isn't just about tools and location. Sizing the unit correctly is just as vital. A system that's too small will run constantly without ever cooling your space, while one that's too big will short-cycle, wasting tons of energy. We have a detailed guide on how to size an air conditioner for your home that walks you through the process. Getting the size right ensures your new AC runs efficiently for years.
Securely Mounting the Indoor and Outdoor Units
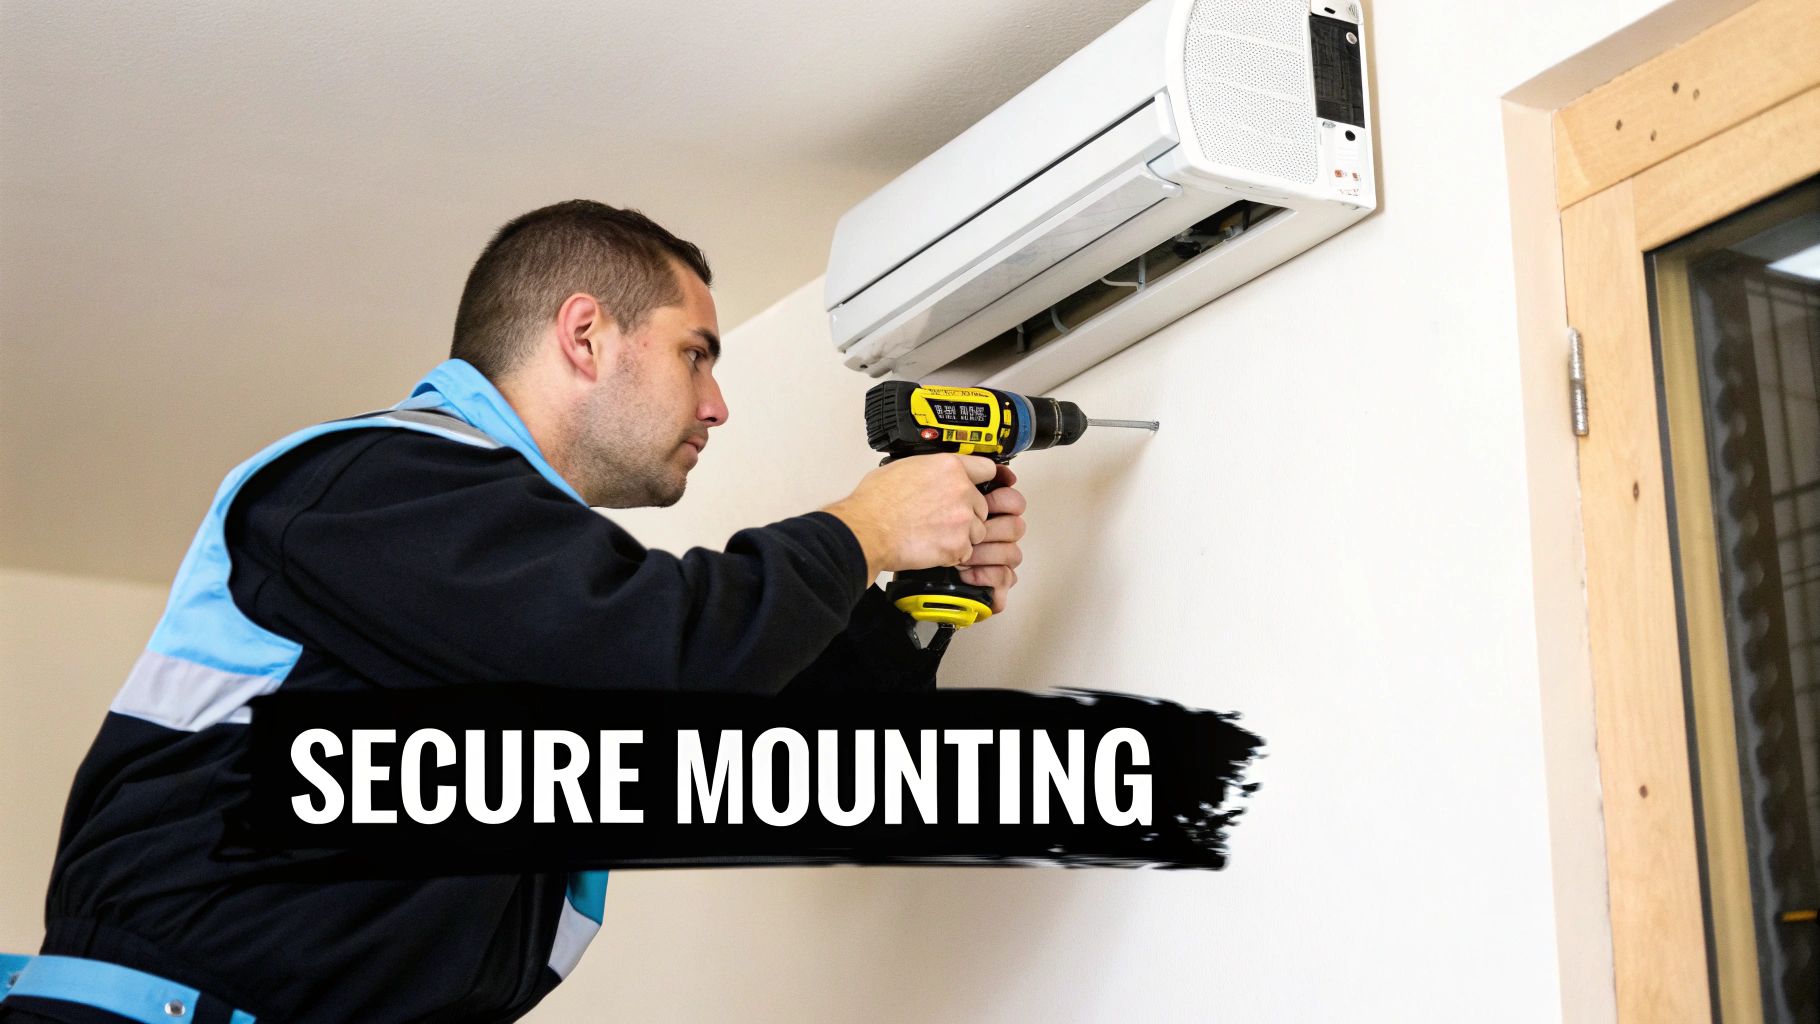
With your locations picked out, it's time to roll up your sleeves and get to the physical installation. This part is all about creating a rock-solid foundation for both parts of your split AC. Getting this right isn't just about making it look good; it's critical for proper drainage, quiet operation, and the long-term health of your system.
A wobbly or poorly mounted unit can cause a whole host of issues, from annoying vibrations that echo through your walls to serious water damage. Taking the time to get the mounting perfect is where your careful planning really starts to pay off.
Positioning the Indoor Air Handler
The indoor unit is the part you'll see every day, so placing it is a blend of function and aesthetics. It all starts with the mounting plate, which is the backbone for the entire indoor unit.
This plate absolutely has to be secured directly to wall studs. Grab a stud finder, locate at least two, and mark them clearly. If the studs just aren't in the right spot, you'll have to use heavy-duty drywall anchors rated for the unit's weight, but trust me, mounting directly to studs is always the better, safer choice.
The single most critical detail here is making sure the plate is perfectly level. Even a slight tilt can make the condensate drain pan overflow, leading to water dripping down your wall and causing a world of damage. Double- and triple-check with your level before you drill a single hole.
Once that plate is locked down, you need to create a pathway for the refrigerant lines, drain hose, and electrical wiring. This means drilling a pass-through hole, usually about three inches in diameter, straight through the exterior wall. Follow the manufacturer's template for the exact position, and always drill from the inside out at a slight downward angle. That angle uses gravity to your advantage, ensuring water drains away from your house.
Establishing a Base for the Outdoor Condenser
While the indoor unit needs precision on a vertical wall, the outdoor condenser needs a stable, level spot on the ground or a special bracket. Its main job is to get rid of heat, and it can't do that effectively without a solid base that allows for great airflow and dampens vibrations.
Any professional job you see will have the condenser sitting on a pre-made concrete pad. These pads provide a durable, level surface that keeps the unit off the damp ground and away from dirt, leaves, and pests. You can find them at pretty much any home improvement store.
If ground space is tight or you live where it snows a lot, wall-mounting brackets are a fantastic alternative. Either way, the principle is the same: the surface must be perfectly level and strong enough to support the condenser’s weight and operational vibrations without a hint of shifting.
Concrete Pad: Always place the pad on a bed of gravel. This helps with drainage and prevents it from sinking or tilting over the years.
Wall Brackets: Fasten these directly to solid masonry or structural supports with heavy-duty lag bolts, making sure they're level both front-to-back and side-to-side.
Clearance is just as important as the base itself. Most manufacturers will tell you to leave at least 12 inches of clear space around the sides and back of the unit, with several feet of open space above it. This isn't a suggestion; it's a requirement. The fan needs that space to pull in enough air to cool the refrigerant. Block it, and you'll tank your efficiency and risk burning out the compressor.
For more hands-on advice, you can check out our guide on 8 essential AC installation tips for 2025.
Connecting the Refrigerant Lines and Electrical Wiring
Alright, this is where the real technical work begins, moving from the structural setup to the system's heart. Precision is everything here. A tiny mistake with a refrigerant line or a loose wire can cause major headaches and even system failure down the road. Let’s walk through how to handle the copper lineset and the critical wiring that powers your new AC.
Getting these connections right is what separates a DIY job from a professional installation. Your attention to detail in these next steps will directly impact how efficiently, and for how long, your system runs.
Mastering the Refrigerant Lineset
Think of the lineset, those two copper tubes, as the circulatory system for your air conditioner. One line carries cool, low-pressure refrigerant to the indoor unit, while the other returns hot, high-pressure refrigerant back outside. Mishandling these tubes is one of the most common and expensive mistakes I see.
First up, you need to carefully route the lineset from the indoor unit, through the hole in the wall, and over to the outdoor condenser. Take your time and use gentle, gradual bends. Kinking that soft copper is a fatal mistake.
A sharp kink in a refrigerant line is like a clog in an artery. It chokes the flow, puts immense strain on the compressor, and can kill the entire system. A proper pipe bender is a small investment that protects the much bigger one you just made in your AC.
With the lines routed, it's time to prep them for connection. This is a meticulous three-step process. Don't rush it.
Cut the Tubing: Use a dedicated pipe cutter, not a hacksaw. You need a perfectly clean, square cut to ensure the flare you're about to make will seal tightly against the fitting.
Deburr the Edge: That fresh cut will leave a small burr on the inside edge of the pipe. Grab a deburring tool and gently ream the edge until it's smooth. This keeps tiny copper shavings from getting into the system and causing serious damage.
Flare the End: Here’s a pro tip that’s easy to forget: slide a flare nut onto the tubing before you flare it (threads facing the end, of course). Use a quality flaring tool to create a perfect, symmetrical, bell-shaped flare. A lopsided or cracked flare is the #1 cause of refrigerant leaks.
Once your flares are perfect, you can connect the lines to both the indoor and outdoor units. When tightening the flare nuts, always use two wrenches: one to hold the fitting steady and one to turn the nut. This is crucial to prevent twisting and damaging the copper tubing. Use a torque wrench to tighten each nut to the manufacturer's exact specifications.
Insulating the Lineset Properly
Connections tight? Great. Now it's time for insulation. Each copper line needs to be fully encased in its own foam insulation tube. This isn't an optional step; it’s critical for two big reasons: preventing energy loss and stopping condensation.
The smaller "liquid line" gets warm during operation, but the larger "suction line" gets incredibly cold. Without proper insulation, that cold suction line will sweat like a glass of ice water on a humid day, potentially causing water damage inside your walls. Uninsulated lines also bleed energy, forcing your system to work harder and reducing its overall efficiency.
Navigating the Electrical Connections
The wiring for a split system breaks down into two main parts: a low-voltage communication cable that links the indoor and outdoor units, and a high-voltage power line that feeds the outdoor condenser.
Safety is non-negotiable here. Before you touch a single wire, go to your main breaker panel and shut off the power to the circuit you'll be working on.
Start by running the communication cable right alongside the refrigerant lineset. This wire is how the indoor and outdoor units "talk" to each other to coordinate their operation. Simply connect the color-coded wires to the matching terminals on both units and make sure every connection is snug.
Next up is the main power for the outdoor condenser. This requires a dedicated circuit run from your home's breaker panel, through an outdoor-rated conduit, to a disconnect box mounted near the unit. When you're making these connections, it’s absolutely critical to understand the proper wiring colour codes Australia or the equivalent for your region to stay safe and compliant.
Confirm Wire Gauge: Your system’s manual will specify the required wire gauge and breaker size. Using a wire that's too small is a serious fire hazard.
Secure Connections: Double-check that all your connections, at the breaker, in the disconnect box, and at the condenser, are tight. A loose connection can arc, create heat, and lead to failure.
Grounding: A proper ground connection is an essential safety feature that protects both the unit and you from electrical faults.
If you feel even slightly unsure about the electrical work, this is the time to stop and call a licensed electrician. For those wanting to dive deeper into the schematics, our guide on how to read hvac wiring diagrams explained is a great resource. Getting the wiring done right isn't just about making the system work; it's about making it safe.
Performing a Proper System Evacuation and Pressure Test
Alright, you've got the units mounted and the lines connected. This next part, the system evacuation and pressure test, is what really separates a professional, long-lasting installation from one that’s doomed to fail. This is a non-negotiable step that ensures your new system kicks on and runs at peak performance from day one.
The goal here is simple but absolutely critical: you have to remove every last trace of air and, more importantly, moisture from the refrigerant lines. If you skip this, non-condensable gases and water vapor mix with the refrigerant. This nasty cocktail can create corrosive acids that will eat your compressor alive from the inside out, leading to terrible cooling and an expensive, premature failure.
The incredible demand for these units highlights why doing this right matters so much. The global market for split HVAC systems was valued at a massive USD 54.5 billion and is expected to rocket to USD 131.9 billion by 2035. With so many homeowners investing in this technology, cutting corners just doesn't make sense.
Before you can even think about pulling a vacuum, the physical prep work on the copper lines has to be perfect. This means precise cutting, flaring, and insulating to guarantee a leak-proof seal.
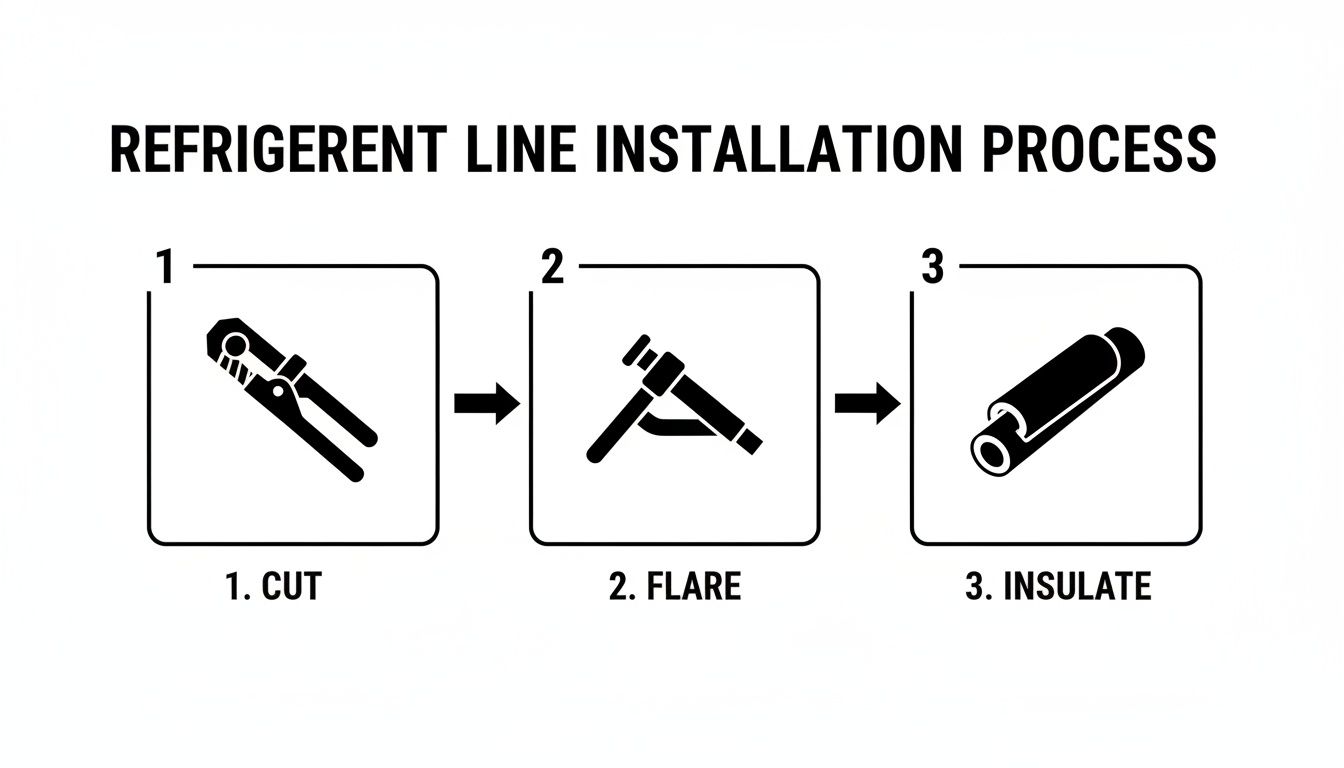
This diagram shows the three essential steps for prepping the copper tubing before you hook up any gauges.
The Importance of Pulling a Deep Vacuum
To get started, you'll need a two-stage vacuum pump and a manifold gauge set. Go ahead and connect your gauges to the service ports on the outdoor unit; one hose to the low-pressure side and the other to the high-pressure side. The center hose on your gauge set hooks directly to the vacuum pump.
With everything connected, fire up the pump and open both valves on your manifold. Your target is to pull a deep vacuum, which we measure in microns. For almost any residential system, you need to pull that vacuum down to 500 microns or less. This isn’t a quick job; depending on how long your lineset is and the humidity in the air, it can take anywhere from 30 minutes to well over an hour.
A common shortcut I see is guys running the pump for 15 minutes and calling it good. This is a huge mistake. If you aren't using a micron gauge, you're just guessing. A deep, verified vacuum is the only way to be certain all the moisture has boiled off and been yanked out of the system.
Conducting a Pressure Decay Test
Once you've hit that 500-micron target, it's time to prove your connections are solid with a pressure decay test. This is how you find out if you have any minuscule leaks in your flare connections. A leak so small you can't see or hear it can still let the entire refrigerant charge bleed out over a few weeks.
Here’s how to do the test the right way:
Isolate the System: First, close the valves on your manifold gauge set. This traps the vacuum inside the lineset and indoor coil.
Turn Off the Pump: Now that the system is isolated, you can shut down the vacuum pump.
Watch and Wait: Let the system sit for at least 15 to 30 minutes. Keep your eye on the micron gauge for any rise in pressure.
It's normal to see a small rise as any leftover moisture boils off, but the pressure should level out and stabilize. If that reading just keeps climbing and goes past 1,000 microns, you've got a leak. At that point, it’s back to square one: double-check every single flare connection, tighten them down, and pull the entire vacuum all over again.
This meticulous process is all about ensuring the integrity of the refrigerant circuit, which is the heart of efficient operation. The refrigerant itself also plays a huge role in performance. To learn more about the latest types, check out our guide on what refrigerant replaces R22.
Final Checks and Powering Up Your System
You’ve done the heavy lifting, and the finish line is in sight. This is the moment of truth, but don't rush it. I’ve seen plenty of otherwise perfect installations stumble at the very end because these final checks were treated as an afterthought. Let's give this stage the focus it deserves.
These last few steps are all about buttoning everything up and then methodically bringing the system to life. It’s not just about flipping the switch; it’s a deliberate process of observation and measurement to confirm your mini-split is ready to go.
Completing the Final Installation Touches
Before a single electron flows, let's get the exterior work completely finished. This means protecting your lineset and sealing the hole in your wall to keep weather, bugs, and drafts where they belong: outside.
Grab a roll of high-quality, UV-resistant vinyl tape. Starting right at the wall, begin wrapping the entire lineset bundle. You want to cover the insulated copper tubes, the communication wire, and the drain hose, creating a single, neat package all the way to the outdoor unit. This tape is your lineset’s primary shield against sun damage and physical scuffs.
Next, turn your attention back to the hole in the wall. A proper seal here is critical. From the inside, use expanding foam sealant to fill the gap around the lineset bundle. Then, head outside and apply a flexible, weatherproof sealant like silicone caulk around the opening. Finish it off by installing the decorative wall escutcheon (that little trim ring) that came with your unit.
A good seal isn't just for looks. It prevents air leaks that kill your home's efficiency and stops moisture from creeping into your wall cavity, which is a recipe for mold and rot. It's a small detail with huge consequences.
The Power-Up and Initial System Test
With everything sealed and secure, it’s time.
First, head to the outdoor unit. Using an Allen wrench, open both the high and low-pressure service valves. This releases the factory refrigerant charge into the lineset and indoor coil. You'll probably hear a quick "psssst" as the pressure equalizes, which is completely normal.
Now, go to your main electrical panel and flip the breaker for your new AC circuit to the "on" position. Grab the remote, power the system on, and crank it down to its coolest setting and highest fan speed. Time to put on your diagnostic hat.
Here’s your immediate startup checklist:
Listen Closely: A healthy unit should just be a quiet hum. Any loud clanking, grinding, or intense vibration from either unit is a major red flag. Shut it down and investigate.
Confirm Operation: Is the indoor unit’s fan blowing? Are the louvers moving? Go outside: is the condenser fan spinning? Can you hear the low-key hum of the compressor?
Feel the Airflow: Back inside, you should feel a steady, strong flow of cool air coming from the unit.
Verifying Cooling Performance
This is the final exam for your installation. We need to confirm the system isn't just running, but is actually cooling effectively. The professional way to do this is by measuring the temperature drop across the indoor coil, known as the "delta T."
You’ll need a decent thermometer for this. First, measure the temperature of the air being pulled into the top of the indoor unit (the return air). Then, measure the temperature of the cold air blowing out of the front (the supply air).
Let the system run for a solid 15-20 minutes to stabilize before taking your final readings.
You're looking for a temperature difference of between 16°F and 22°F. A delta T in this sweet spot tells you the system has the right amount of refrigerant and is working at peak efficiency. If your number is too low, you might have a refrigerant issue that needs a pro to diagnose. Nailing this final test is a huge part of learning how to install a split AC system the right way.
Knowing When to Call a Professional
There's a real sense of accomplishment that comes with a successful DIY project, and I get it. But learning how to install a split AC system isn't like building a bookshelf; you're navigating a minefield of technical and regulatory rules. Sometimes, the smartest move is knowing when to hang up the tool belt and let a certified pro take over. It's not just about convenience; it's about protecting your investment from day one.
Frankly, many parts of this job require specialized knowledge that goes way beyond even advanced DIY skills. I’m talking about things like handling refrigerant, making the final high-voltage electrical connections, and correctly sizing the unit for your home's unique heat load. A single misstep here can lead to an inefficient system that costs a fortune to run, a voided warranty, or worse, a dangerous situation.
Legal and Technical Complexities
One of the biggest stop signs for any DIY installer is the refrigerant. In the United States, EPA Section 608 makes it crystal clear: only certified technicians can legally handle refrigerants. This isn't a friendly suggestion. Trying to buy or work with these chemicals without the right credentials is a federal offense that can bring some serious fines.
And that's just the federal law. You also have to deal with local rules. Many cities and counties require permits for HVAC installations to make sure the work is up to local building and electrical codes. A professional knows how to navigate this red tape and ensures your installation is fully compliant, saving you from a major headache if you ever decide to sell your home.
A professional installation is your best insurance policy. It guarantees that every connection is sound, the system is charged correctly, and all work complies with local codes and the manufacturer's warranty requirements. That peace of mind is priceless.
The Science of Sizing and Efficiency
Getting the unit installed correctly is only half the battle. Making sure it’s the right size is just as critical. HVAC pros don't guess; they use detailed calculations like Manual J to figure out the precise cooling load of your home. They look at all the things you might not think about:
Insulation levels in your walls and attic.
Window quality and which direction they face.
Local climate data and how much sun your house gets.
The number of people living there and even heat-generating appliances.
An improperly sized unit, whether it's too big or too small, will never run efficiently. It will constantly struggle to hold the right temperature, your energy bills will skyrocket, and the whole system will likely fail years sooner than it should.
The demand for these systems is exploding, and for good reason. While the Asia Pacific region currently makes up 47.5% of the market, North America's share is growing the fastest. The U.S. mini-split market alone is expected to jump from USD 7.7 billion to USD 12.5 billion in the next decade.
Ultimately, calling in a professional like Covenant Aire Solutions turns what could be a risky gamble into a sound investment. We handle the technical dangers, the legal paperwork, and the complex science behind it all. All you have to do is relax and enjoy the comfort. For a deeper dive, check out our expert air conditioning installation guide for Tucson residents.
Common Questions About Split AC Installation
Even with a detailed guide, jumping into a project like this for the first time always brings up questions. It's easy to get bogged down in the details of installing a split AC system, so let's clear up some of the most common concerns we hear from homeowners.
Do I Really Need a Permit for This?
One of the first questions people ask is about permits. The short answer is, almost certainly, yes. Most local building departments want to see a permit pulled for any HVAC work. It’s their way of making sure the installation is up to snuff with safety standards and electrical codes. Always give your city or county a call before you buy a single tool.
Can I Get By Without the Fancy HVAC Tools?
Another big one is about the equipment. Is it really necessary to get a vacuum pump and manifold gauges? Absolutely. You simply can't skip this. These aren’t just suggestions; they are 100% essential for a reliable system. Without a proper vacuum, you're leaving moisture in the lines that will inevitably kill the compressor.
Can I Just Install This Myself?
While a handy homeowner can definitely handle mounting the units and running the lines, some parts of the job require a pro, both legally and practically. In the United States, you can't handle refrigerant unless you have an EPA Section 608 certification. It’s the law.
This is where a hybrid approach often makes the most sense. Many homeowners do the physical work: mounting the units, drilling the hole, running the copper lines, and handling the basic wiring, and then call in a licensed HVAC tech for the final connections. The pro can then legally and correctly vacuum the lines, pressure test the system, and charge it with refrigerant. You save some money, but the most critical steps are handled by an expert.
How Long Is This Actually Going to Take?
If this is your first time, be realistic and block out a full weekend. A seasoned pro can knock out a standard installation in 4 to 8 hours, but you’re not a pro. You’ll want to move slowly and double-check everything you do. Rushing is how you end up with a cracked flare fitting or a leaky connection.
A good game plan looks something like this:
Day 1: Pick your spots, get the indoor and outdoor units securely mounted, and drill the hole through the wall.
Day 2: Focus on carefully running the lineset, making the electrical connections, and then moving on to the crucial final steps: evacuation, pressure testing, and commissioning the system.
Trying to juggle the technical steps, safety rules, and local regulations for a split AC installation can be a real headache. For a guaranteed safe, compliant, and perfectly efficient setup, trust the certified experts at Covenant Aire Solutions. We make sure your system is installed right the first time, so you can enjoy years of worry-free comfort. Contact us today for a professional consultation.