AC Dripping Water Your Complete Guide to Finding and Fixing Leaks
- Jan 30
- 13 min read
Seeing a puddle of water forming under your air conditioner is definitely unsettling, but don't panic. It doesn’t always mean your entire system is shot. More often than not, it’s a sign that one specific part isn't doing its job correctly, and it's often a fixable problem.
First things first: shut your AC off. Turn it off at the thermostat, then head to your circuit breaker and flip the switch for the AC unit. This is critical for preventing further water damage and avoiding any electrical hazards.
So, Why Is My AC Leaking Water Anyway?
Your air conditioner's main job, besides cooling, is to pull humidity out of the air. This moisture, called condensate, has to go somewhere. It drips into a pan and flows out through a drain line. When that drainage system gets backed up, the water has nowhere to go but down, right onto your floor or through your ceiling.
This is a surprisingly common issue. Did you know that water dripping from AC vents points to a critical malfunction that affects about 30% of residential cooling systems? In hot climates, an AC unit can produce up to 20 gallons of condensate on a scorching day. A simple clog can turn all that moisture into a serious mess, fast.
Common Causes At a Glance
A few usual suspects are behind most AC leaks. Getting familiar with them is the first step to figuring out a solution.
Here are the most frequent culprits I see in the field:
Clogged Condensate Drain Line: This is, by far, the number one reason for leaks. Over time, algae, dirt, and other gunk build up and create a blockage, causing water to back up.
Frozen Evaporator Coil: Usually, a dirty air filter is to blame here. When airflow is restricted, the coil gets too cold and freezes solid. As it melts, the drain pan can't handle the sudden flood of water.
Cracked or Rusted Drain Pan: The pan that catches all that condensate can wear out over the years. If it cracks or rusts through, water will leak directly out.
Failed Condensate Pump: If your indoor unit is in the basement or attic, it likely uses a small pump to push the water outside. If that pump breaks, the water has nowhere to go.
No matter what you suspect the cause is, shutting off the power to the unit is the most important first step. This single action can be the difference between a small water spot and major structural damage or a serious electrical risk.
For a deeper dive into these issues, you might find our expert tips and solutions for a leaking central AC helpful.
Quick Diagnosis At a Glance
To help you quickly pinpoint the problem, I've put together a simple table outlining the causes, their common symptoms, and how difficult they are to fix yourself.
Potential Cause | Common Symptoms | DIY Fix Difficulty |
|---|---|---|
Clogged Drain Line | Standing water in drain pan, musty smells | Easy to Moderate |
Dirty Air Filter | Reduced cooling, ice on the unit, higher bills | Easy |
Frozen Evaporator Coil | Visible ice, poor airflow, dripping after shutdown | Moderate (thawing) |
Damaged Drain Pan | Consistent dripping directly under the indoor unit | Difficult (Requires Pro) |
Use this as a starting point. If the fix seems straightforward, like changing a filter, you can likely handle it. If it looks more involved, like a damaged drain pan, it's always best to call in a professional.
How to Unclog Your Condensate Drain Line
If you've spotted a puddle forming around your indoor AC unit, don't panic. More often than not, the culprit is a clogged condensate drain line. It's the most common reason we see for AC leaks, and thankfully, it's often a straightforward fix you can handle yourself.
Think of this drain line as the plumbing for your air conditioner. It's designed to carry all the moisture your AC pulls from the air safely outside. But over time, algae, mold, and general gunk can build up inside that pipe, creating a blockage. When that happens, the water has nowhere to go but back into your home.
Locating Your Drain Line
First things first, you need to find the drain line itself. It's usually a white or black PVC pipe, roughly an inch thick, coming out of your indoor air handler. Depending on your home's layout, this unit might be tucked away in an attic, closet, or basement.
Follow that pipe from the indoor unit to where it exits your home, which is typically on an exterior wall near your outdoor condenser unit. You'll also want to look for a T-shaped vent pipe with a cap near the indoor unit; this is your access point for cleaning.
Before you touch anything, always follow the golden rule of HVAC work: cut the power to your system at the breaker box. Safety first, always.
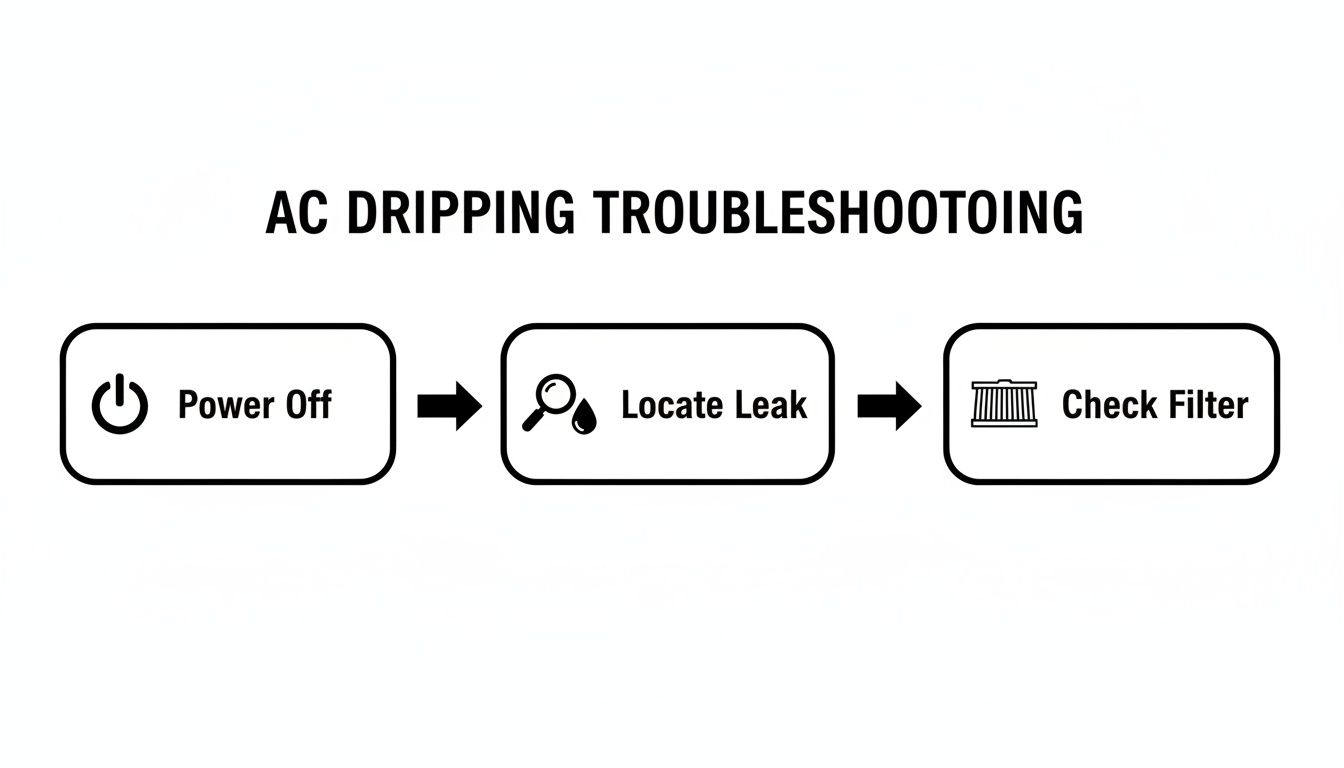
This quick flowchart nails the initial steps: power down, find the leak's source, and check for simple things like a dirty filter before you dive deeper.
Clearing the Blockage with a Vacuum
Once you've found the outside end of the drain line, your best friend for this job is a wet/dry shop vacuum.
You're going to attach the vacuum hose firmly to the end of that PVC pipe. The goal is to create a really tight seal. You might need some duct tape to get it right, or you can just press it firmly in place with your hands.
Flip the vacuum on and let it run for a solid two or three minutes. If all goes well, you'll hear the satisfying sound of water and whatever gunk was causing the clog getting sucked right into the vacuum canister. It's a simple trick, but it's incredibly effective at pulling the blockage out and clearing the way for water to drain properly again.
Pro Tip: After you've cleared the line from the outside, go back to that T-shaped access port near your indoor unit. Pour about a cup of distilled white vinegar down the pipe. This will help kill off any lingering algae or mold and prevent new clogs from forming so quickly.
A clogged drain doesn't just make a mess; it hurts your system's efficiency. Research from UC Davis found that blocked drains can lead to significant air leakage, potentially wasting 5-10% of your cooling energy. That's a real hit to your utility bill.
When DIY Isn't Enough
Sometimes, a clog is just too stubborn for a shop vac. If you've given it your best shot and the line still won't clear, it might be time to call in the experts.
For particularly tough blockages, it's often best to contact professional drain unclogging services. Technicians have specialized tools that can power through clogs that DIY methods can't touch. For a more detailed guide on the process, you can also check out our walkthrough on how to unclog a condensate drain line with easy fixes. Getting a professional involved ensures the line is completely clear, protecting your home from future water damage.
Dealing With a Frozen Evaporator Coil
So, you’ve checked the drain line and it's clear, but the AC is still dripping water all over the place. The next big suspect on our list is a frozen evaporator coil. It can be a little jarring to open up your indoor air handler and see a solid block of ice, but don't panic. This is a surprisingly common problem, and it usually points back to one thing: poor airflow.
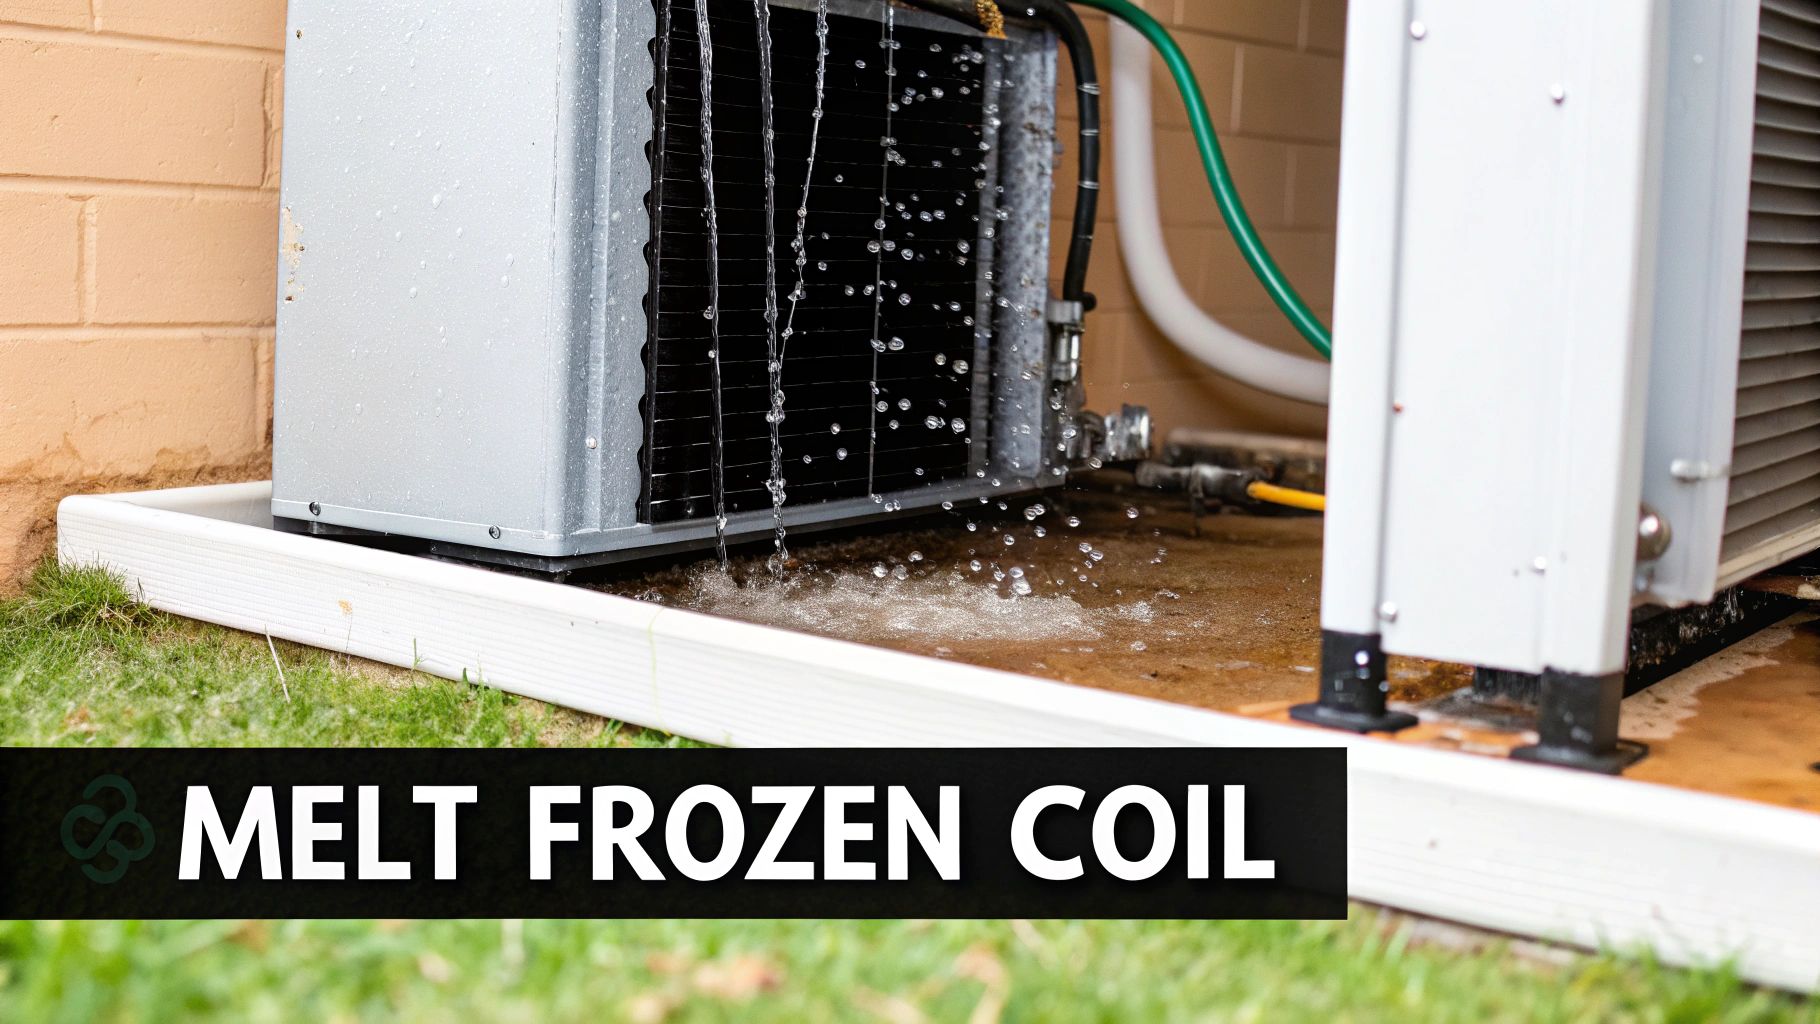
Here's what happens: when not enough warm air moves across the coil, its surface temperature drops below freezing. The condensation that normally forms on it instantly turns to ice. When that ice eventually melts, the sudden gush of water is often way more than your drain pan can handle, and that’s when you get a leak.
First, Thaw. Then, Troubleshoot.
Before you even think about fixing the problem, you have to let the coil thaw out completely. Whatever you do, don't try to chip or scrape the ice off. Those little aluminum fins on the coil are incredibly delicate, and damaging them will turn a simple fix into a costly repair.
Here's the right way to do it:
Turn the Cooling Off: Go to your thermostat and switch the system from "Cool" to "Off."
Keep the Fan On: Now, switch the fan setting to "On" or "Fan Only." This keeps the blower running, circulating room-temperature air across the ice to help it melt faster and more evenly.
This process isn't quick, it can take several hours, so patience is key. It's a good idea to lay some old towels around the base of the air handler to soak up the water as the ice melts.
The Number One Culprit: A Dirty Filter
Once all the ice is gone, your investigation can begin. And nine times out of ten, the cause of the freeze-up is a dirty, clogged air filter. A filter that's choked with dust, pet hair, and other gunk is like trying to breathe through a pillow; it suffocates your system and kills the airflow.
Go pull out your air filter. Can you see light through it when you hold it up? If not, it's way past its prime. Swapping out a dirty filter is the simplest and most common fix for this specific AC dripping water issue. For a deeper dive, we have a detailed guide that explains more about what causes AC coils to freeze in Arizona homes.
Pro Tip: Check your air filter at least once a month. If you live in a dusty area or have pets, you'll probably need to change it even more often. A clean filter is your absolute best defense against a frozen coil.
When a Clean Filter Doesn't Fix It
But what if you put in a fresh filter, turn the AC back on, and the coil ices over again? This is a strong signal that you're dealing with a more serious problem, and the most likely candidate is a refrigerant leak.
When refrigerant levels drop, the pressure inside the system falls with it. This causes the evaporator coil to get far too cold, leading to a freeze-up. This isn't just an efficiency issue; low refrigerant can seriously damage your compressor, the heart of your AC system.
Leaking refrigerant is also an environmental concern. EPA regulations require swift repairs, as even small drips can be a sign of a bigger problem. In fact, low refrigerant from tiny leaks is the reason behind about 25% of AC service calls and can spike your energy use by 20-30% as the system struggles to compensate. Refrigerant is a hazardous material, and only a licensed and certified HVAC professional should ever handle it.
Time to Check the Drain Pan and Condensate Pump
Alright, so if the drain line is clear and your coils aren't a block of ice, the next place to look is the hardware that catches and removes the water. An ac dripping water problem often points directly to a cracked drain pan or a busted condensate pump, especially if you have an older system or one tucked away in a basement or attic.
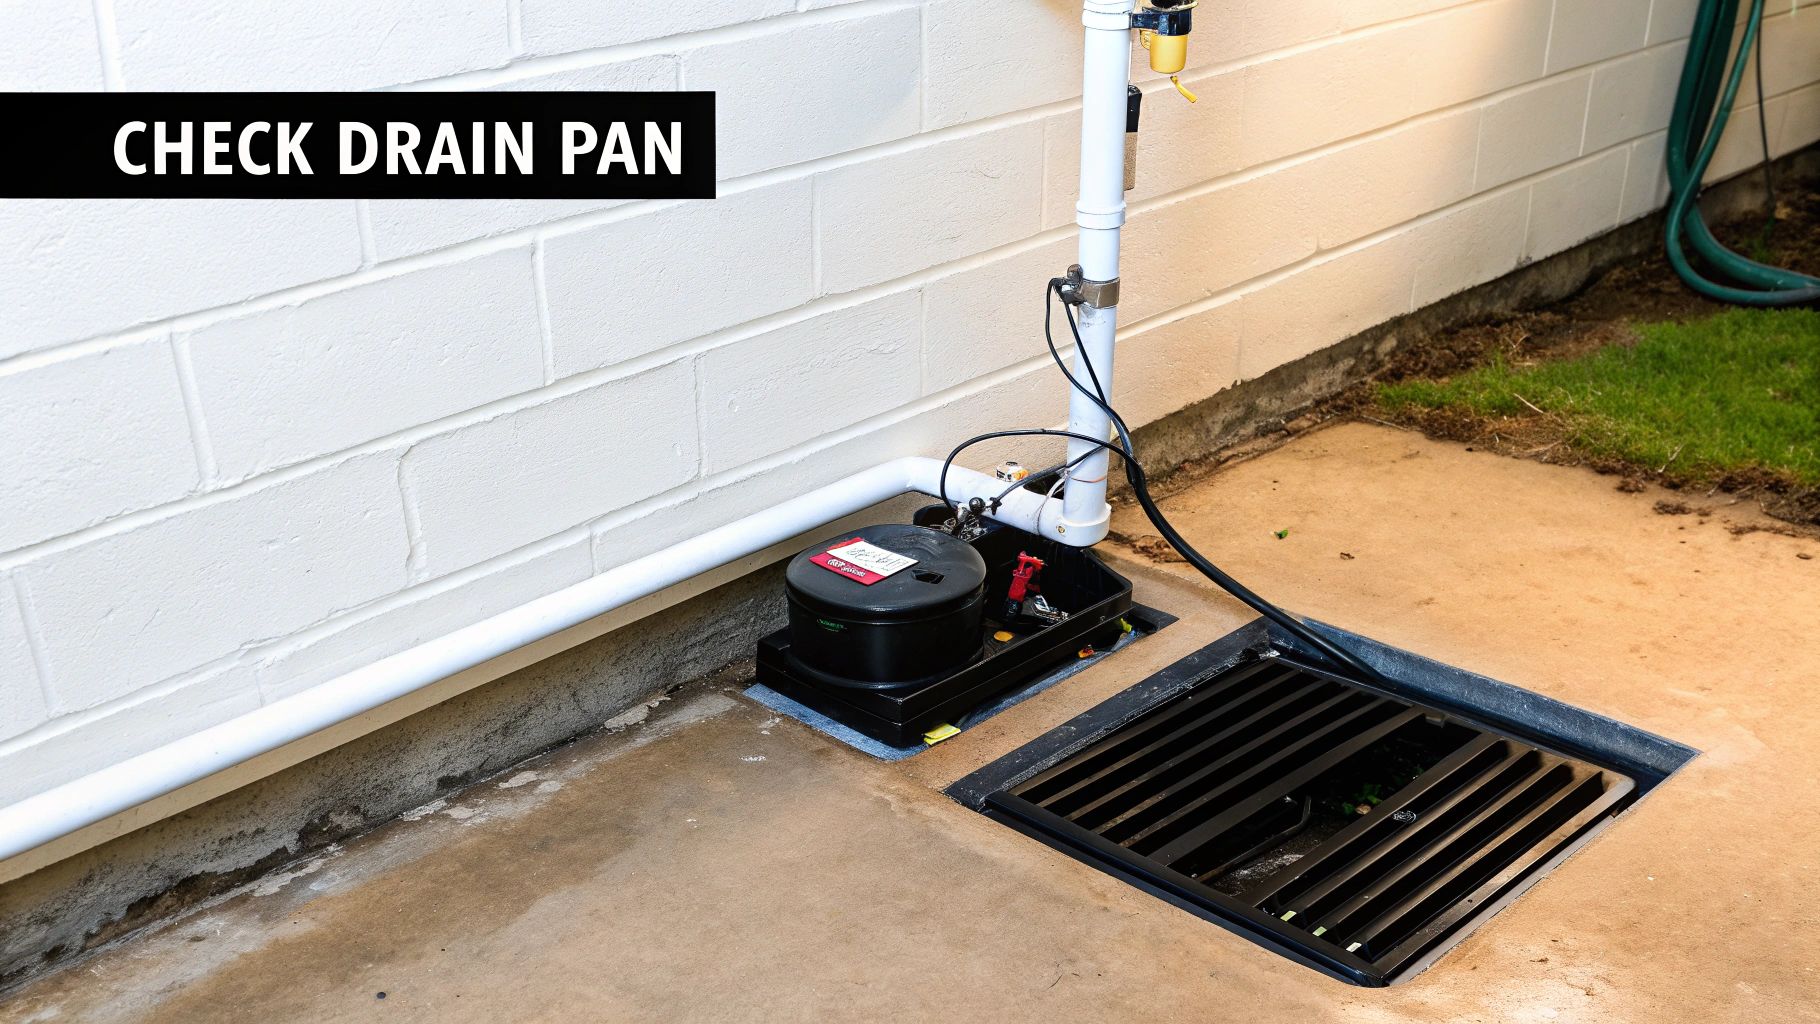
The drain pan is a simple but vital piece of the puzzle. It’s just a shallow tray sitting right under your indoor unit's evaporator coils, and its only job is to catch condensation before it heads down the drain line. After years of service, these pans can wear out and cause some really frustrating leaks.
Looking Over the Drain Pan for Damage
With the power still off, grab a flashlight and get a good, close look at the drain pan. You're hunting for a few key signs of trouble.
Cracks: Plastic pans get brittle over time and can develop tiny cracks. It doesn't take much, even a hairline fracture can create a slow drip that leads to major water damage.
Rust: If you have a metal drain pan, corrosion is its worst enemy. Rust spots are bad news, but if you see holes rusted clean through the bottom, that pan is done.
Bad Alignment: The pan has to be perfectly level to work right. If it’s tilted even slightly, water can just spill over the edge instead of going down the drain.
A damaged drain pan is more than a small problem; it's a guaranteed leak. You might be able to patch it for a temporary fix, but replacing it is the only real way to protect your home. For more on this, check out our guide on quick fixes for air conditioner condensation leaks.
What to Do with a Faulty Condensate Pump
For many HVAC setups, especially those in basements, gravity isn't enough to get the condensate water outside. That’s where a condensate pump comes into play. It's a small box that collects water from the drain pan. When the water hits a certain level, a float switch kicks the pump on and pushes the water out.
If the pump gives up, its reservoir will overflow and dump water all over your floor. Pop the top off and check for any sludge or gunk that might be jamming up the float switch; sometimes a good cleaning is all it needs.
But if you hear the pump humming away without moving any water, the motor has likely burned out. In that case, the entire pump assembly needs to be replaced.
Knowing When to Call an HVAC Professional
While it's incredibly satisfying to fix an ac dripping water issue on your own, it’s just as important to know when to put the tools down. Some AC problems run deeper than a simple clog or dirty filter, involving complex systems and hazardous materials that absolutely require a certified professional. Pushing your DIY skills too far can quickly turn a manageable repair into a costly, and even dangerous, mistake.
One of the biggest red flags I see in the field is a repeatedly freezing evaporator coil. You’ve done your homework, you changed the filter and made sure all the vents are open, but the coil still turns into a solid block of ice. This almost always points to a refrigerant leak.
Let me be clear: handling refrigerant is not a DIY job. It requires specialized tools, proper training, and EPA certification for a reason. Trying to add refrigerant yourself isn’t just illegal without the right credentials; it’s also a great way to destroy your system. An overcharged AC can cause catastrophic damage to the compressor, which is by far the most expensive part of your air conditioner.
Signs That Demand a Professional Call
Some symptoms are your AC’s way of screaming for professional help. Ignoring them can lead to a total system meltdown or create serious safety risks for you and your family. If you spot any of the following, it’s time to pick up the phone.
You should contact a technician if you notice:
Visible Ice After a Filter Change: As I mentioned, this is a strong indicator of a refrigerant problem.
Hissing or Bubbling Noises: These sounds often go hand-in-hand with a refrigerant leak and need to be addressed immediately.
Electrical Issues: Any sign of electrical trouble, like frequently tripping breakers or a burning smell, points to a serious fault that needs a pro.
Major Component Damage: A visibly cracked drain pan or corroded refrigerant lines are jobs that require professional-grade parts and expertise.
An HVAC system is a complex machine involving high-voltage electricity and pressurized chemicals. For your safety and your system's longevity, problems involving refrigerant or electrical components should always be left to a licensed and insured professional.
Refrigerant Leaks and Electrical Hazards
Working with refrigerant, often known by brand names like Freon, is highly regulated. Direct exposure can cause nasty frostbite or respiratory problems. More critically, an improper charge can completely wreck your system. Industry data consistently shows that incorrect refrigerant levels are a leading cause of premature compressor failure, a repair that can easily run into the thousands.
The same goes for the electrical components inside your air handler. They carry a dangerous charge, even after you’ve switched off the power at the breaker. Capacitors, for instance, can hold enough voltage to cause serious injury. A professional technician has the training and the right equipment to safely discharge these components and diagnose electrical faults without putting anyone at risk. When you're facing a potential emergency, our guide on emergency air conditioning repair can give you immediate next steps.
Finding a Reliable HVAC Company
When you need a pro, you want someone you can trust to get the job done right. To effectively reach homeowners in need of repairs, HVAC professionals should focus on robust home improvement website optimization to make their services easy to find. When searching, look for companies with strong local reviews, proper licensing and insurance, and transparent pricing. This ensures you get the reliable service you need without any unwelcome surprises on the final bill.
Still Have Questions About That Leaking AC?
Even after you’ve pinpointed the cause of that annoying drip, you’ve probably got a few more questions. That’s totally normal. Homeowners often ask me what to do next, how much a fix is going to set them back, and what they can do to keep this from happening all over again.
Let's run through some of the most common questions I hear out in the field.
How Often Should I Clean My AC Drain Line?
To keep clogs from forming in the first place, you have to be proactive. I always tell my clients to flush their condensate drain line with a cup of distilled white vinegar every two to three months, especially when the AC is running constantly in the summer.
This little bit of maintenance does wonders to kill the algae and gunk that thrive in that dark, damp pipe. If you're in a dusty area or have furry friends at home, you might even want to do it monthly. It’s a five-minute job that can save you a world of trouble and a costly service call.
Is It Safe to Run a Leaking AC?
I get this question almost daily, and my answer is always a hard no. Running an air conditioner that’s actively dripping water inside your home is a recipe for disaster.
For starters, you’re looking at serious water damage. That small puddle can quickly warp your floors, stain your ceiling, and lead to some pretty expensive structural repairs. A 2021 report showed that this kind of water damage is a top home insurance claim, with the average incident costing over $10,000.
Then there’s the health risk. All that moisture creates a perfect environment for mold and mildew, which can wreak havoc on your home's air quality. And if the leak is from a frozen coil, keeping the system on puts a ton of stress on the compressor, the heart of your AC, and can lead to total system failure.
The smartest thing you can do is shut the system down immediately. Turn it off at the thermostat, then head to your electrical panel and flip the breaker for the AC unit. This protects your home, your health, and your wallet from a much bigger problem.
What's the Typical Cost for a Professional Fix?
The cost to get a leaking AC fixed really depends on what’s causing the problem. A simple clog in the drain line is your best-case scenario and is usually the most affordable fix, typically running somewhere between $75 and $250.
But if the problem is more serious, the price tag will climb. Here’s a rough breakdown to give you an idea:
Replacing a cracked drain pan: This is a labor-intensive job, so you can expect to pay anywhere from $250 to $600.
Fixing a refrigerant leak: This is often the most expensive repair. Just "topping off" the refrigerant isn't a solution; a true professional has to find and repair the leak itself. This can cost anywhere from $200 to over $1,500, depending on how hard the leak is to find and fix.
Always make sure you get a clear, detailed quote from a licensed HVAC technician before they start any work. A trustworthy pro will diagnose the issue correctly and walk you through all your options without trying to upsell you on services you don’t need.
Don't let a dripping AC ruin your day or damage your home. For fast, reliable diagnostics and expert repairs in the Tucson area, you can trust the certified professionals at Covenant Aire Solutions. Schedule your service today and let us get your system back in top shape.